
Bookable Events with StoreConnect
Administer event registrations with ease
Booking events can be easily administered with StoreConnect. A product can be configured to reserve and pay for an event schedule for a given time slot in several easy steps. This guide will show you how. In this guide, we will create a bookable event for the ‘Exclusive Investor Dinner’ which is a product included with the ‘StoreConnect Corporate Store’ which is installed with a trial install. After following the steps of this guide, we will have a bookable event with the following configurations:
- The bookable product will be the ‘Exclusive Investor Dinner’ which comes pre-installed with a trial install of StoreConnect
- The bookable event will have a price of $1,000 which is the pre-configured price of the ‘Exclusive Investor Dinner’ as it installs
- The event will take place a the ‘Physical Site’, which is a pre-configured venue which comes pre-installed with a trial
- The event will take place on 6/7/2025
- The event will have 200 maximum amount of attendees and a minimum of 50 attendees
- The event will be reserved for 2 guests - the person purchasing the event and another attendee
- The reservation will have a timer of 15 minutes while it sits in the cart. After that, the reservation will cancel
- The event attendees will register and relate to the order in Salesforce
1. Install StoreConnect
To host this on a website, we need to get StoreConnect installed, as described here for a trial org or here for a sandbox or production org.
*If StoreConnect is already installed and you have access to the appropriate Salesforce objects, proceed to the next step.
2. Configure the booking timer for the store
- Select ‘Stores’ from the StoreConnectCMS dropdown and select the ‘StoreConnect Store’

- Navigate to the ‘Booking System’ section of the store record
- Enter a time limit for bookings. This will run a timer once the item has been placed into a cart and will cancel the reservation if the timer completes before the purchase is made. We will enter 15 in the ‘Booking Hold Duration (mins)’ field

3. Enter the booking information for the product
- Select the product that will be bookable. We will use the ‘Corporate - Exclusive Investor Dinner’. Navigate to the product page for this product
- Scroll to the ‘Booking Information’ section of the product
- Enter amount of minutes that event will last in the
Booking Duration (mins)field - Enter the amount of time before bookings will close in the
Booking Start Buffer (mins)field. We will stop bookings 24 hours before the event so we will enter 1,440 minutes - We will not add a value for the
Booking End Buffer (mins)as attendees will attend the dinner and do not need to remove their booking afterwards - We will capture the details of the attendees so we will enable the
Booking Require Attendee Detailscheckbox - Reservations are made for a maximum of 2 people, so we will enter 2 in the
Max Attendees Per Bookingfield
4. Define a bookable location for the event
In order to schedule a bookable event, we need to define a location for this event to occur.
- Open StoreConnect CMS in the dropdown tab and Navigate to ‘Bookable Locations’
- Choose the ‘Physical Site’
- Ensure that this location is associated to the store where this product applies. In this case, it will be the ‘StoreConnect Store’
- Ensure that the
Activecheckbox is enabled
*If this is a physical location, ensure that the ‘Location is Virtual’ checkbox in NOT enabled
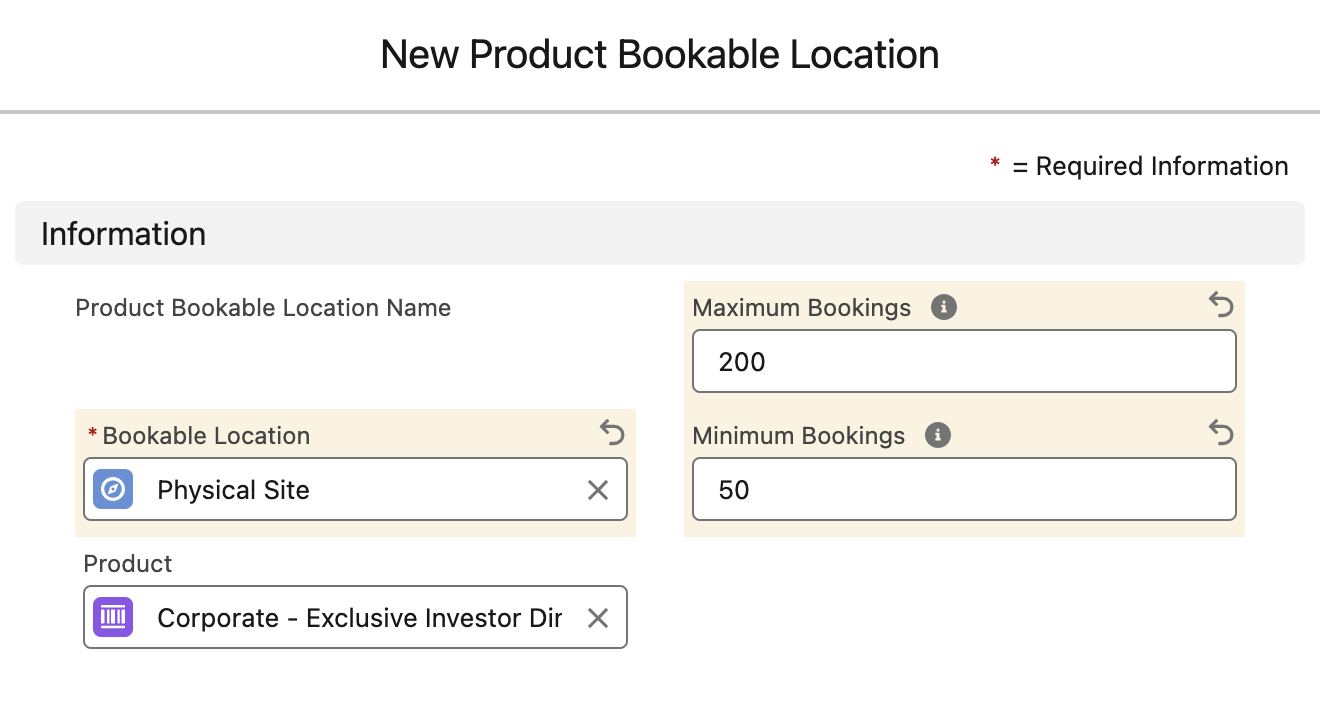
5. Define a product bookable location
- In the related list of the Bookable Location, select the ‘Product Bookable Location’ related list
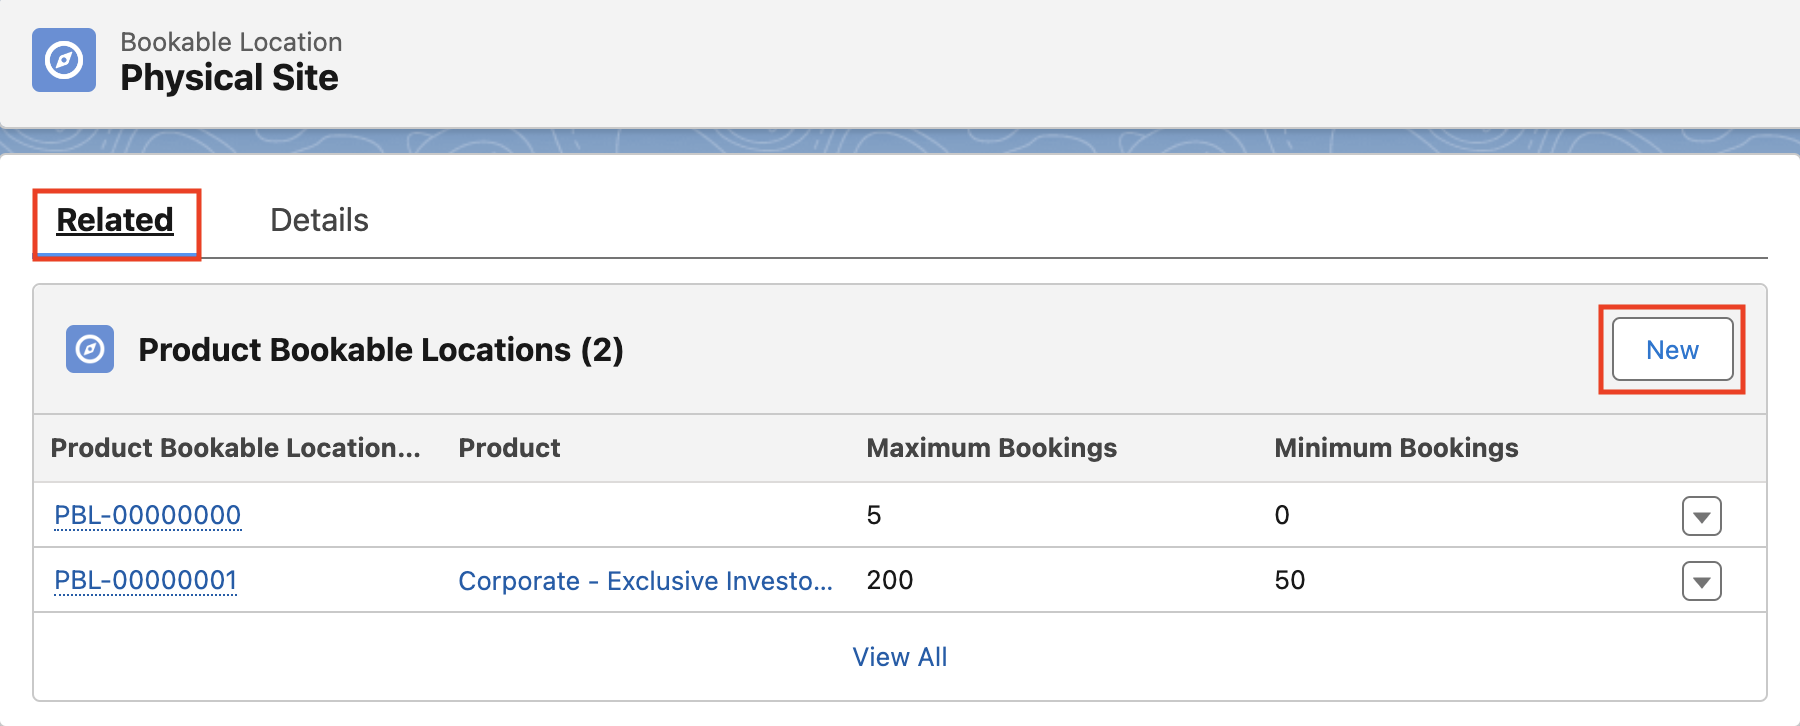
- Create a new Product Bookable location and define the product to be booked. We will enter ‘Corporate - Exclusive Investor Dinner’ in the search bar to populate this an associate this product to this product bookable location
6. Define availabilities for the bookable event
- From the Bookable Location related lists, click ‘New’ under ‘Availabilities’

- Name the
Availability Name. We will use ‘Exclusive Investor Dinner Event Availabilities’ - Add the same
Start Dateas the bookable event. We will enter 6/7/2025 - Add the same
End Dateas the bookable event. We will enter 6/7/2025 - Add the same
Start Timeas the bookable event. We will enter 7:00pm - Add the same
End Timeas the bookable event. We will enter 11:00pm - Enter the day(s) of the week that the event will run. This event will occur on Saturdays, so we will add ‘Saturday’ in the
On these daysfield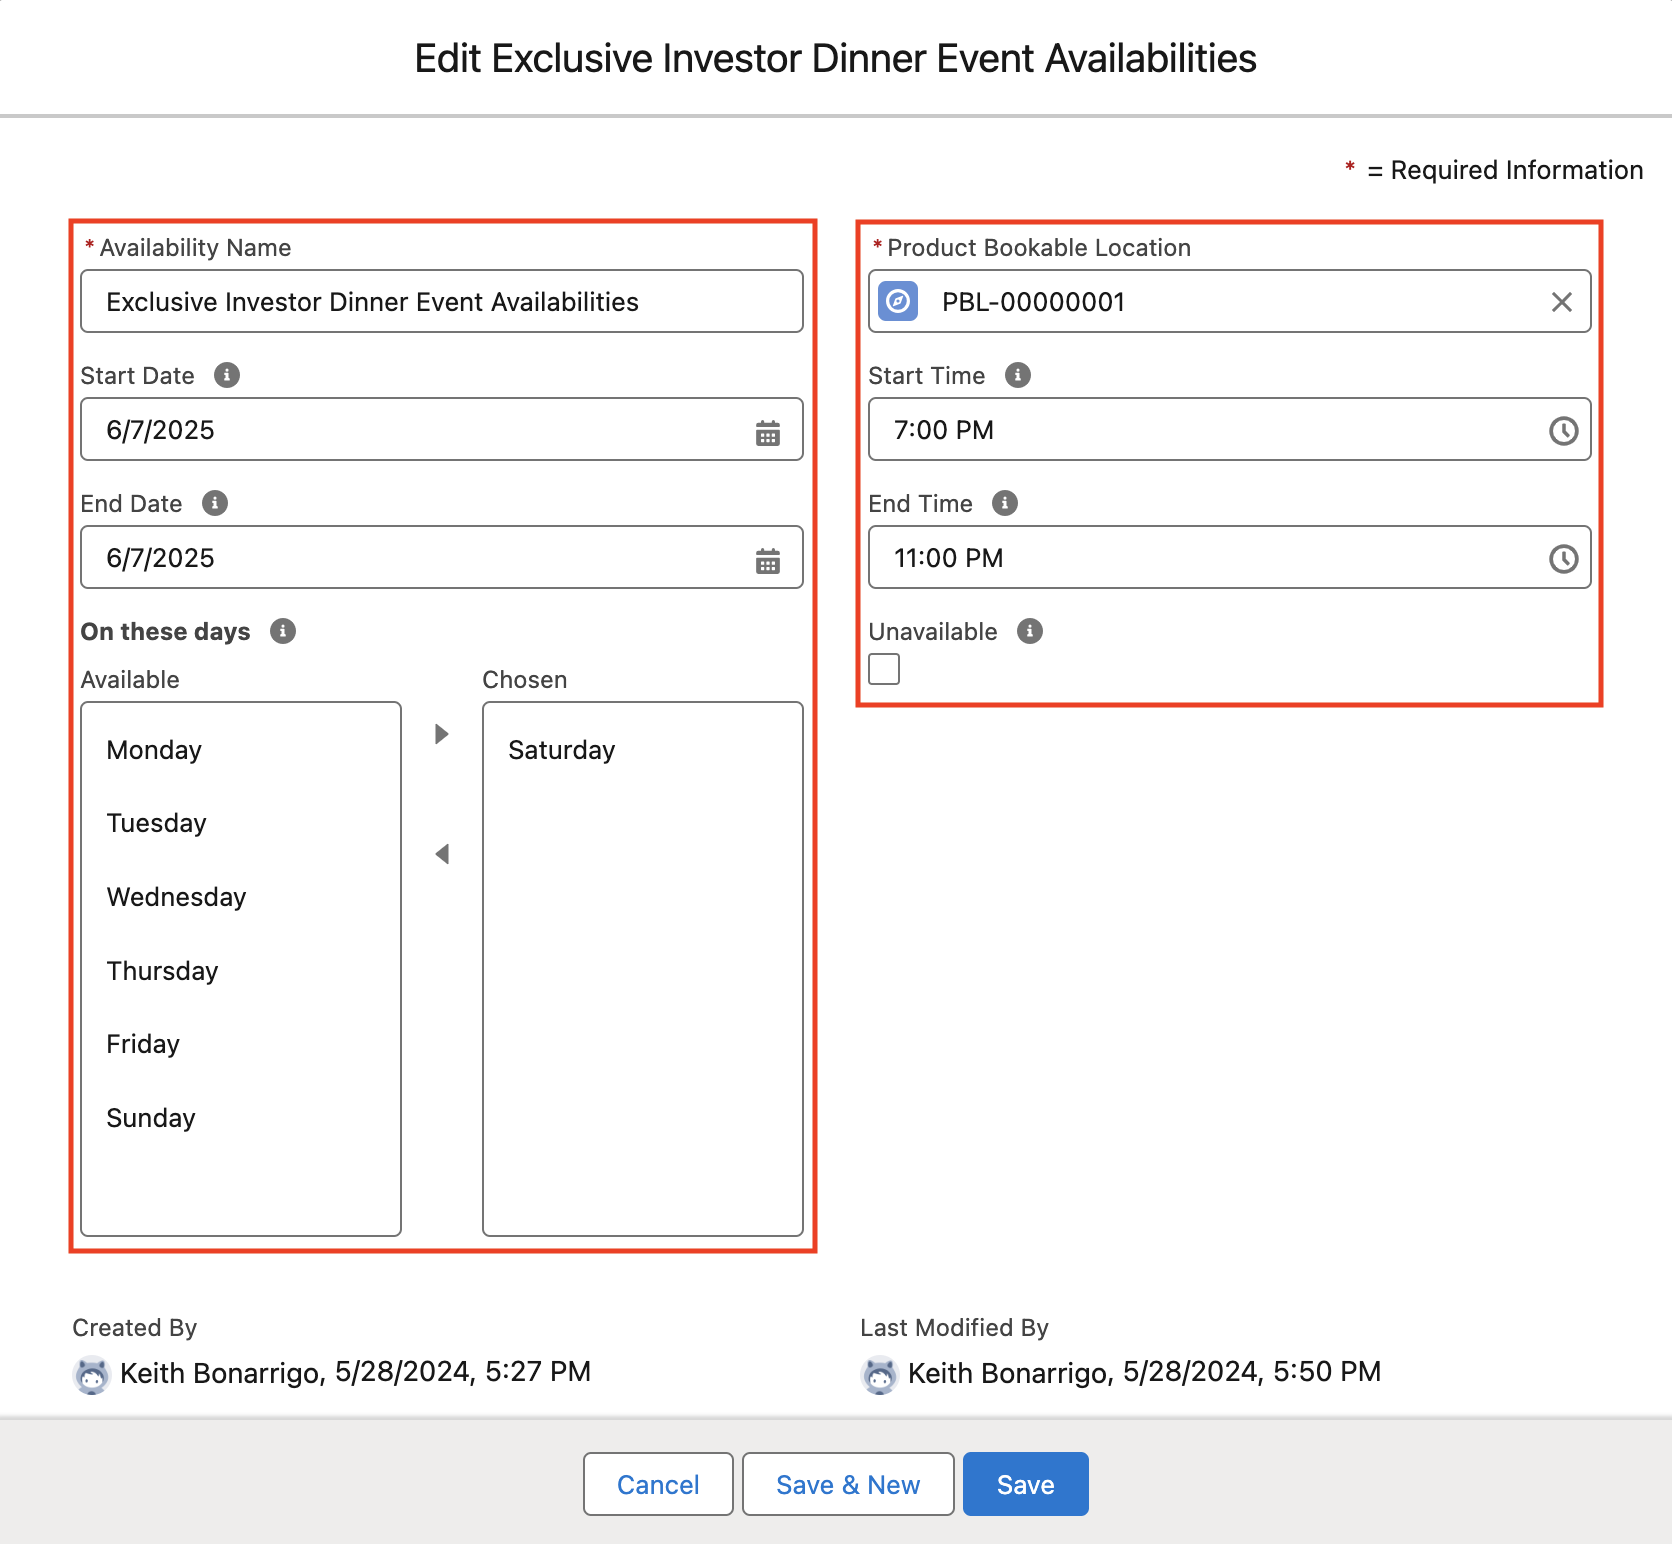
*Note: the amount of minutes entered for start and end time must match the booking duration time entered in the product booking information in step 2 above. Also, If the event is to be immediately available, ensure that the ‘Unavailable’ checkbox is not enabled
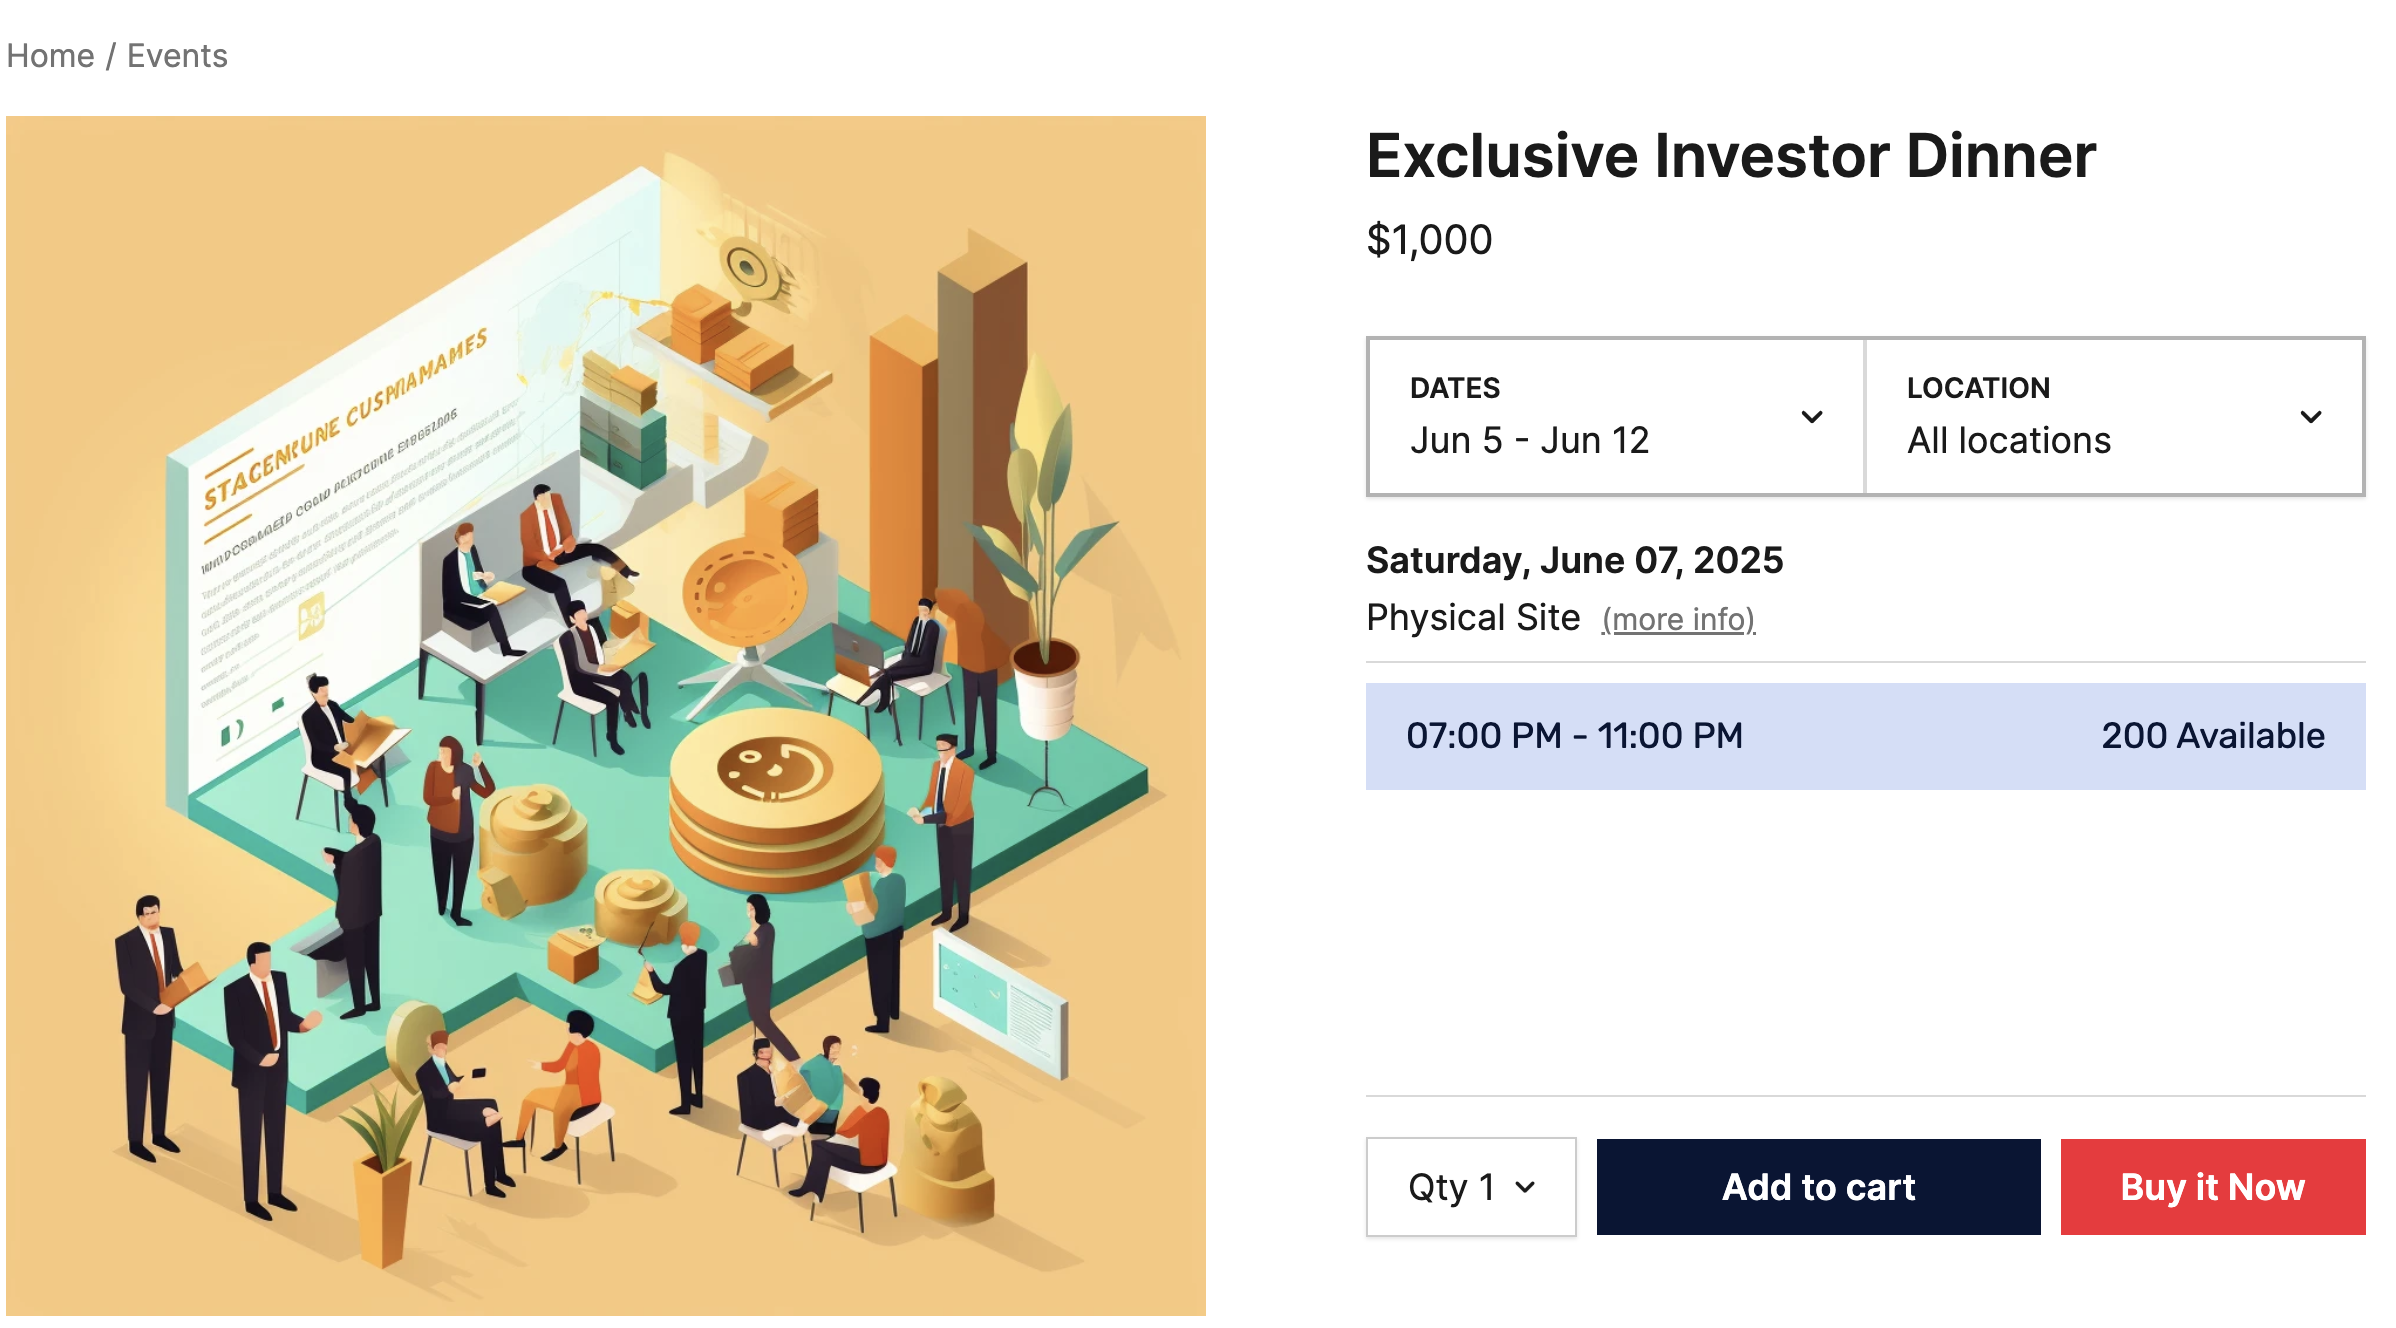
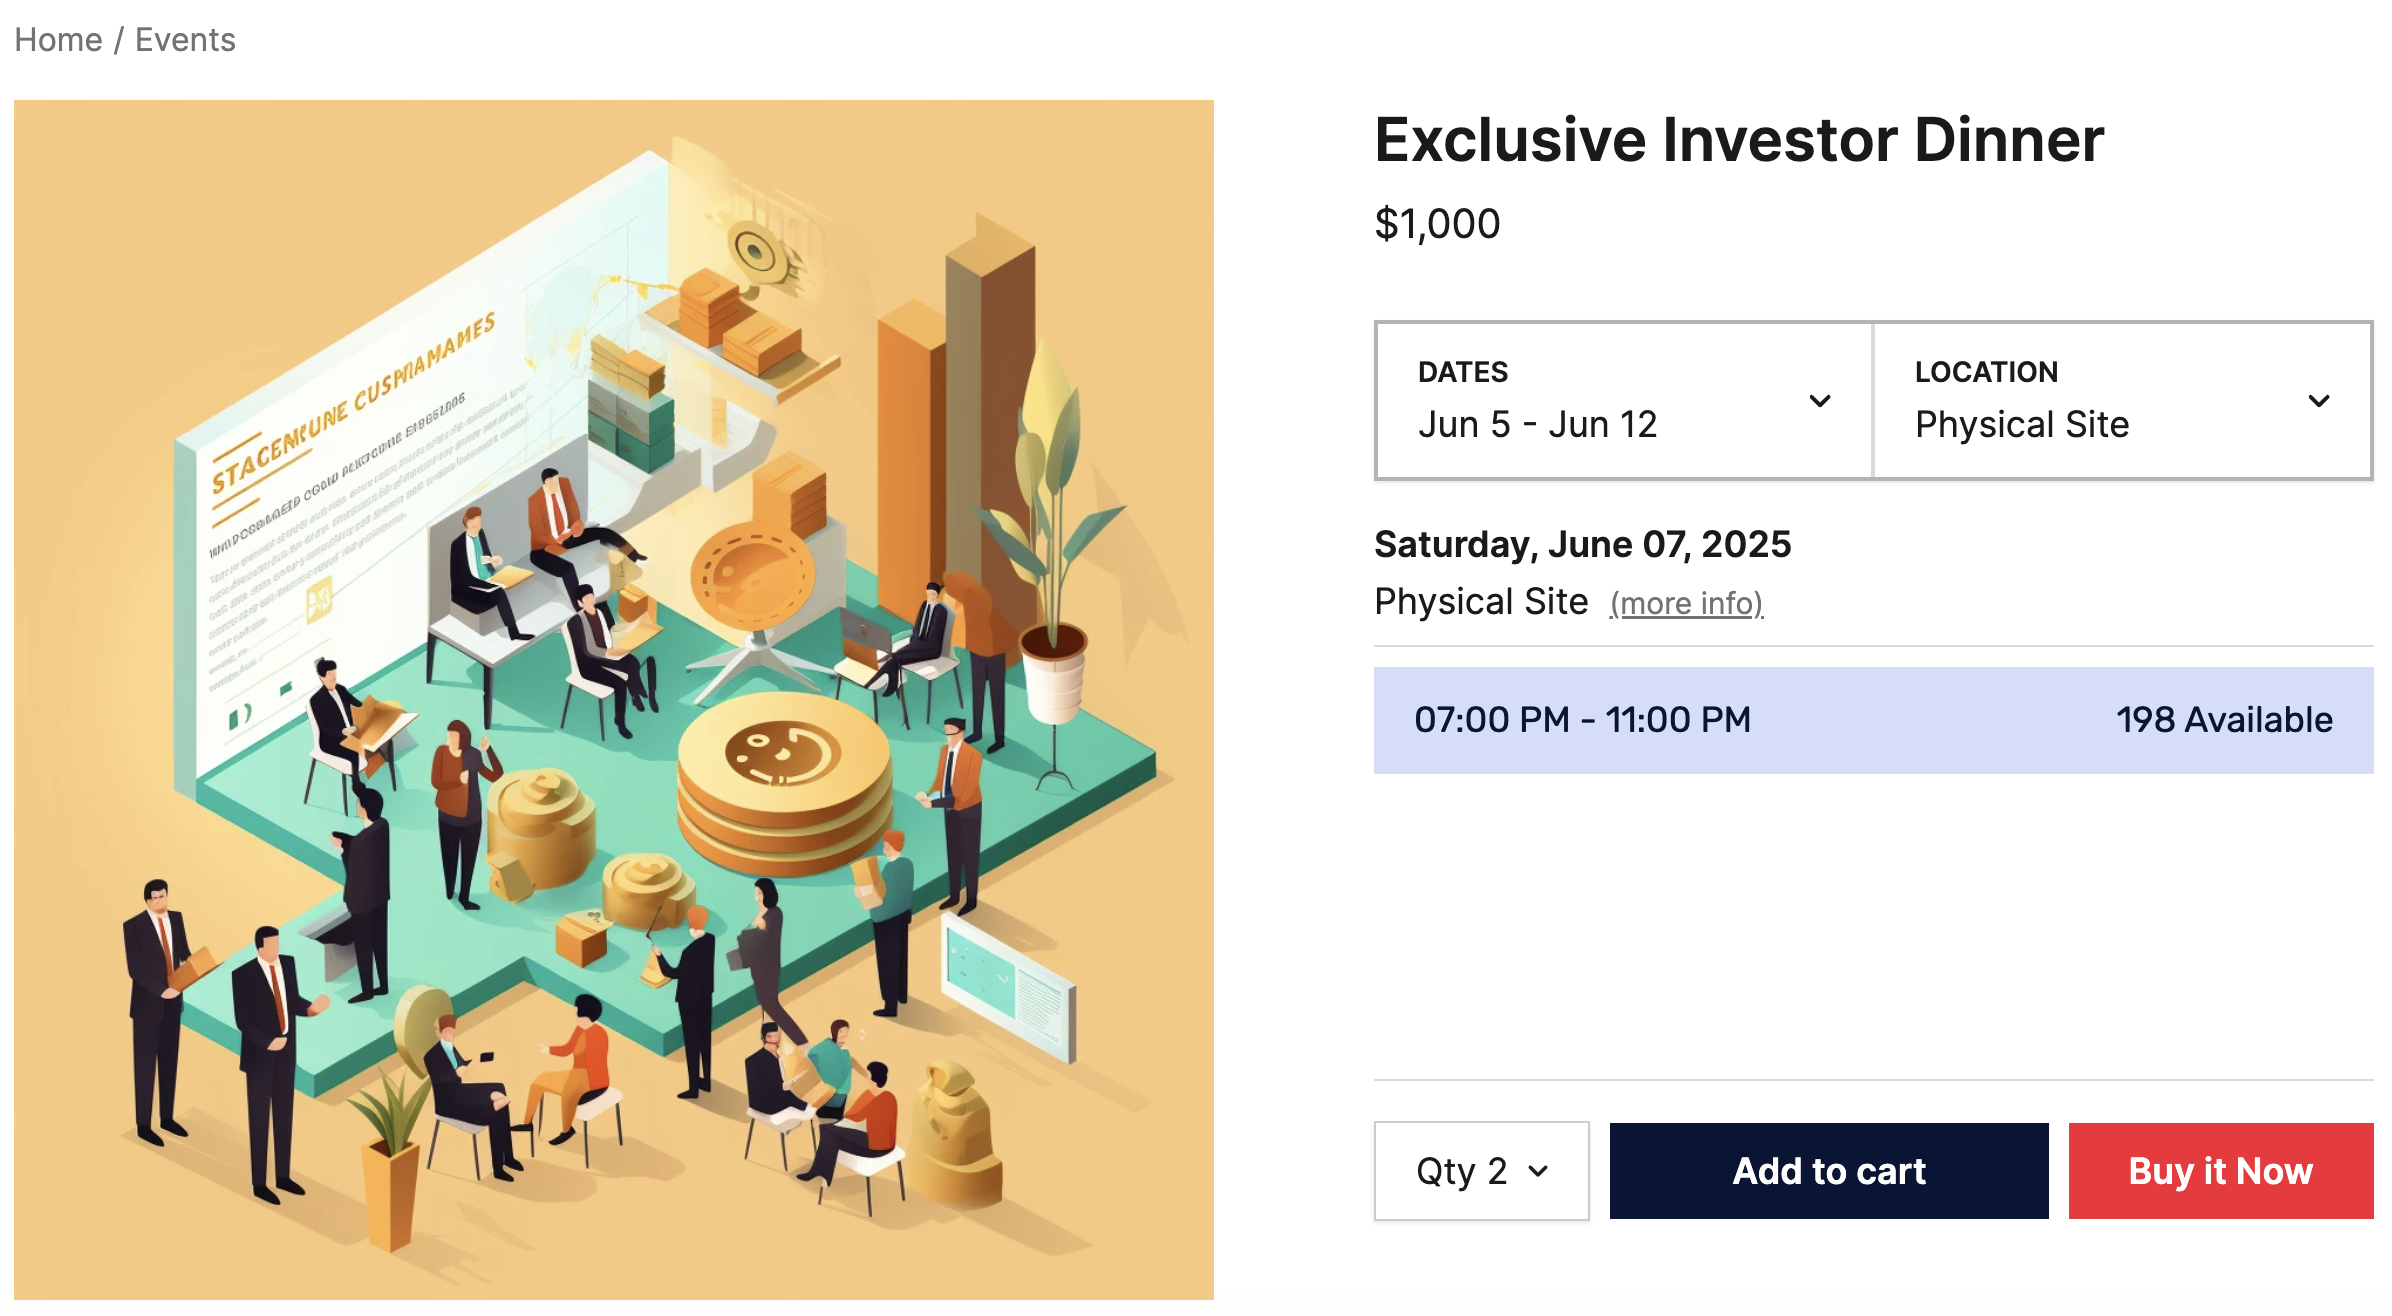
7. Test the bookable product
-
Navigate to the ‘Exclusive Investor Dinner’ product by searching “Dinner” in the upper search bar

- A date range should appear that includes the 6/7/2025 date entered
- The start and end time should display beneath the drop down entries, along with the amount of reservations remaining
- In the location dropdown, select ‘Physical Site’
- Add a quantity of 2 and select ‘Buy Now’
8. Checkout the bookable product
- Navigate to checkout
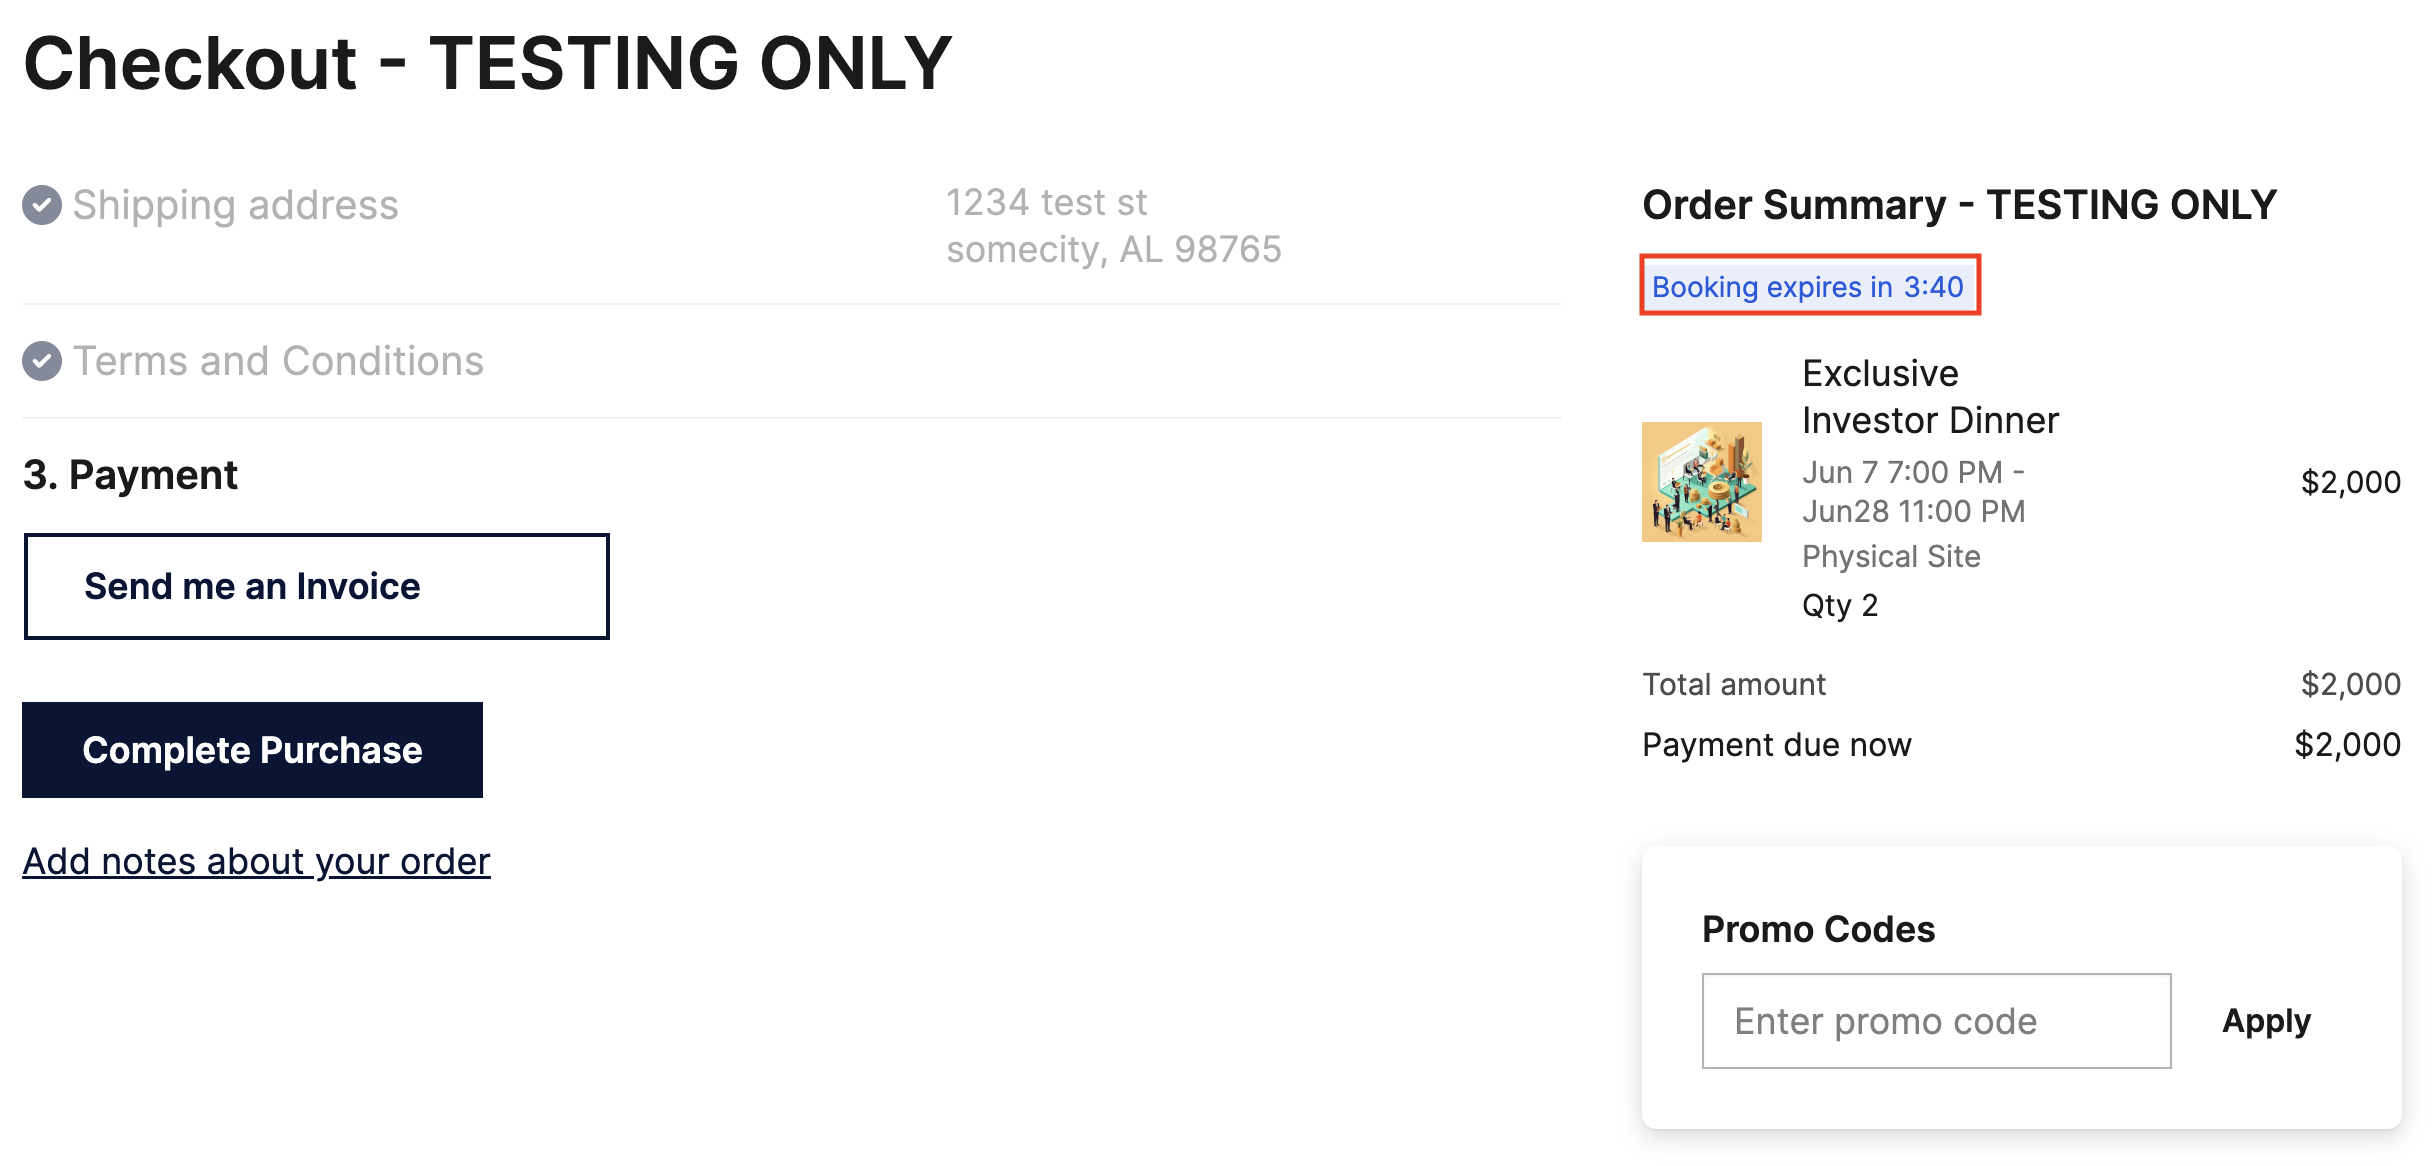
- Fill in your shipping/billing information and accept the terms and conditions on the next page. *Note that the timer is running on the cart, as configured in step 2 above.
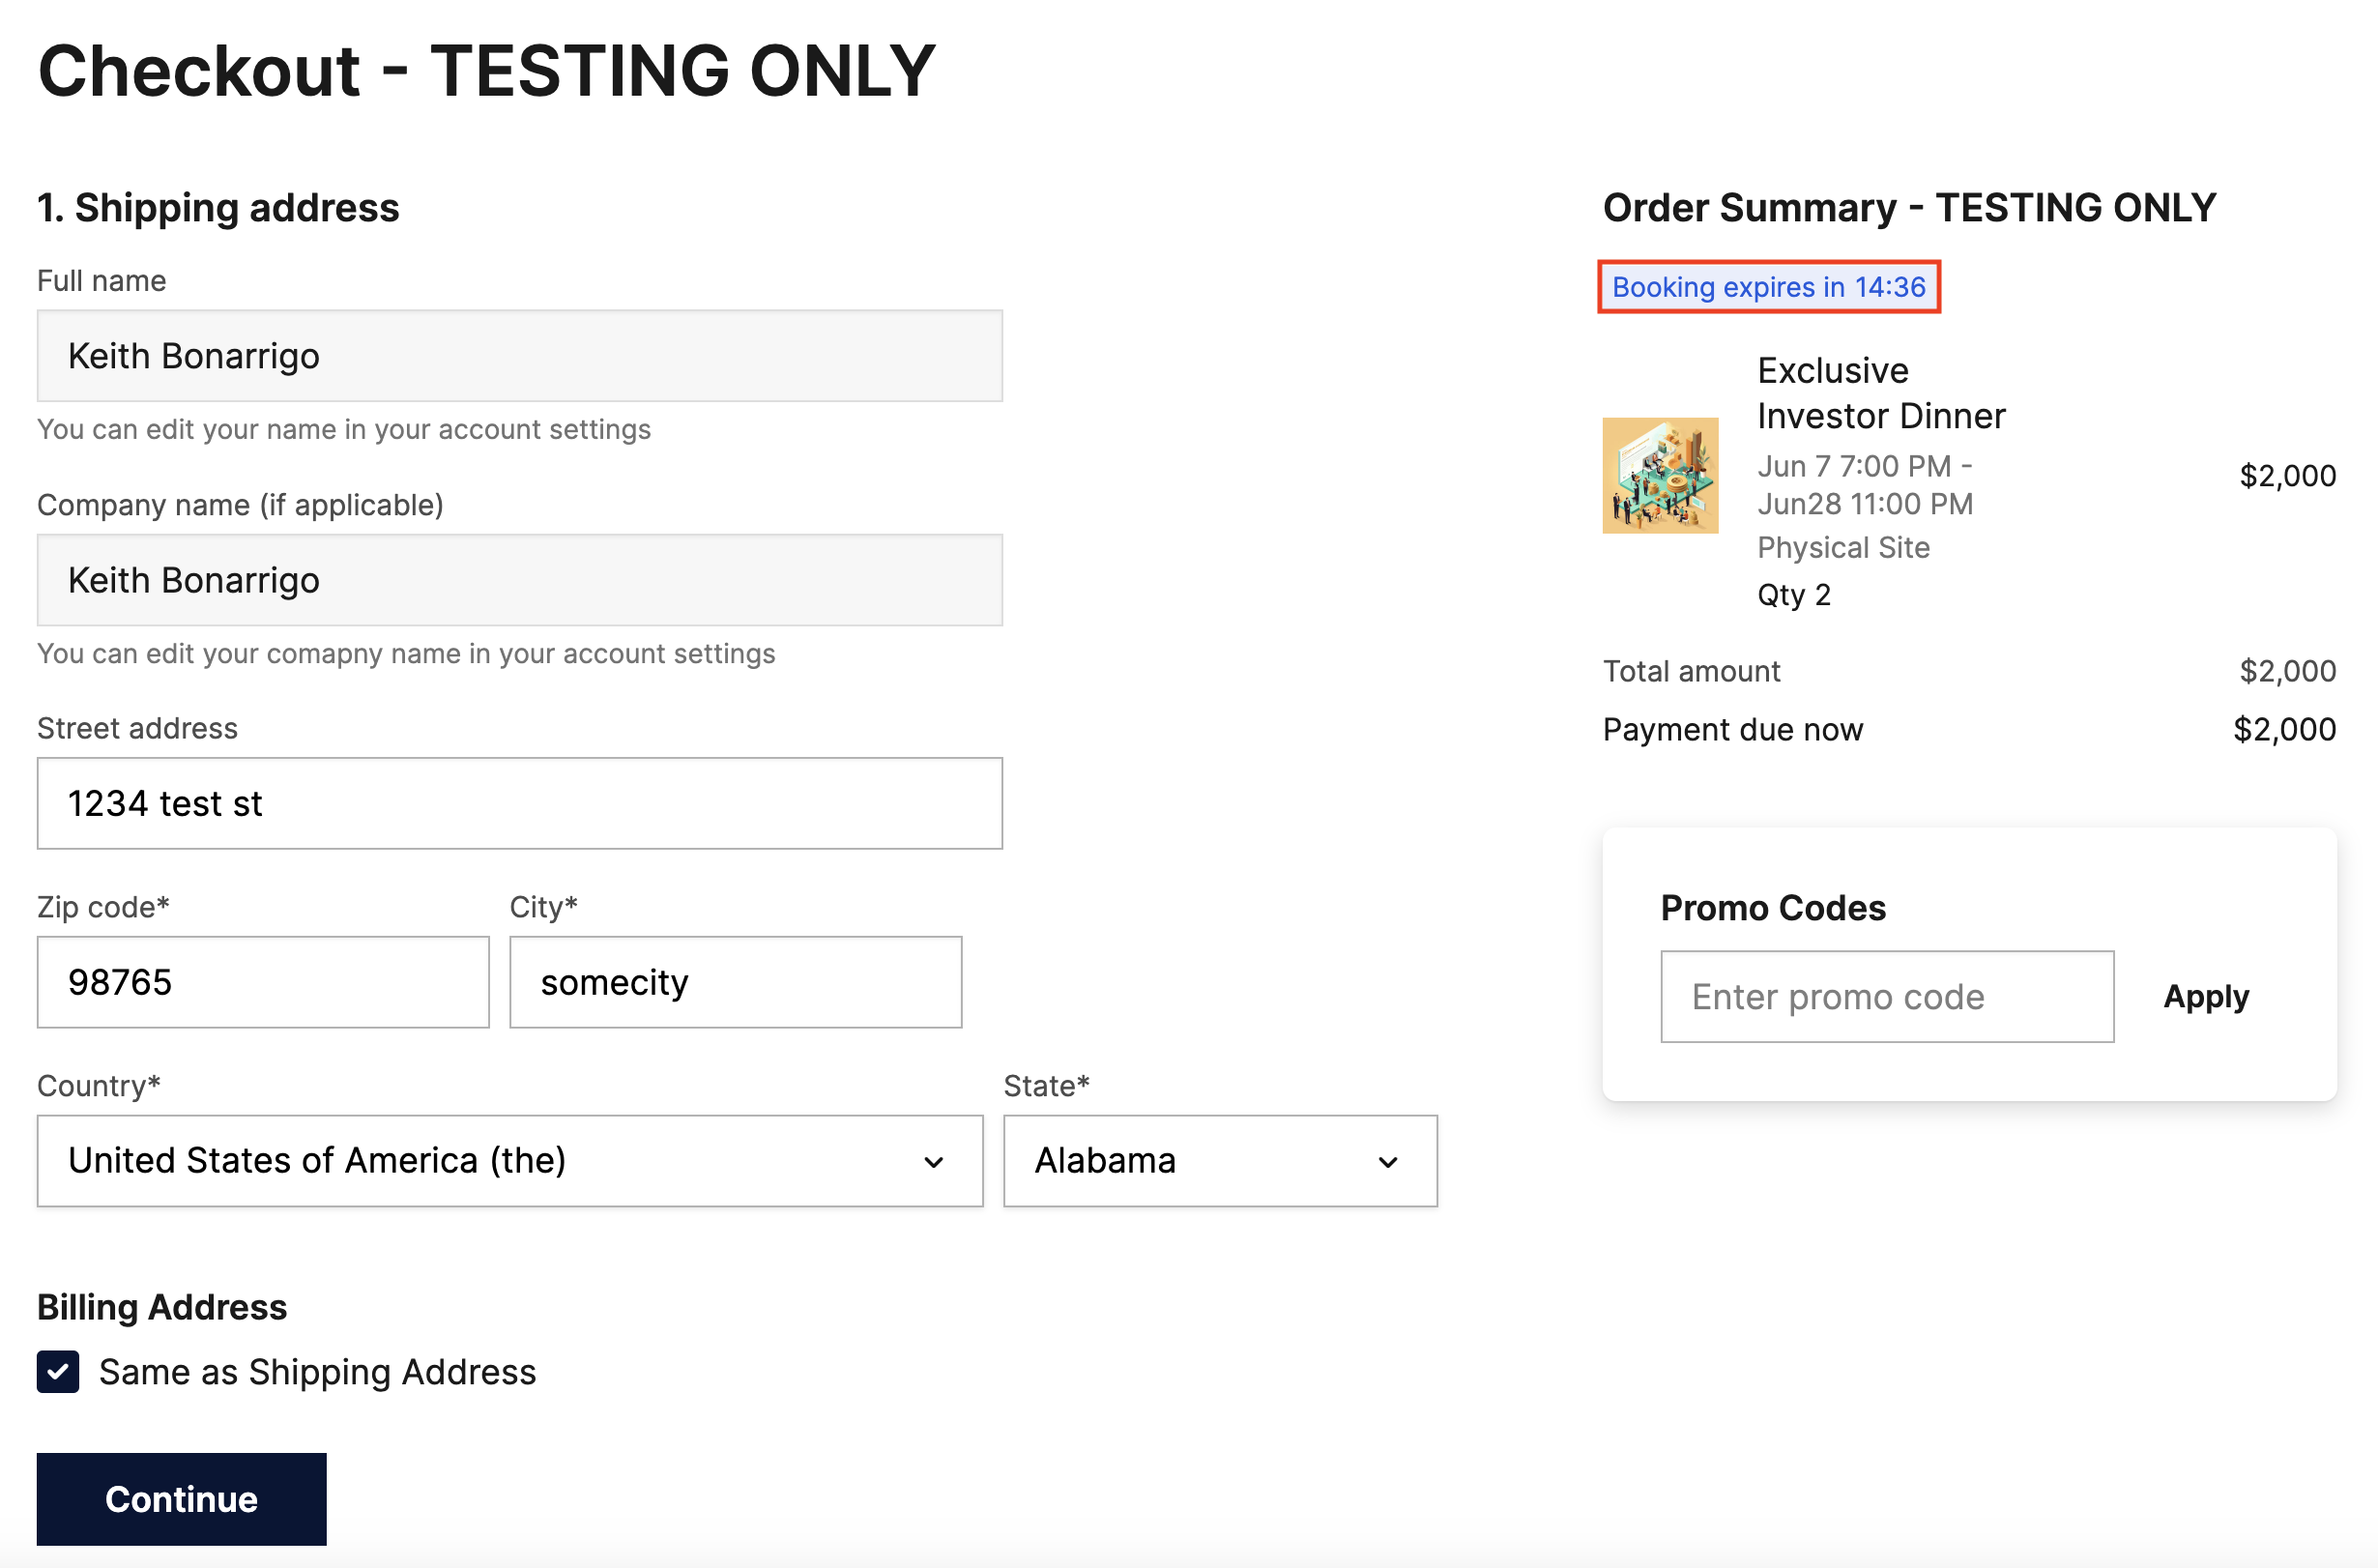
- We will select the ‘Send me an invoice option’ for payment
-
You will be presented with Attendee information for both guests
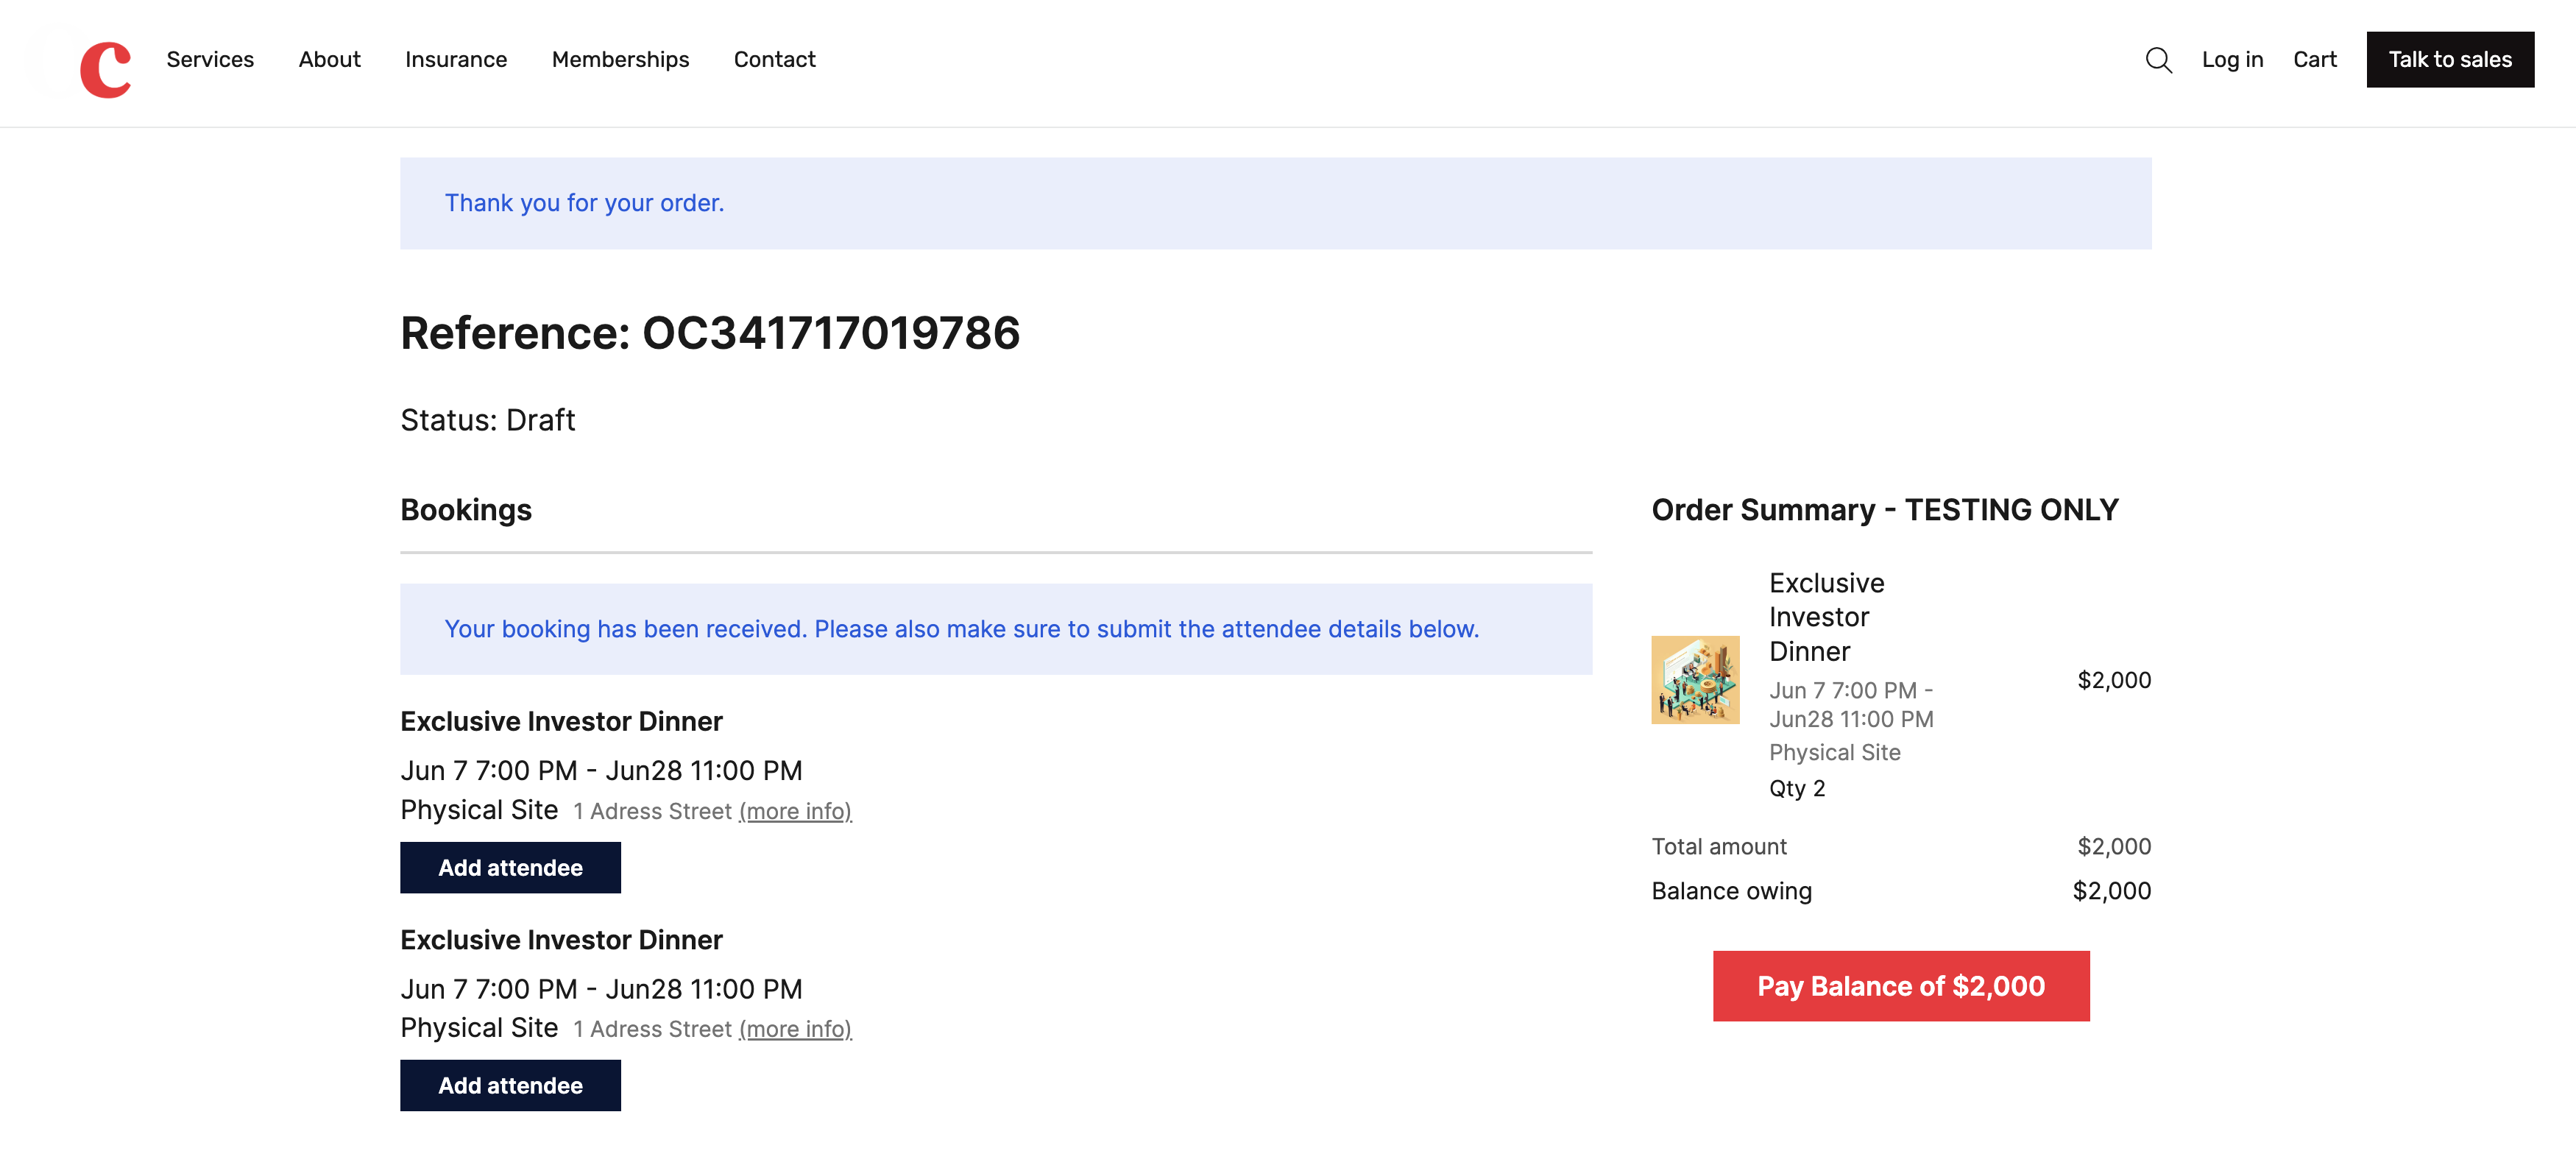
- Click first the ‘Add Attendee’ button and ensure that the ‘I am attending’ radio button is selected
-
Select the second ‘Add Attendee’ button. Add another attendee of your choosing, with their email and phone
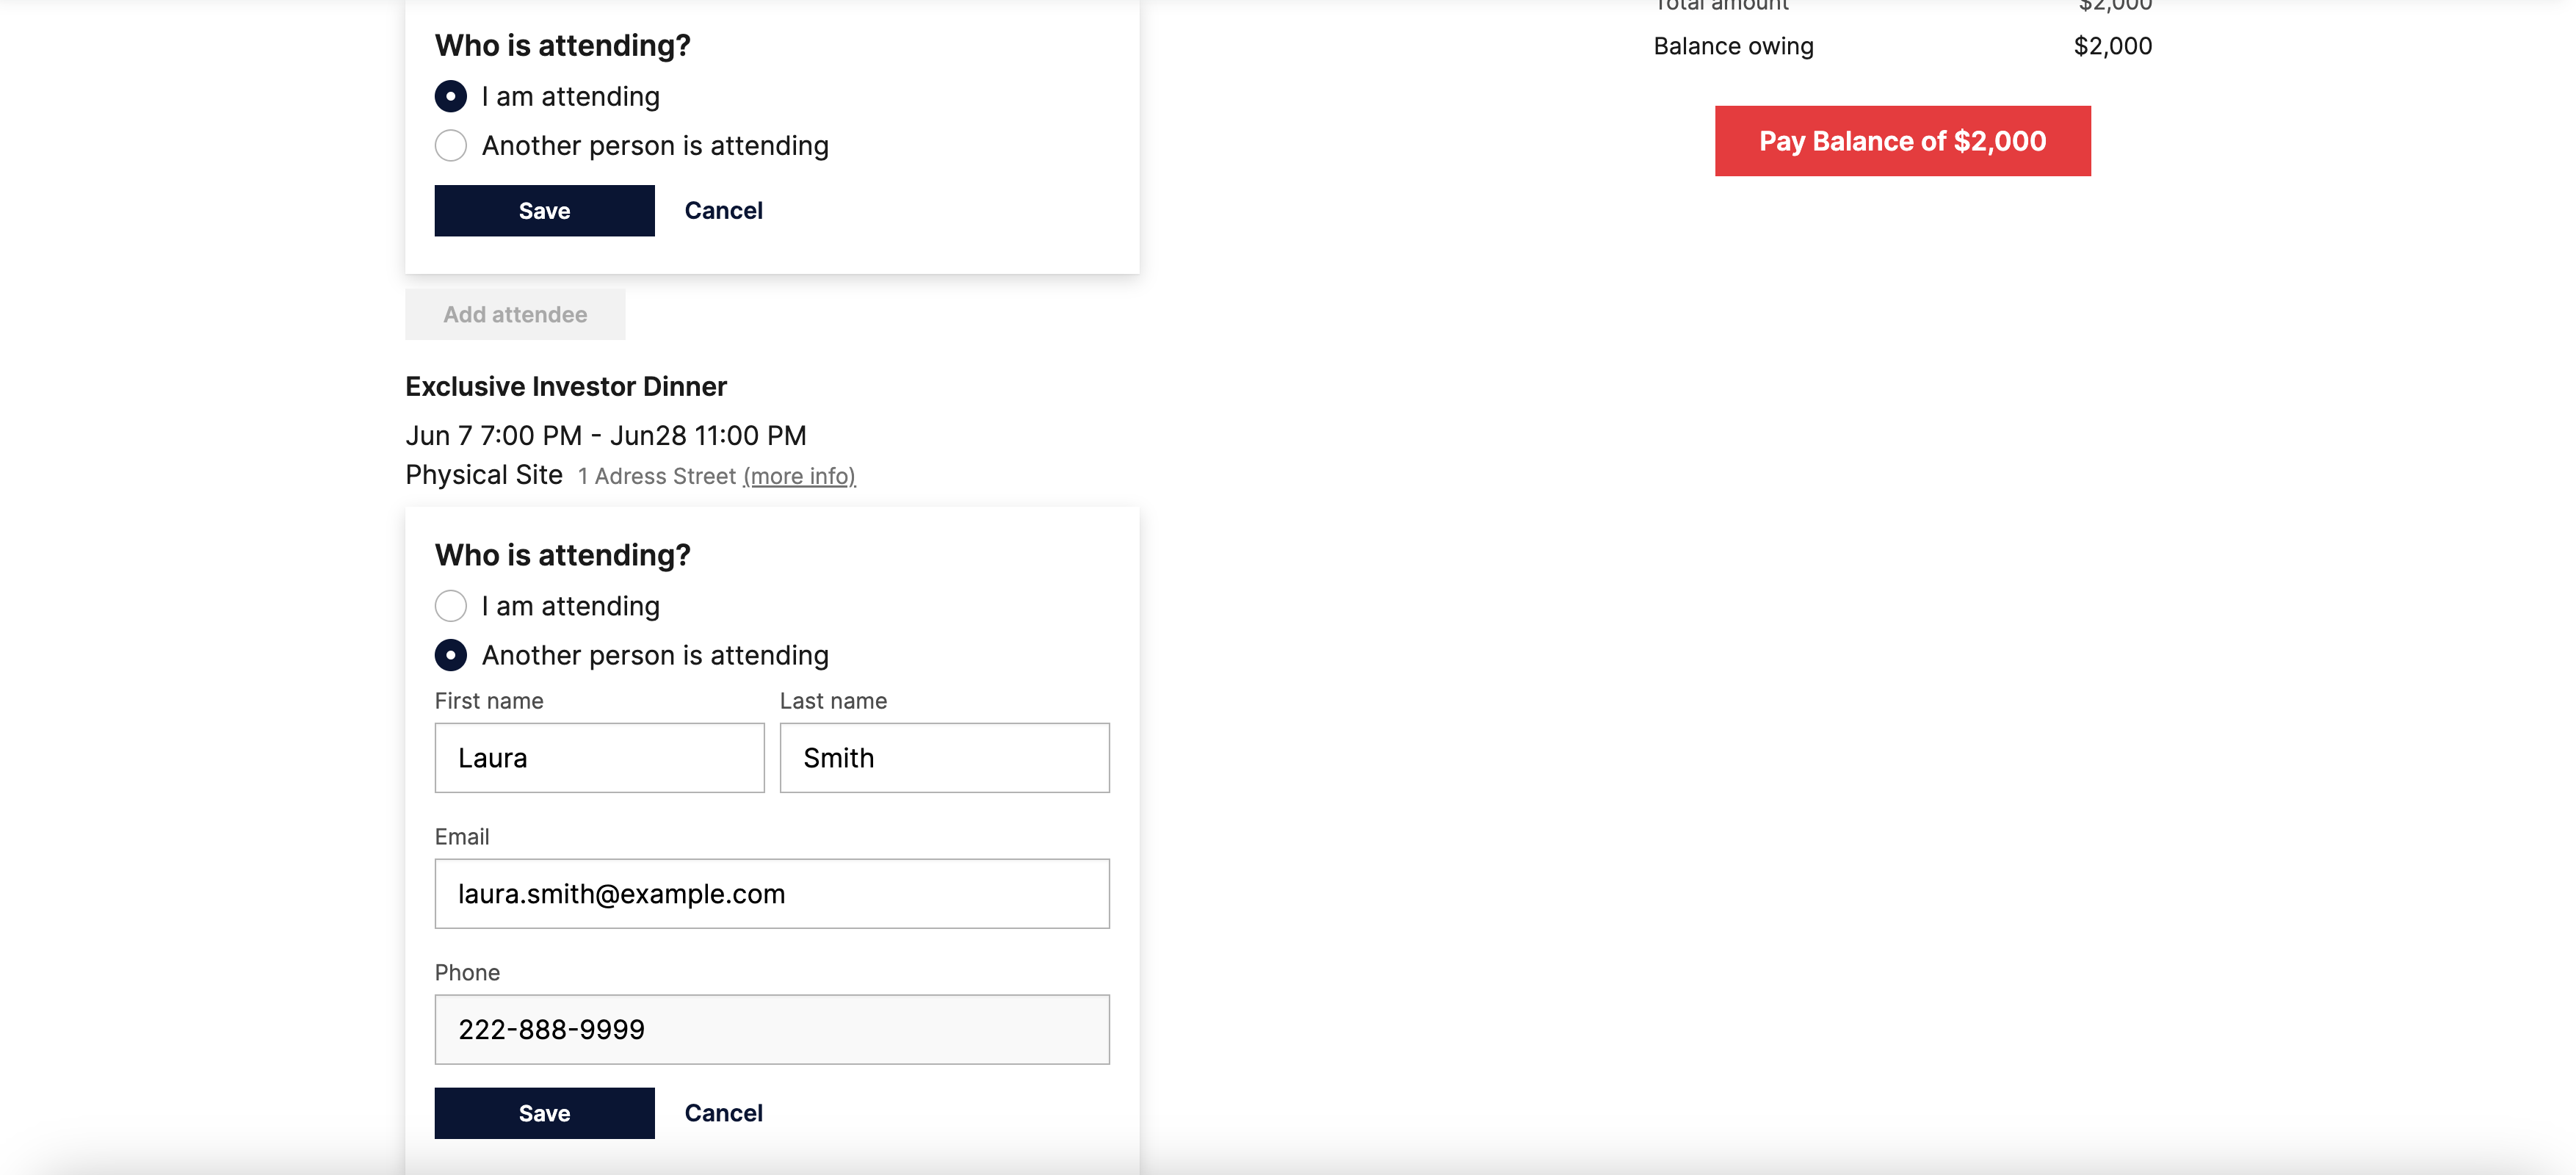
- Save each of the attendee entries
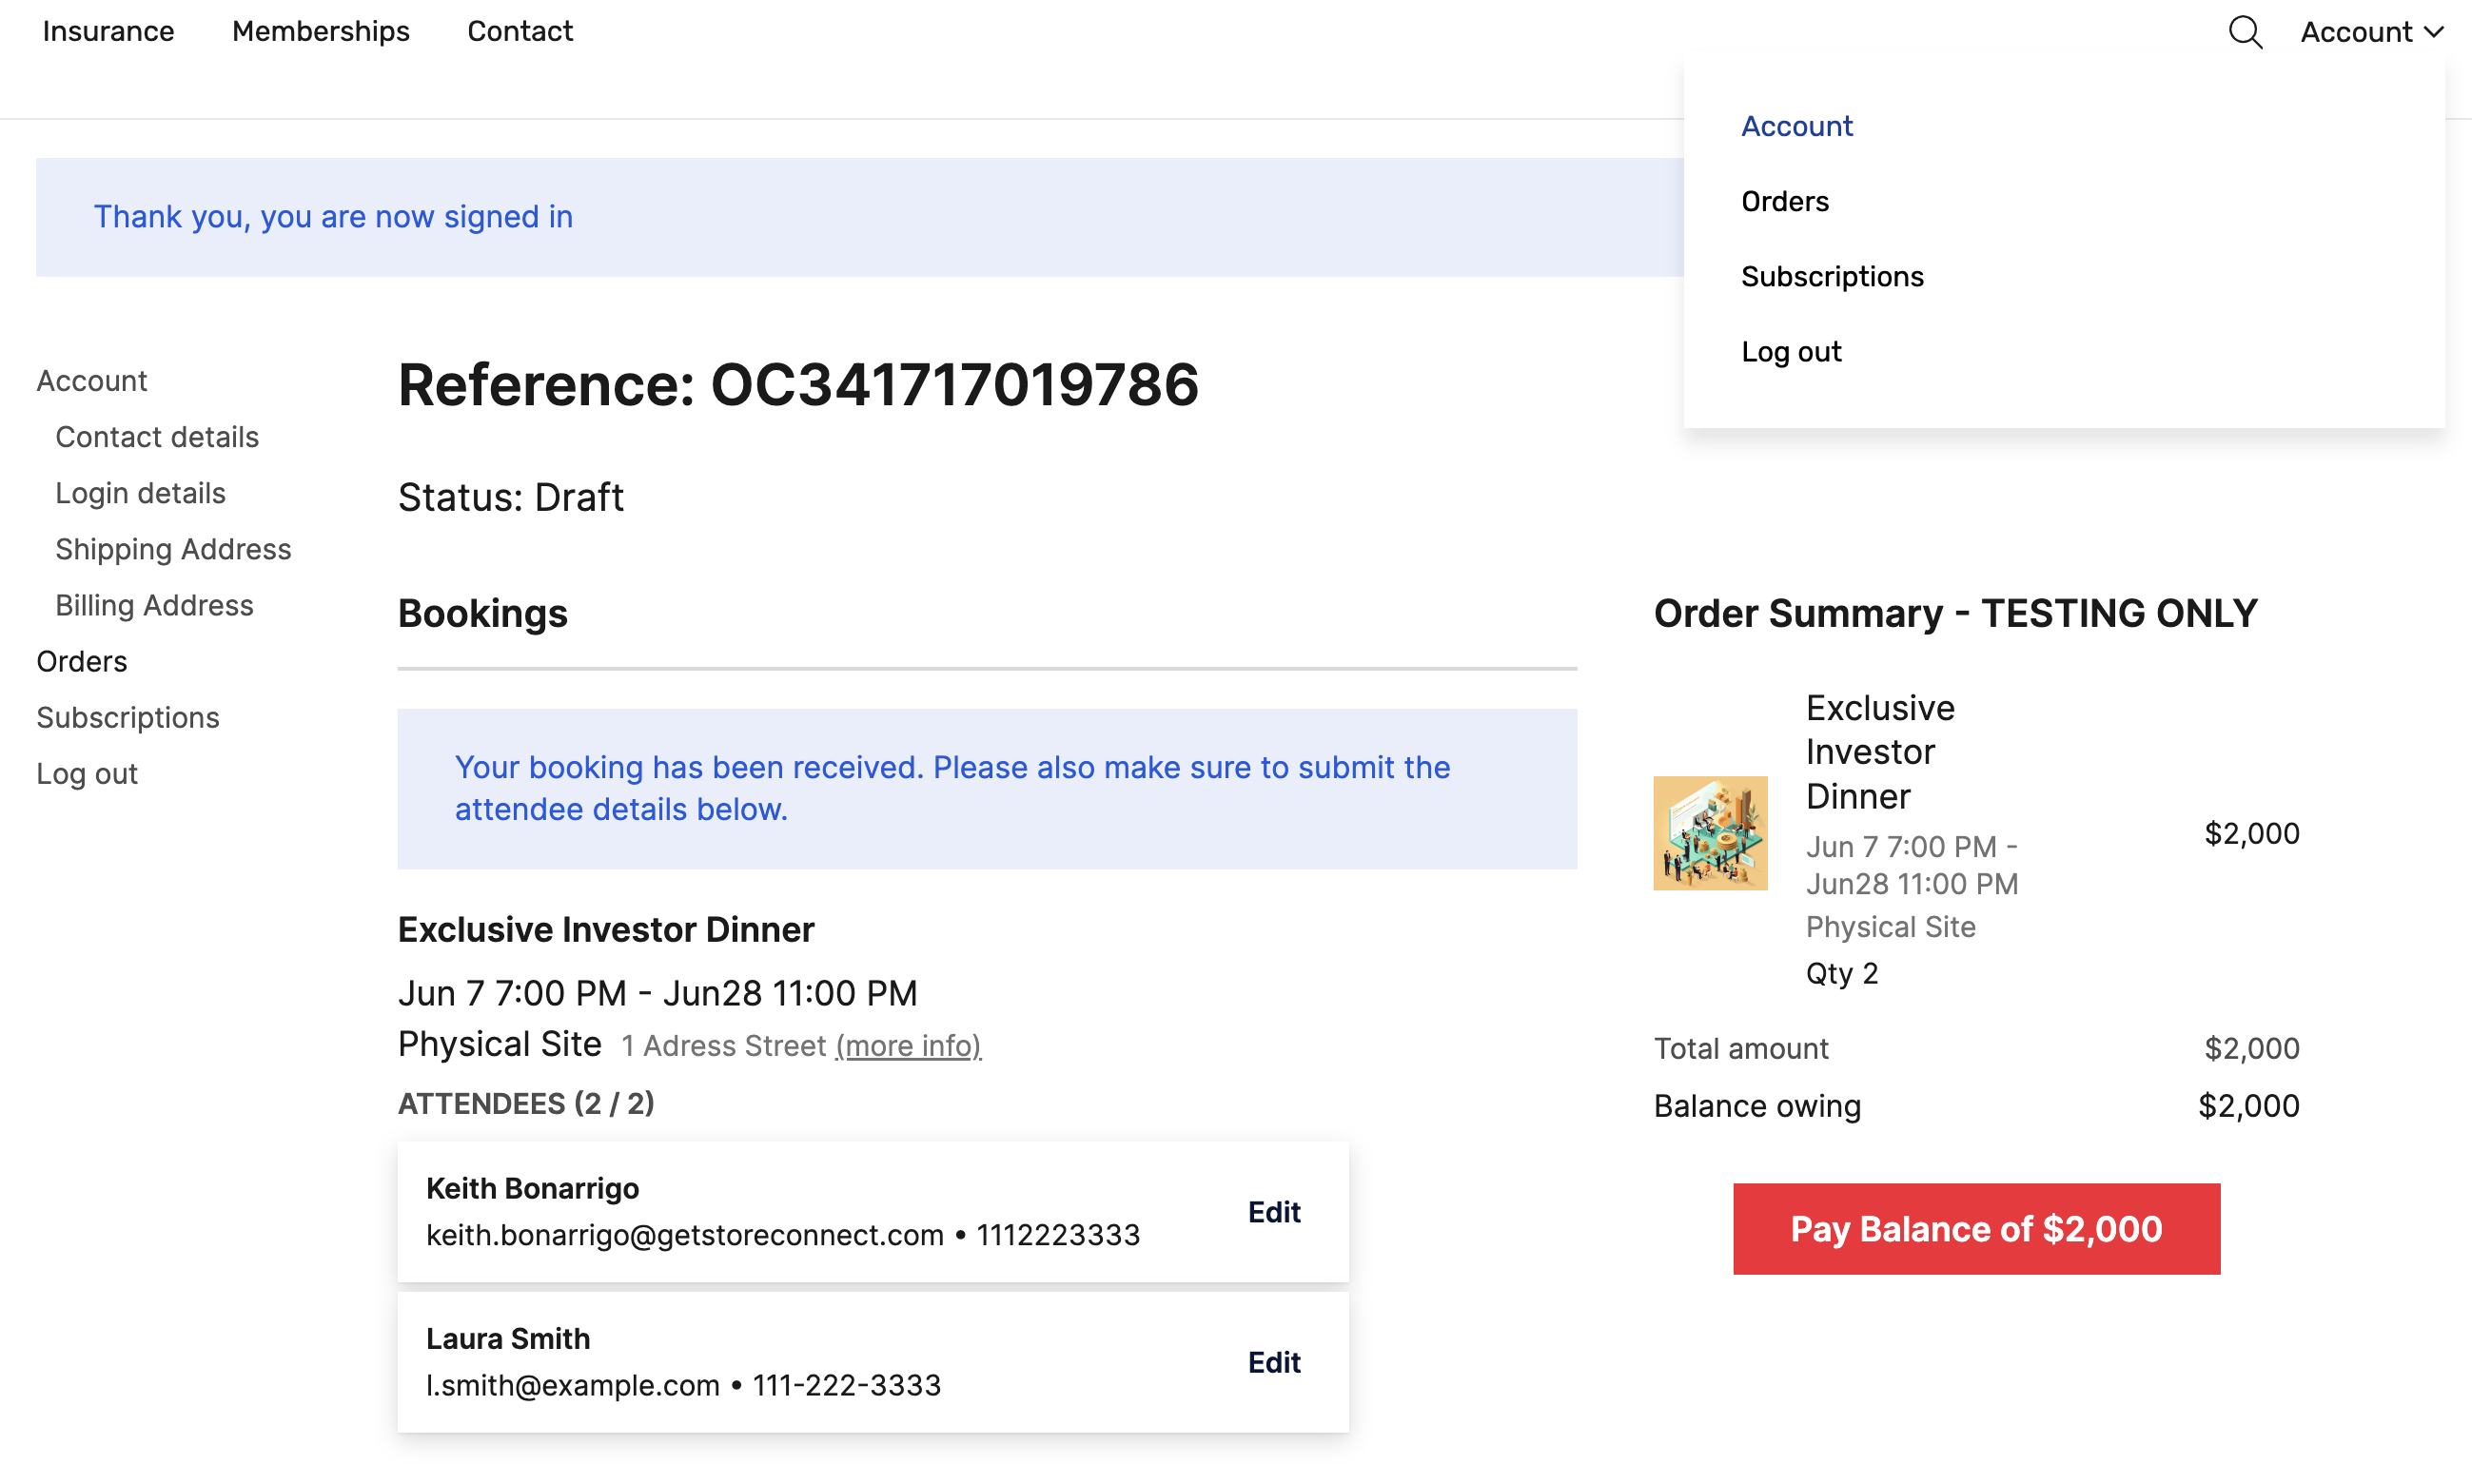
9. Check the order record in StoreConnect
- Navigate to the Account section of the StoreConnect interface
- Ensure that the bookable event is listed with the attendees
10. Check the order in the back-end of Salesforce
-
Navigate to your order by entering the Reference ID from the StoreConnect order page into the Salesforce search bar

-
In the ‘Order Products’ related list and click on the ‘Corporate - Exclusive Investor Dinner’ order line item
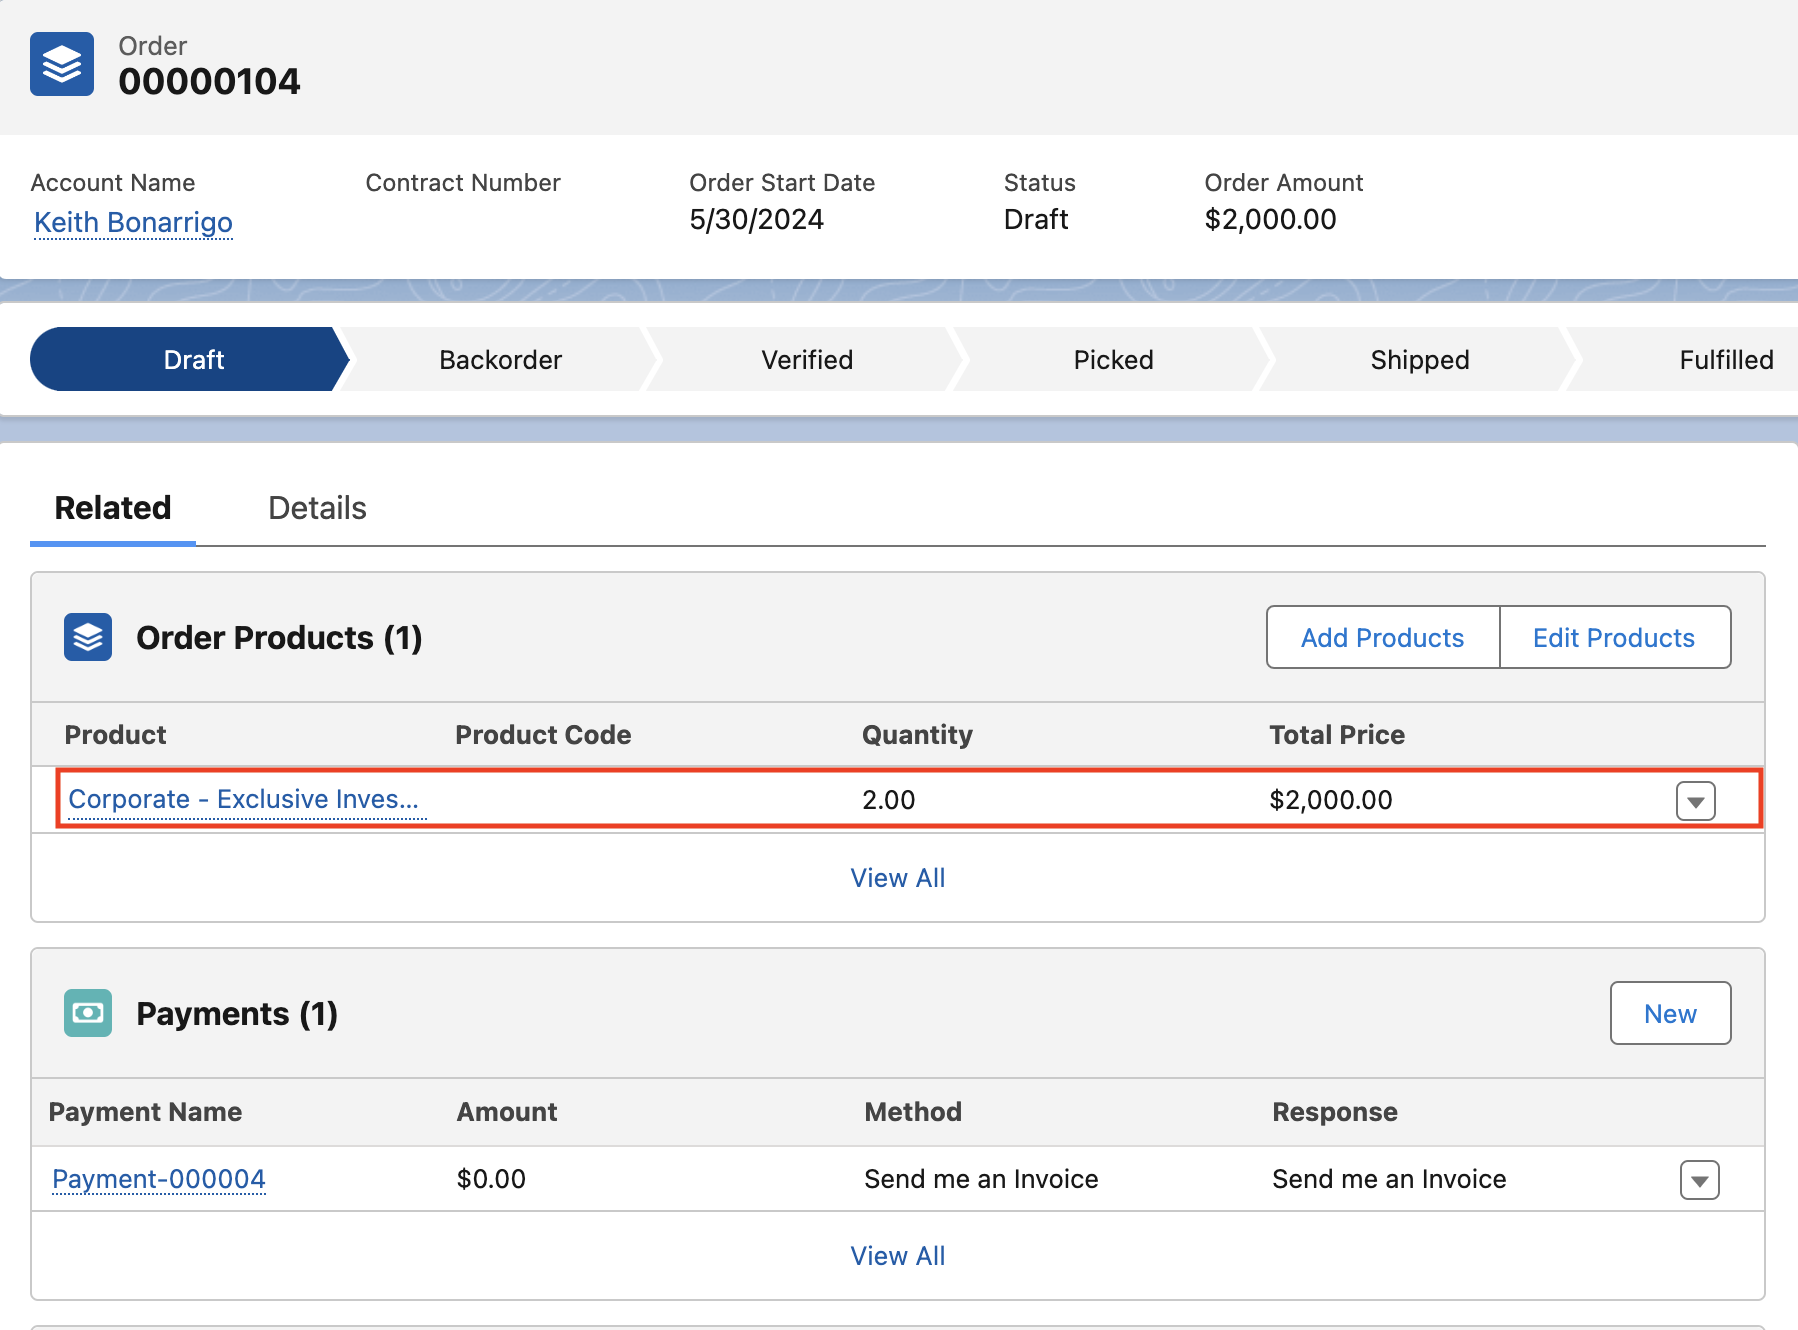
-
In the related list of the ‘Corporate - Exclusive Investor Dinner’ product, select the Bookings related list

-
Ensure that both of the attendees are listed in the Booking record
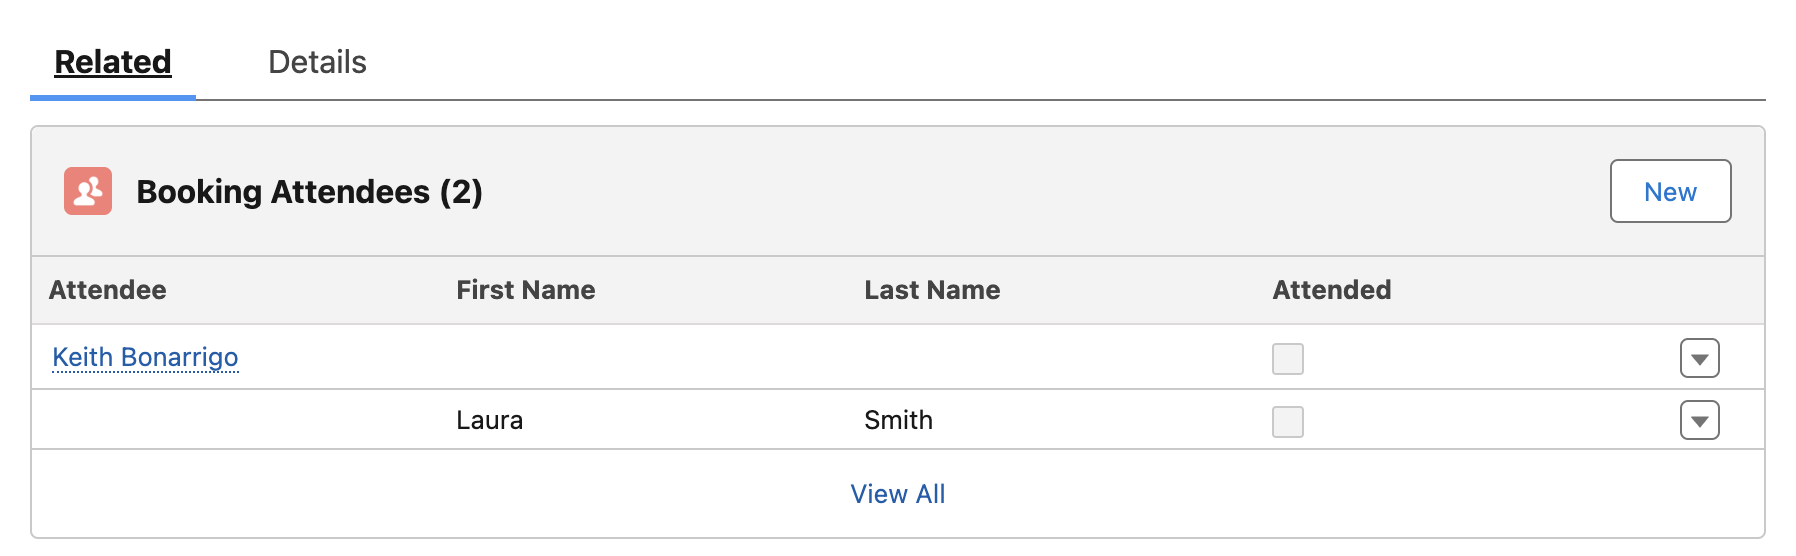
Congratulations! You’ve successfully set up a bookable event and registered. Enjoy your upcoming dinner!