
How to Build an Application Form with Payment on Salesforce
And do it all within a single afternoon!
This guide is a complete, step by step guide on how to set up a highly dynamic and customisable application form using Salesforce Screen Flows embedded on a public website that also takes payment from the applicant. It is designed for Salesforce Administrators (experienced or budding) who want to get something like this up and running in a single afternoon.
Member registration is a common requirement for many businesses. Even more so is being able to pay for that membership through a public-facing webpage.
This has traditionally been quite difficult or complex to do on Salesforce, requiring either heavy solutions costing tens of thousands of dollars a year to license and taking weeks or months to complete the sales and installation process.
This guide will show you how to create a complex membership form that also accepts payment, all powered by a StoreConnect instance. You could then register via credit card for a small month-to-month payment without any sales process required!
While StoreConnect has it’s Generic Custom Form feature, which is the best practice way of building this sort of solution, sometimes you need access to direct Salesforce objects and logic in the application flow, and you can do this by leveraging a Salesforce Lightning Screen Flow and then embedding it within a StoreConnect page to capture the membership details, make it available on a public StoreConnect site and then take the data provided to capture payment for the membership.
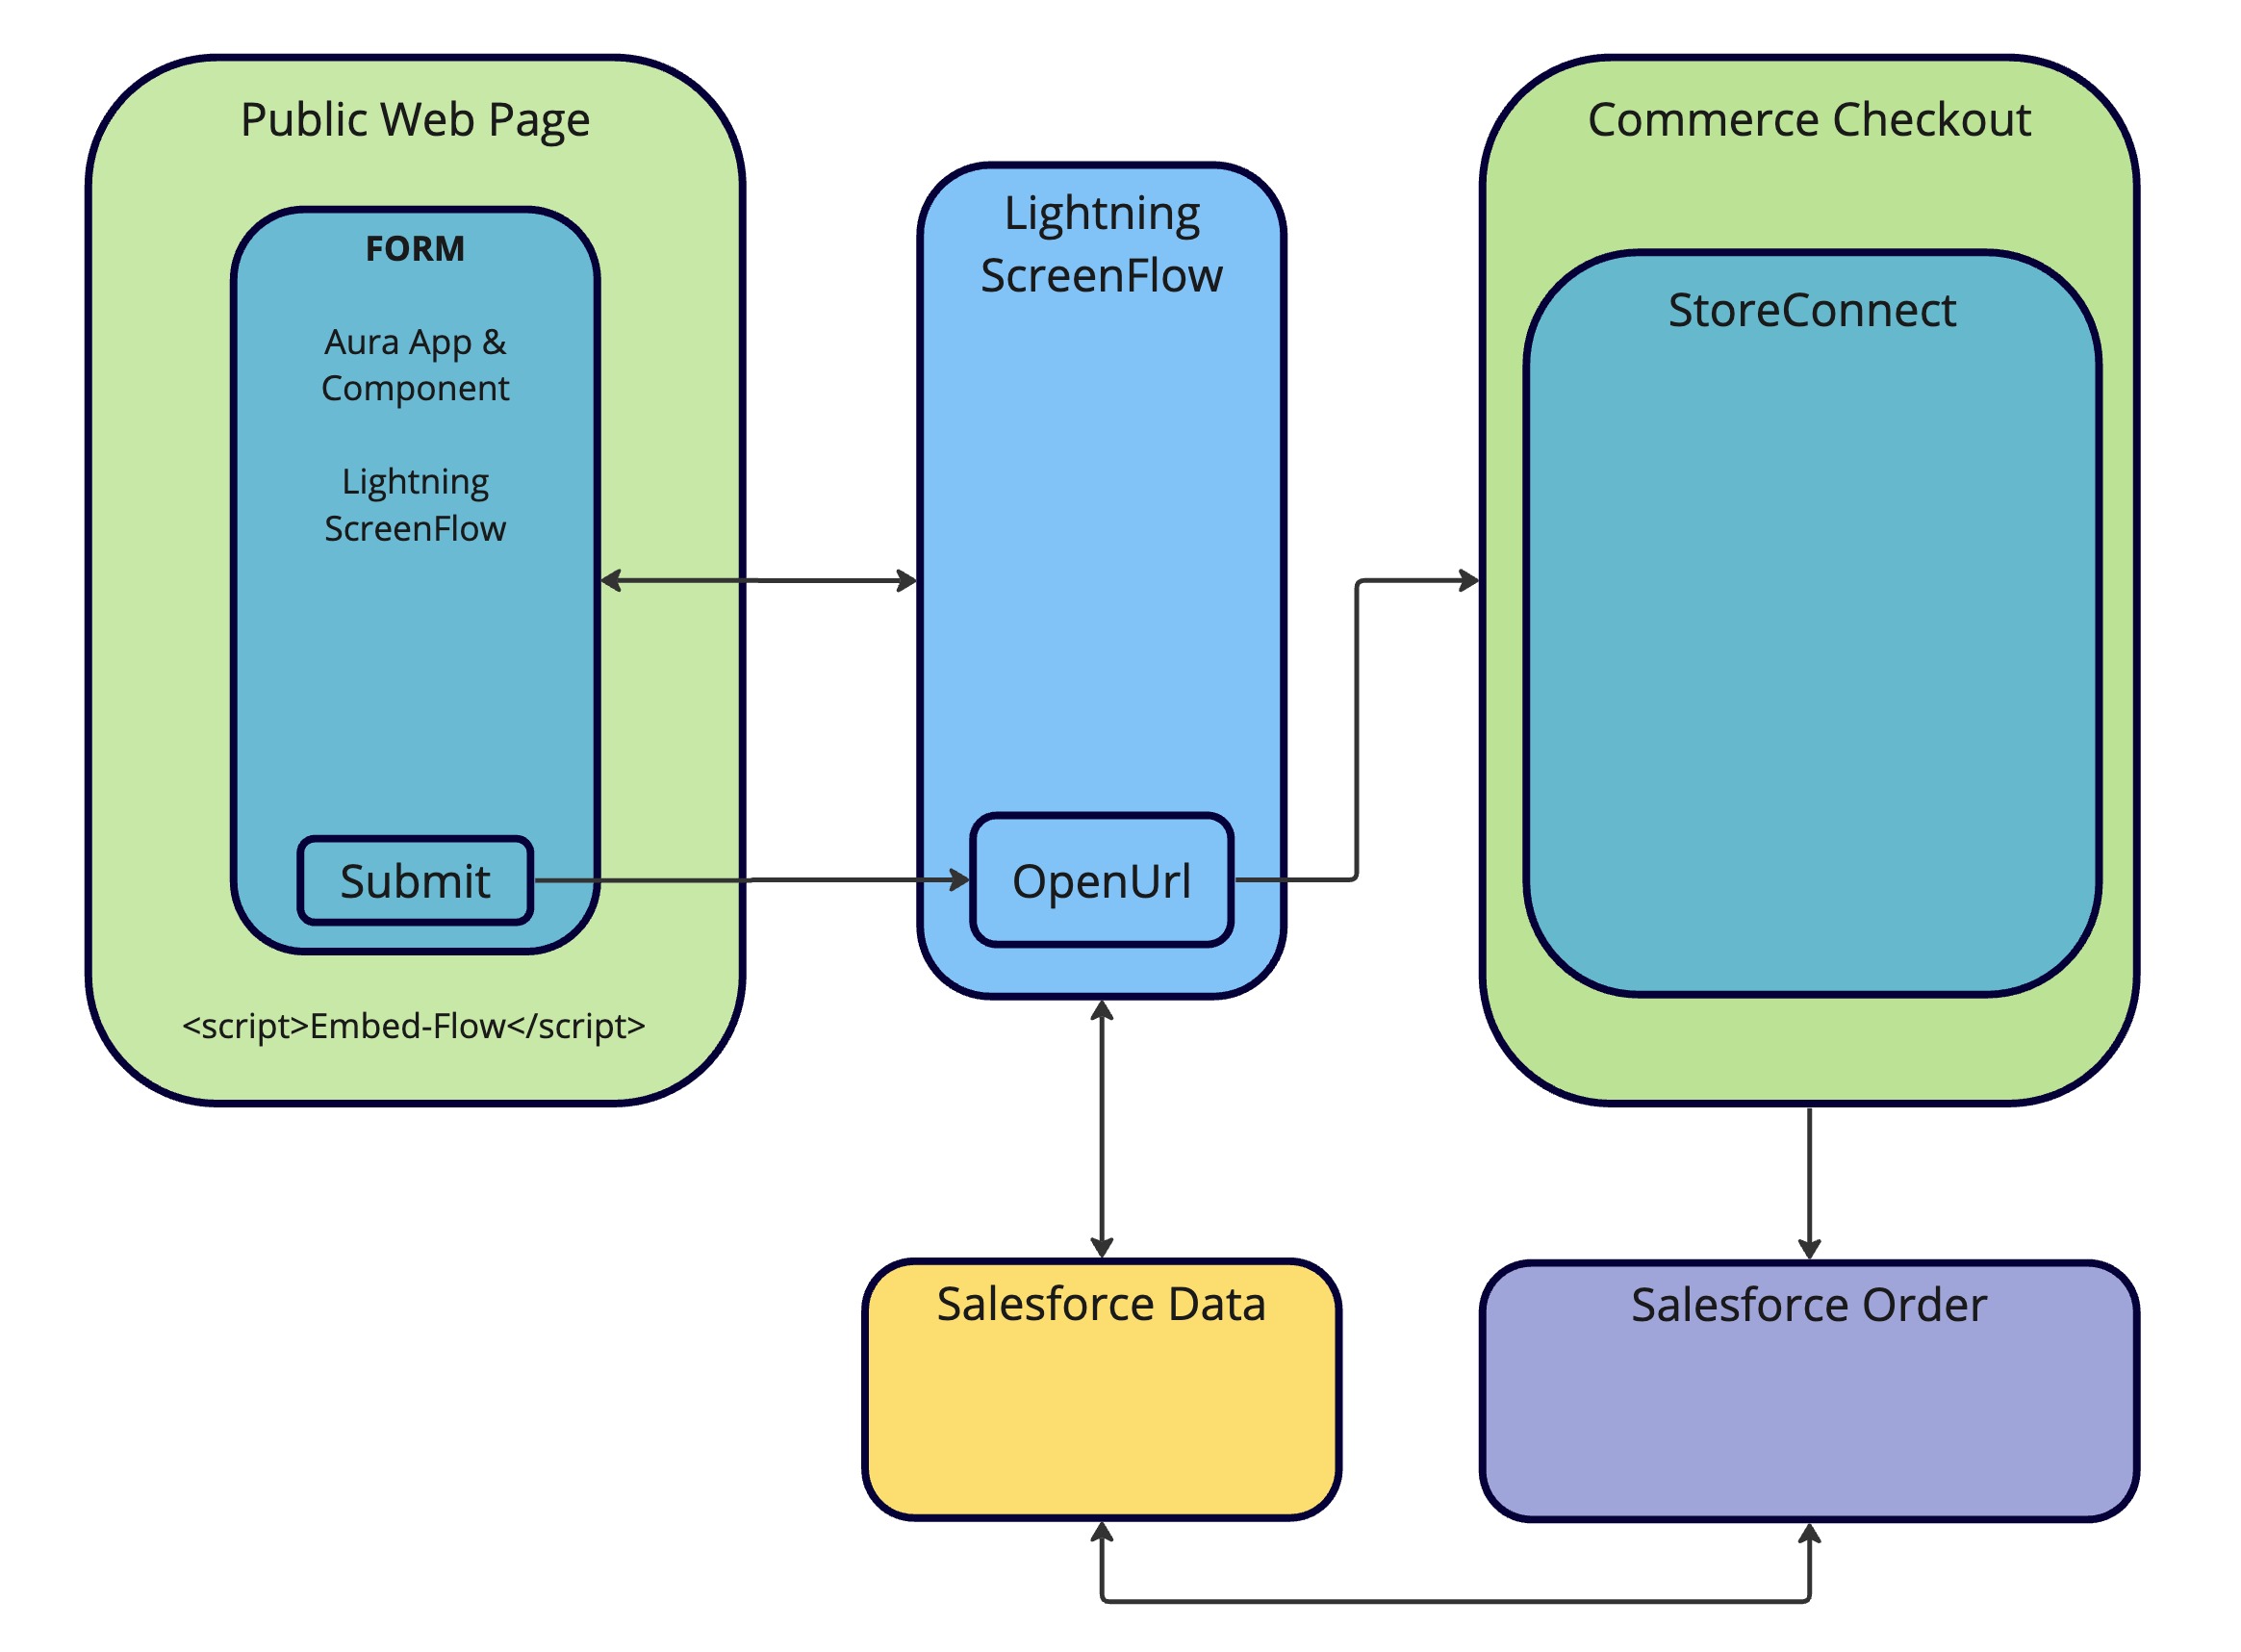
And do this all in a single afternoon, using this architecture diagram.
1. Install StoreConnect
To host this on a website, we need to get StoreConnect installed, so let’s get that started.
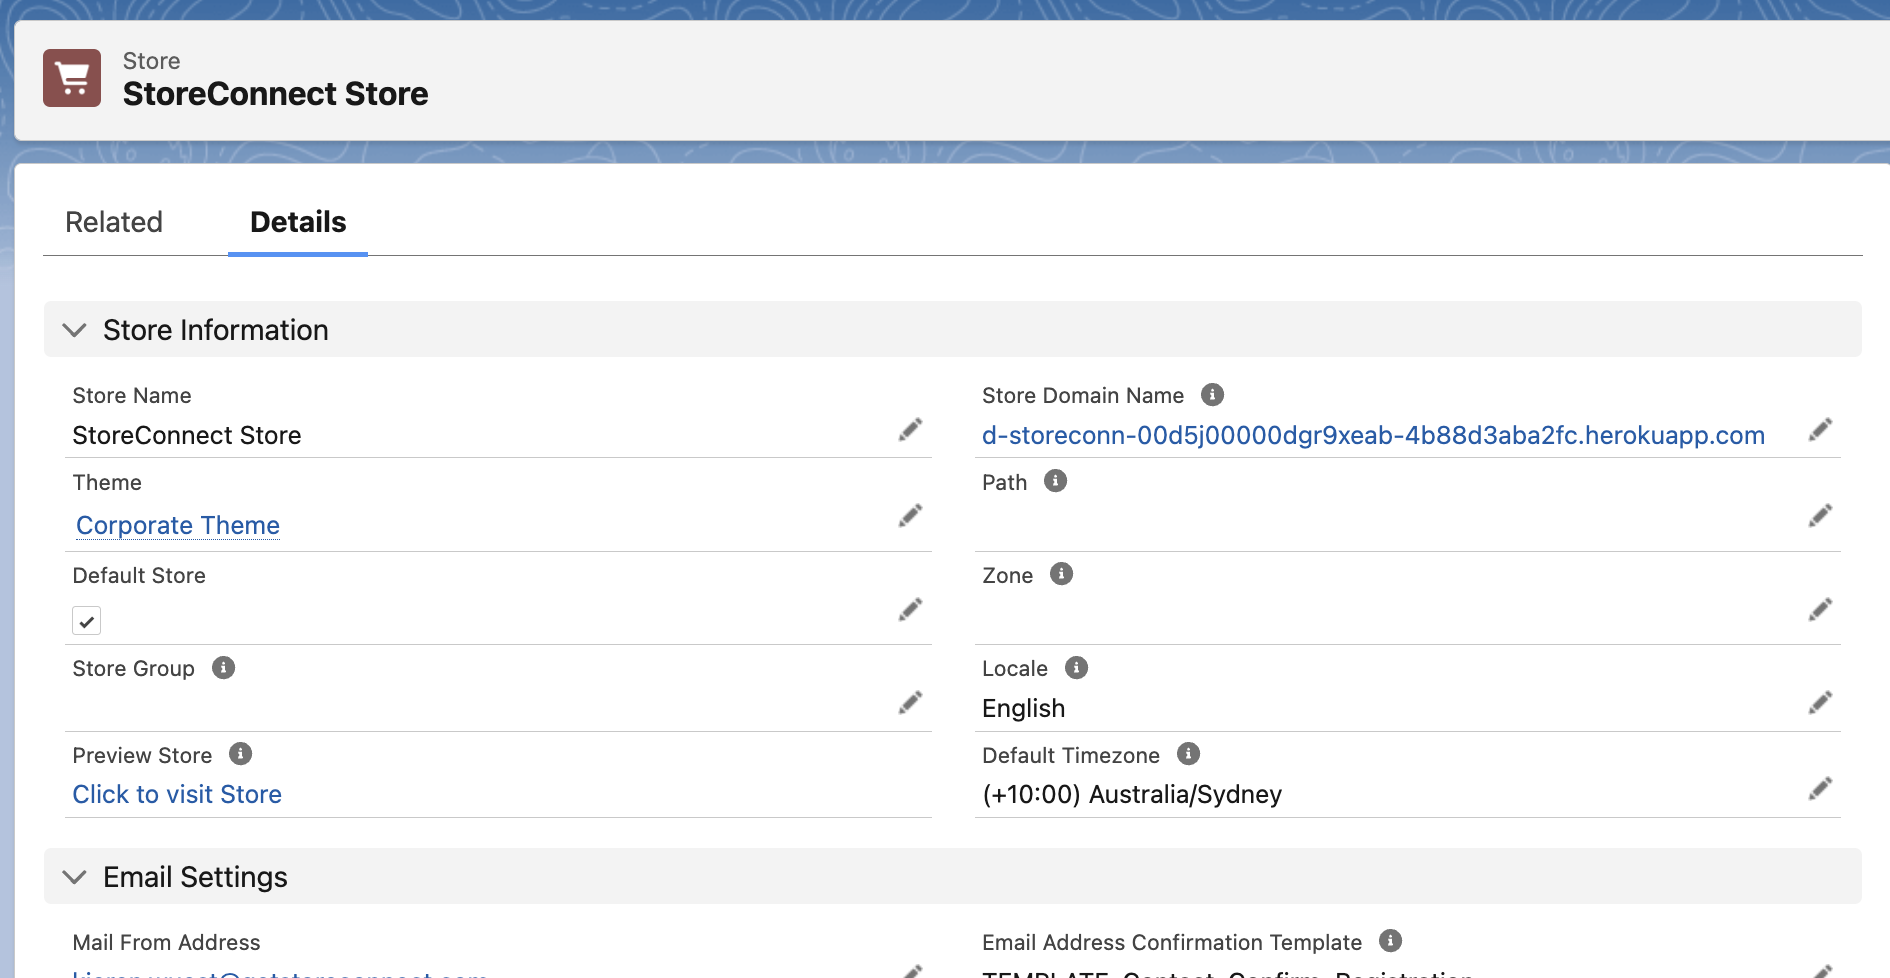
Before beginning with StoreConnect, ensure it is installed and properly set up. Here is the installation guide. Additionally, your StoreConnect Store and Site should be active with a functional URL. This setup enables a great way to integrate the web form and payment system.
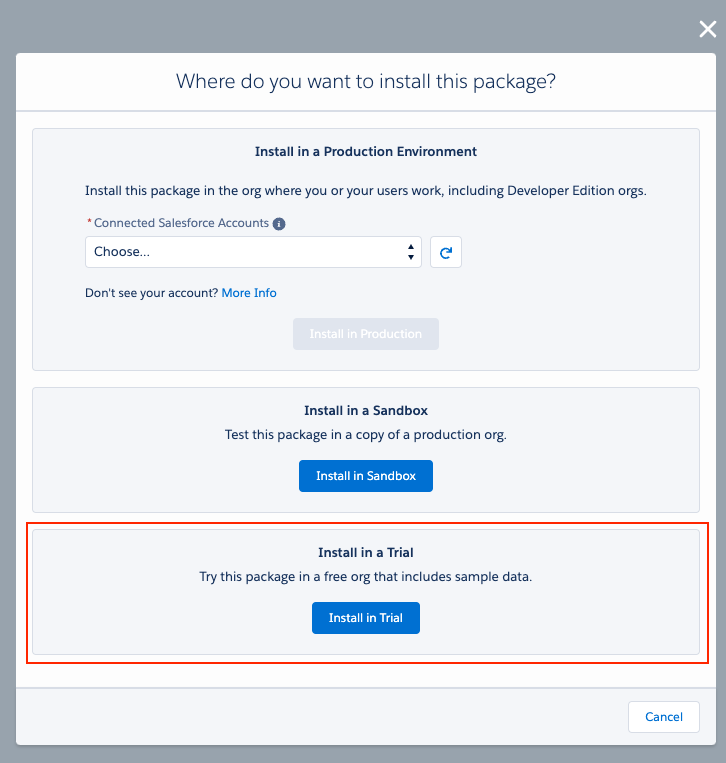
You can install a StoreConnect trial to test this solution (as done in this guide) if you are not working on a production or sandbox site implementation.
Once this is complete, you should have a StoreConnect Store and Site that is accessible online.
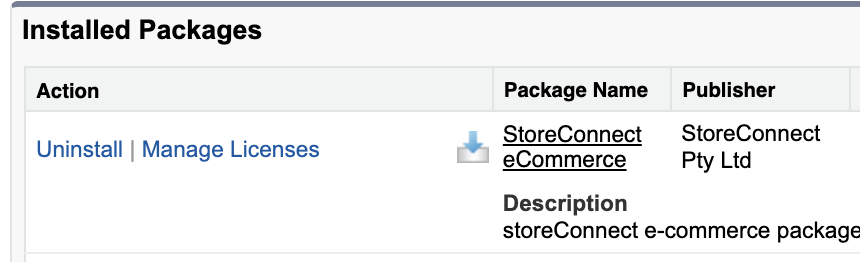
If you are installing StoreConnect as a package into your production or sandbox org, check to see this entry in the Installed Packages setup screen:
2. OpenUrl Installation:
The first tool we need to make this work is the OpenUrl package from UnofficialSF, which allows us to redirect from the screen flow we will create to the checkout page.
- Visit the UnofficialSF page for OpenURL.
- Click either the “production” or “sandbox” links to install into your Salesforce Org.
As a result, we should see this entry in the Installed Packages setup screen:

3. Site Custom Domain Setup:
The next thing we need to do is create a site within the Salesforce Org to publish your Screen Flow and make it available to embed within the StoreConnect site.
- Search ‘Sites’ in the Setup Quick Find bar.
- Accept the Sites Terms of Use to continue if not done previously.
- Create a new Site record in the Sites list.
- Give the site a name referring to the page or type of form, for example,
SignUpSite. - Set the Active Site Home Page lookup to
UnderConstruction, which we will use as a placeholder, to meet this required field. - Check the
Activecheckbox. The record should look like this:
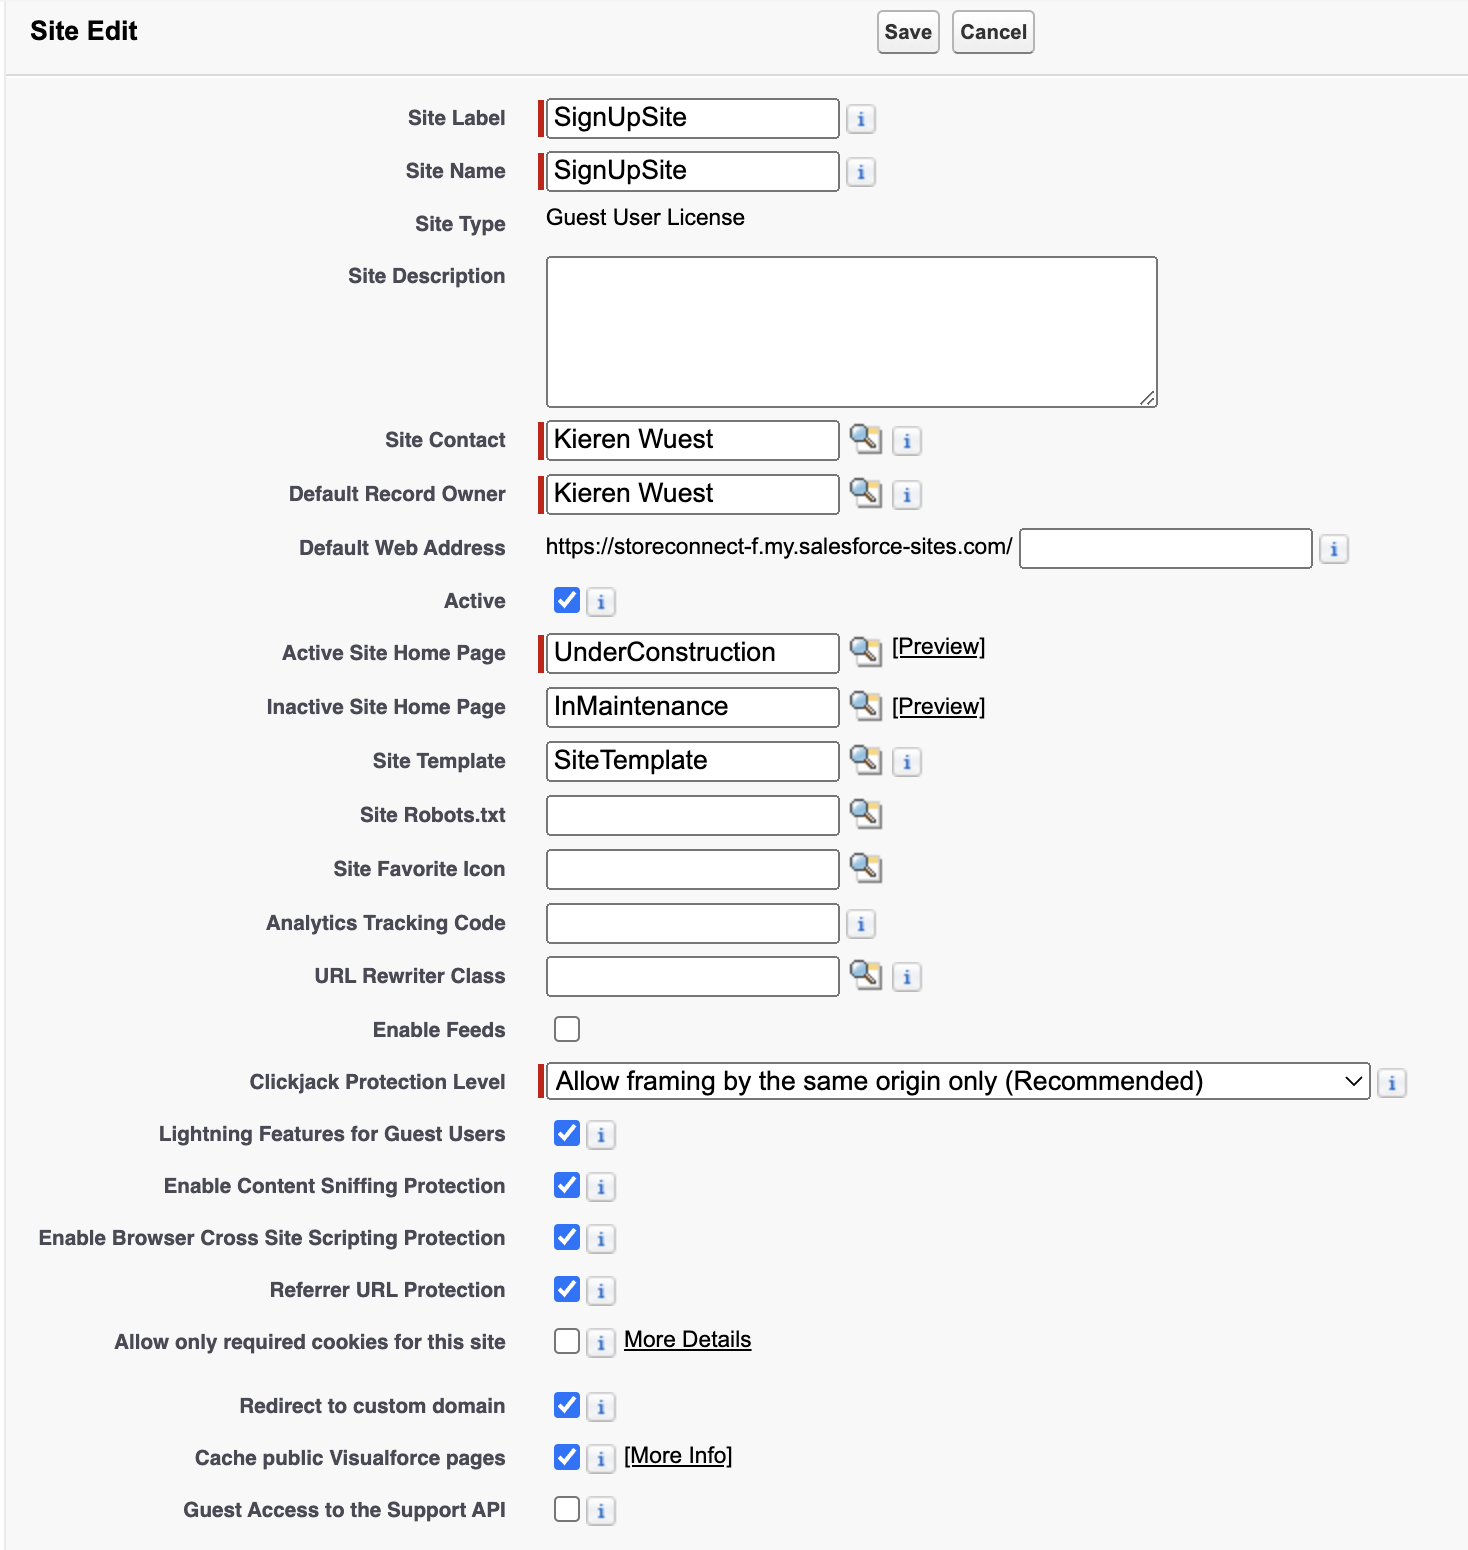
- Leave other settings as default, and save.
- Note the URL of the site for the last step in Section 9.
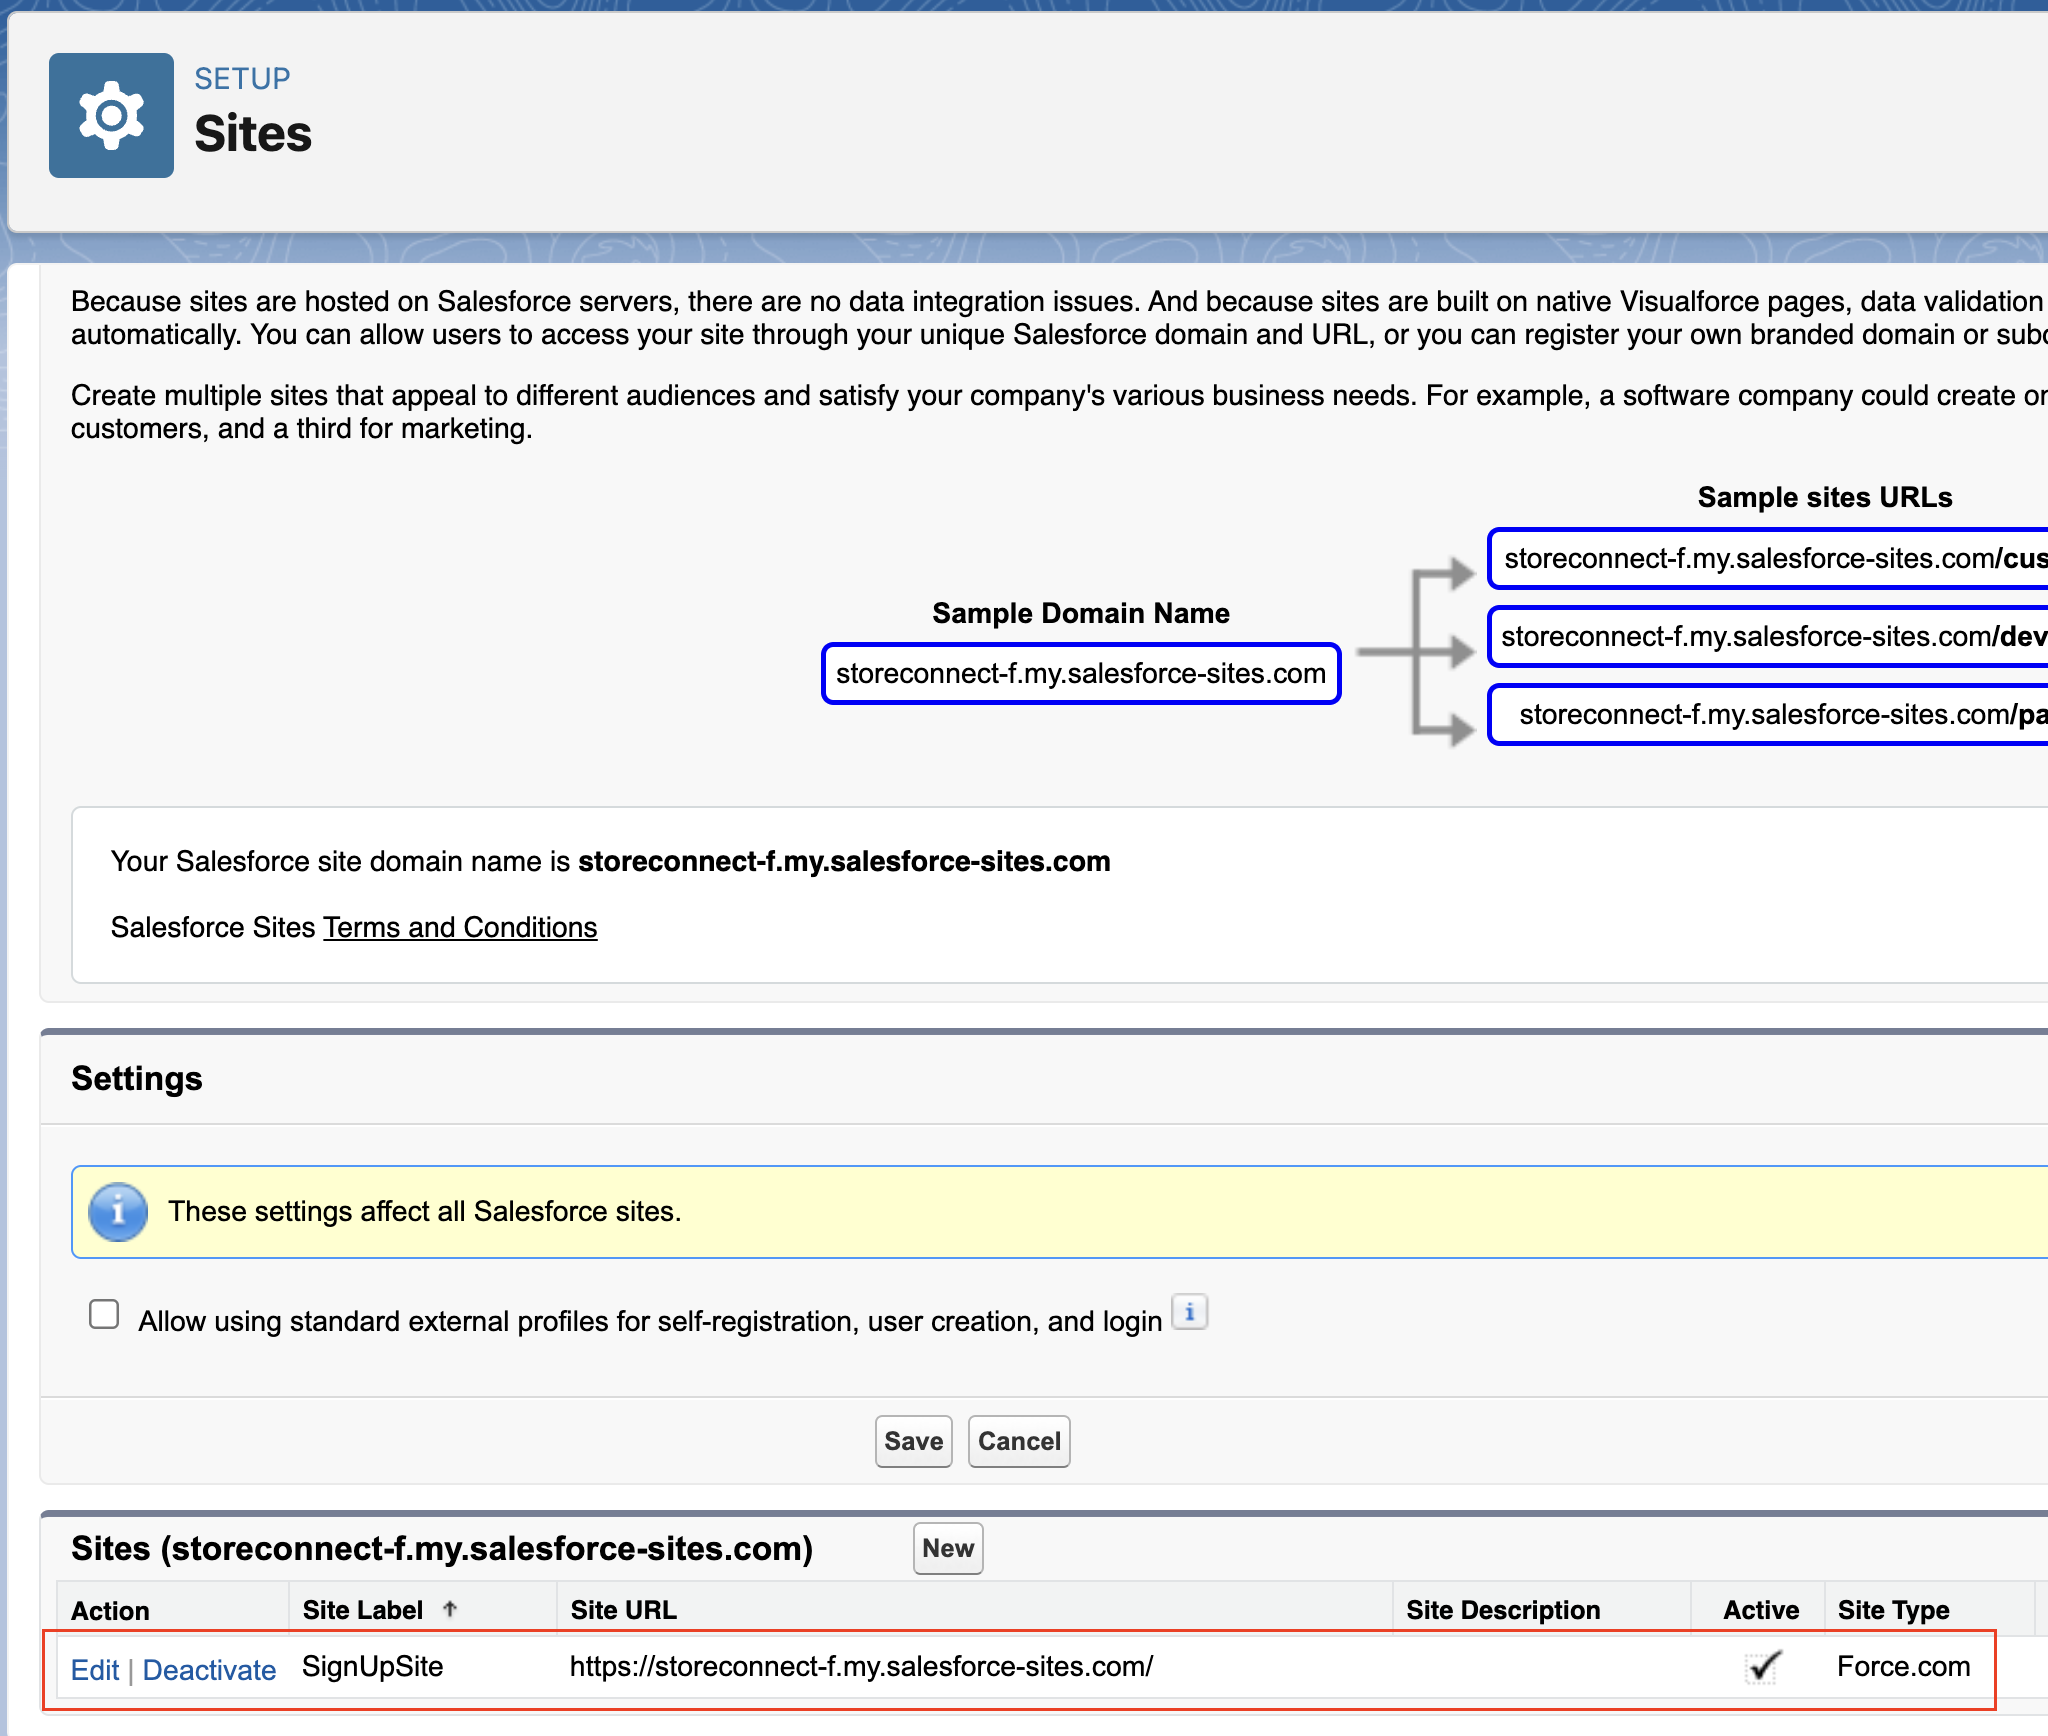
As a result, we should see this red highlighted SignUpSite record in the Sites setup screen:
4. Enabling CORS:
CORS (or Cross-Origin Resource Sharing) is a security feature that prevents sites that you don’t authorize from embedding your Screen Flow form. So, this means we need to explicitly authorize our StoreConnect site to be able to embed the form.
- Search ‘CORS’ in the Setup Quick Find bar.
- In the ‘Allowed Origins List’, click New.
- Add the URL pattern of the domain where your webpage form will be located. In this example, we will be using our StoreConnect store domain which you can find on the Store record created in step 1 of this guide.
- Then click Save.
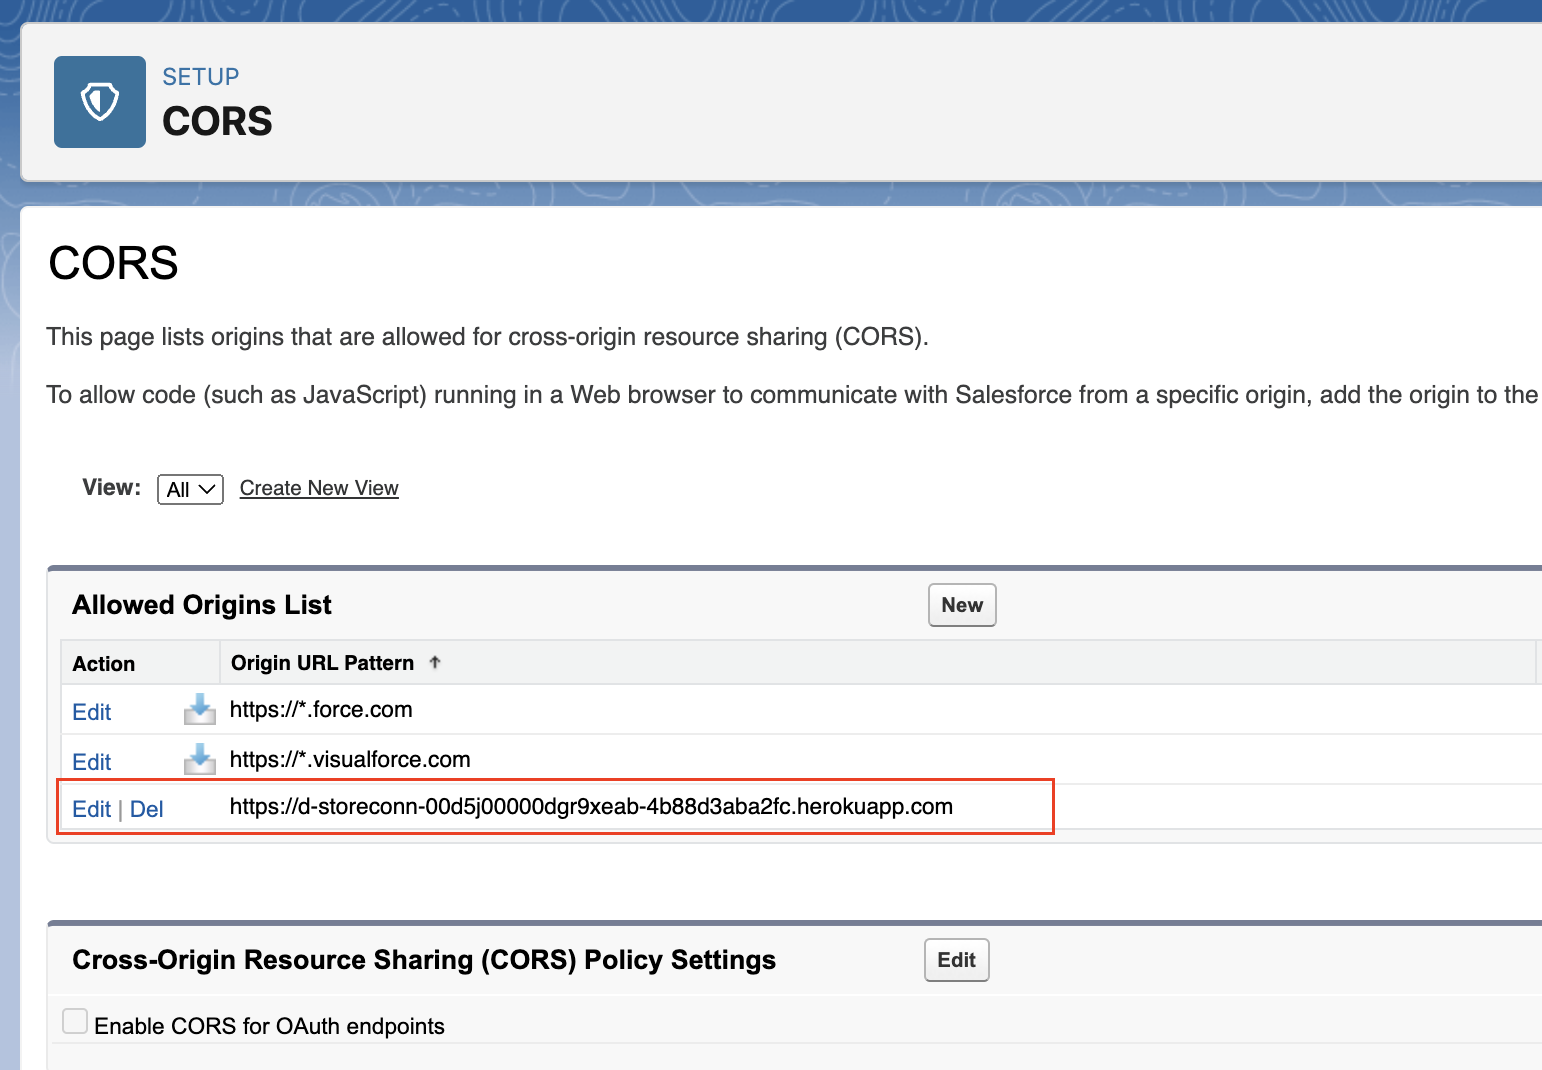
As a result, we should see this red highlighted entry in the CORS setup screen:
5. Form Structure Definition:
Actively defining the form fields on paper or a digital document allows us to determine and reference our data model. Use existing fields or create the necessary new object and fields in Salesforce, reflecting the information you need from new members for your form. You will use these at multiple points along the solution.
- Define or note the fields that will be in the form.
- Create or modify any Custom Objects and Custom Fields to be used that are not to be used with existing standard fields.
- In this example, I will be using StoreConnect commerce checkout which creates the standard Salesforce Objects of Order, Order Items, Contact, and Account records on a successful checkout.
- We will define the required Contact information to complete a StoreConnect checkout.
Contact.FirstName
Contact.LastName
Contact.Phone
Contact.Email
Contact.MailingStreet
Contact.MailingCity
Contact.MailingState
Contact.MailingPostalCode
Contact.MailingCountry
Note: The StoreConnect checkout creates Contact and Account records through the checkout process, and we will take advantage of that here. If you wanted to create a Lead in this process, you would reference Lead fields and consider permissions for creating these fields through the form and flow, as we will explore next.
- We will define a Custom Object called
Applicationand a Custom field calledMembership_Option__cto demonstrate this concept. For this field, we will create it as a single select picklist, with 4 values:Basic,Premium,Professional,Corporate. - We will create a lookup field called
Membership_Order__c, which is a lookup to the Order Object. We will end up linking the Application record to the Order record at the end of the checkout.
Application__c.Membership_Option__c
Application__c.Membership_Order__c
Note: You may have more fields for a more lengthy, involved form, to suit your needs. Also, for this example, we will not trigger any logic based on the membership options picklist selection, but based on this selection in the flow, we could modify the direct-to-cart formula to change products with a CASE() or IF() functions.
6. Access Settings Adjustment:
Modify the Site Public Access Settings for your newly created object and fields, allowing non-Salesforce users to complete your form.
- Search ‘Sites’ in the Setup Quick Find bar.
- Click on the Site Label in the Sites list. Not
Editor the site URL. - Click the
Public Access Settingsbutton. - Click Edit and check Read and Create for any of the Objects we will create in this form. In this instance, I will do this for
Applications, then click Save. - In the ‘Field-Level Security’ section of the Profile page, click the [ View ] hyperlink to view and appropriately modify the permissions of the fields in your form for Read Access or Edit Access. In this example, I will provide Read and Edit Access for the
Membership Optionfield on theApplicationsobject. Click the ‘Back to Profile’ button when complete.
Note: The StoreConnect checkout creates Contact and Account records, so we will not need to provide access for these fields in this example. Ensure you allow access for objects and fields in your form in this step.
Note: We will revisit this page when we follow section 10 below on embedding the flow on our website, after we create our Screenflow. This will allow the form to show on the page via the profile access settings.
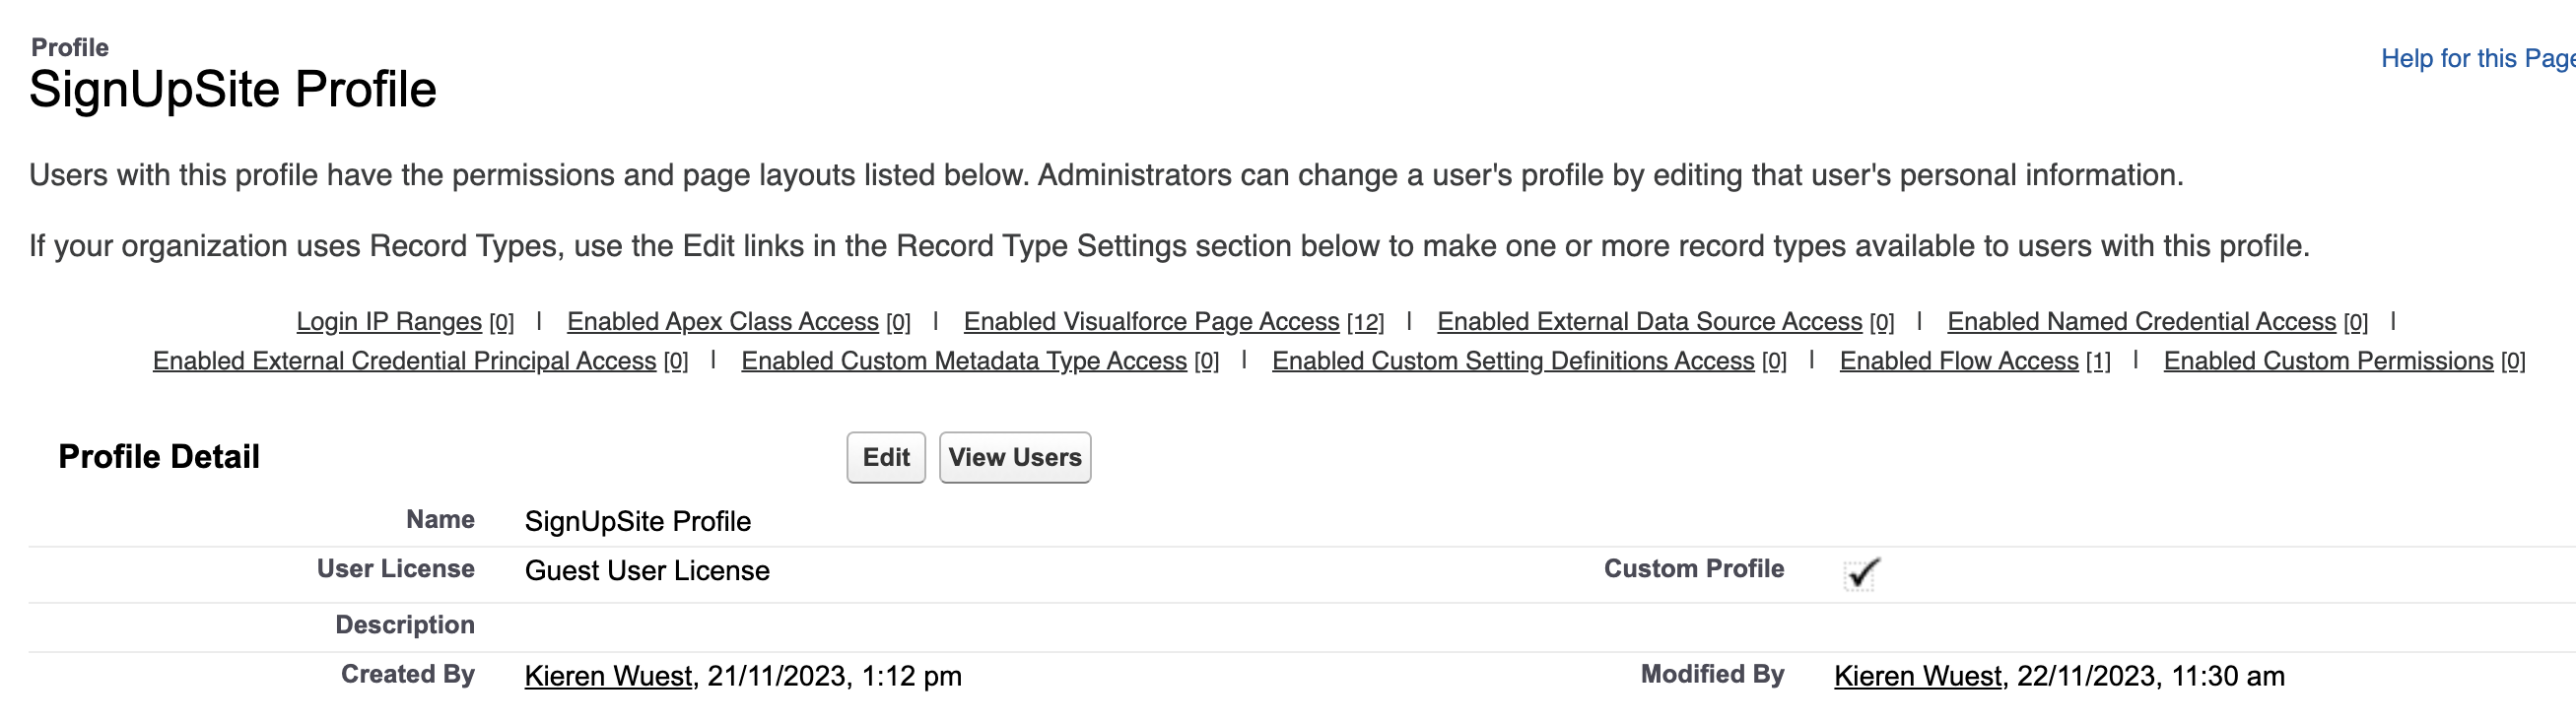
As a result, we should have this profile configured for access to our defined data-model.
7. Flow Creation:
Design a Salesforce Lightning Flow that captures user information and directs them to the StoreConnect payment page.
- Search ‘Flows’ in the Setup Quick Find bar and click
Flowsunder ‘Process Management’. - Click the ‘New Flow’ button on the top right of the screen.
- Ensure the “Screen Flow” option is selected and click the ‘Create’ button at the bottom right of the modal.
- Click the ‘Add Element’ circle connector that turns to a plus sign on mouse hover.
- Select a
Screenoption from the ‘Interaction’ group. - Give your Screen a Label and an API Name.
- Configure the Header and Footer options of the Screen Flow to control which form buttons are displayed. I will be configuring a single ‘Submit’ button.
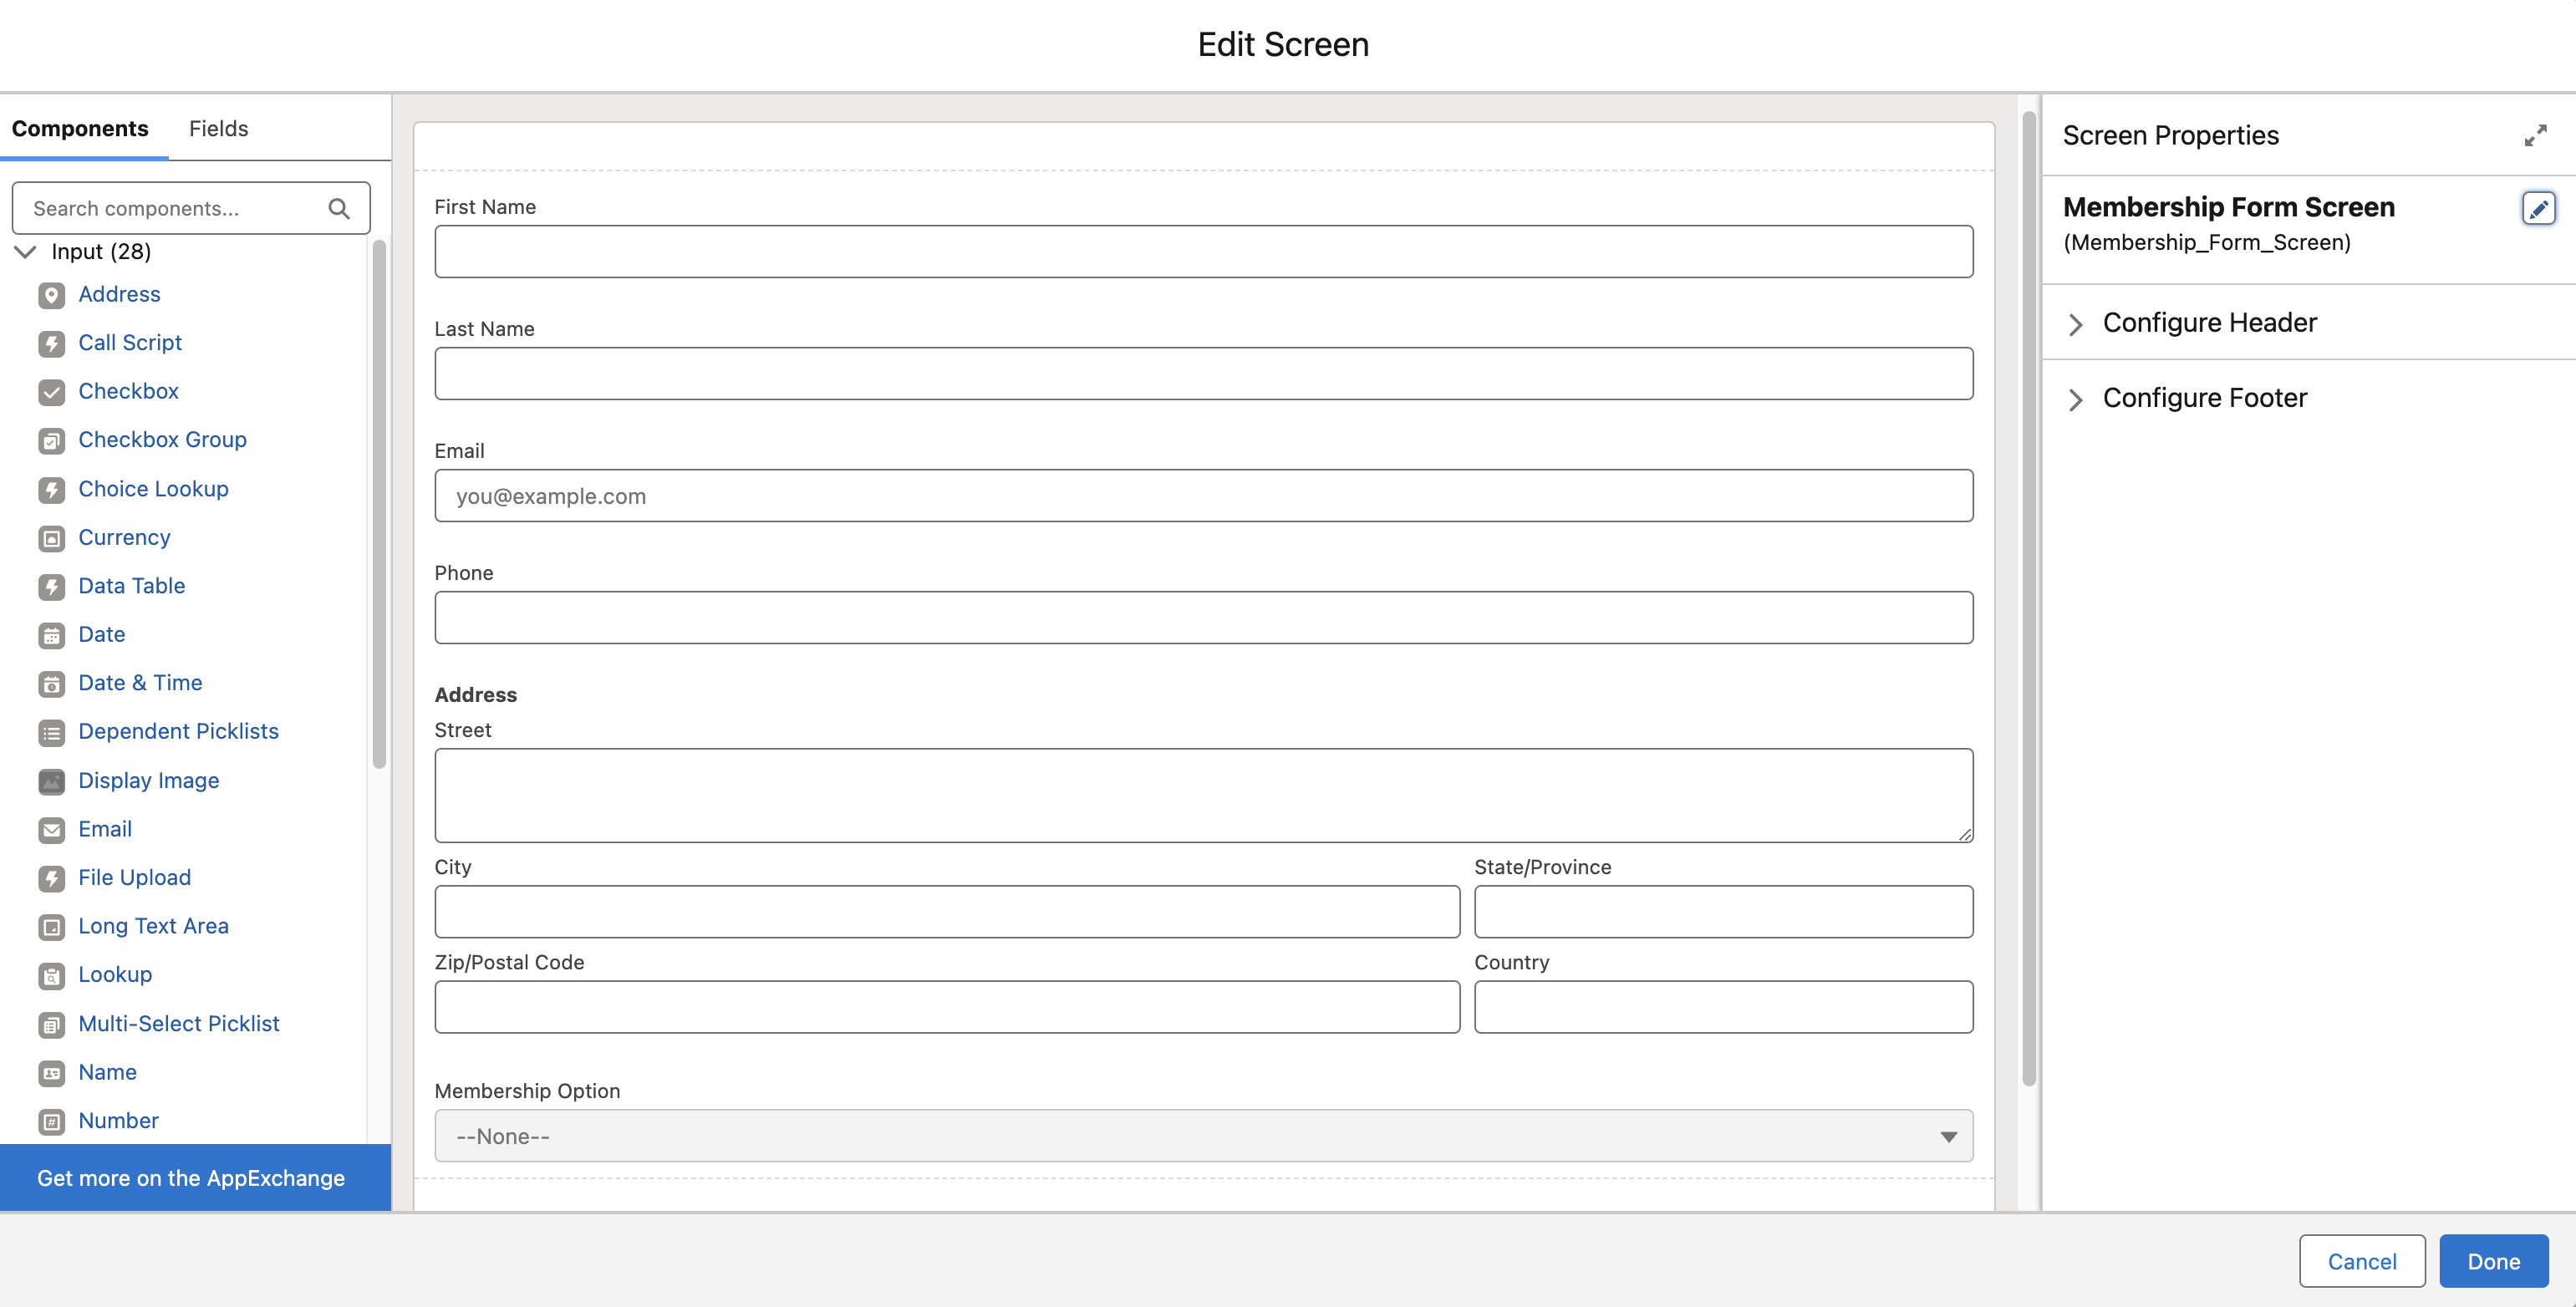
- Use the component menu to create a form which aligns with the data defined in section 5 of this guide. When completed, click ‘Done’.
Note: Take note of the API Names of the fields to use in our direct-to-cart step below.
As a result, your screen form should look something like this:
- Click the ‘Add Element’ connector under the Screen we just created.
- Under the ‘Data’ group, select
Create Recordsoption. - Provide a Label and API Name. I will use ‘Create Application’ and
Create_Application. - For this example, choose options to create One record and the option to “Use separate resources, and literal values”.
- Under ‘Create a Record of This Object’ Record lookup. Select the Object for this Element. We are using
Application. - Map the Object ‘Fields’ to the ‘Values’ of the API Names of the fields created in the screen element in step 8 above.
- Check the ‘Manually assign variables’ checkbox as we will capture an ID of this record in a variable for use in Sections 7 & 10 below. Where we pass and then link the records together post-checkout.
- Under ‘Store Application ID in Variable’ Variable field. Create a new resource of type ‘Variable’ with a data type of text and check the ‘Available for output’ checkbox. Here we will give an API Name of
ApplicationID. As a result, your Create Records function should look like this: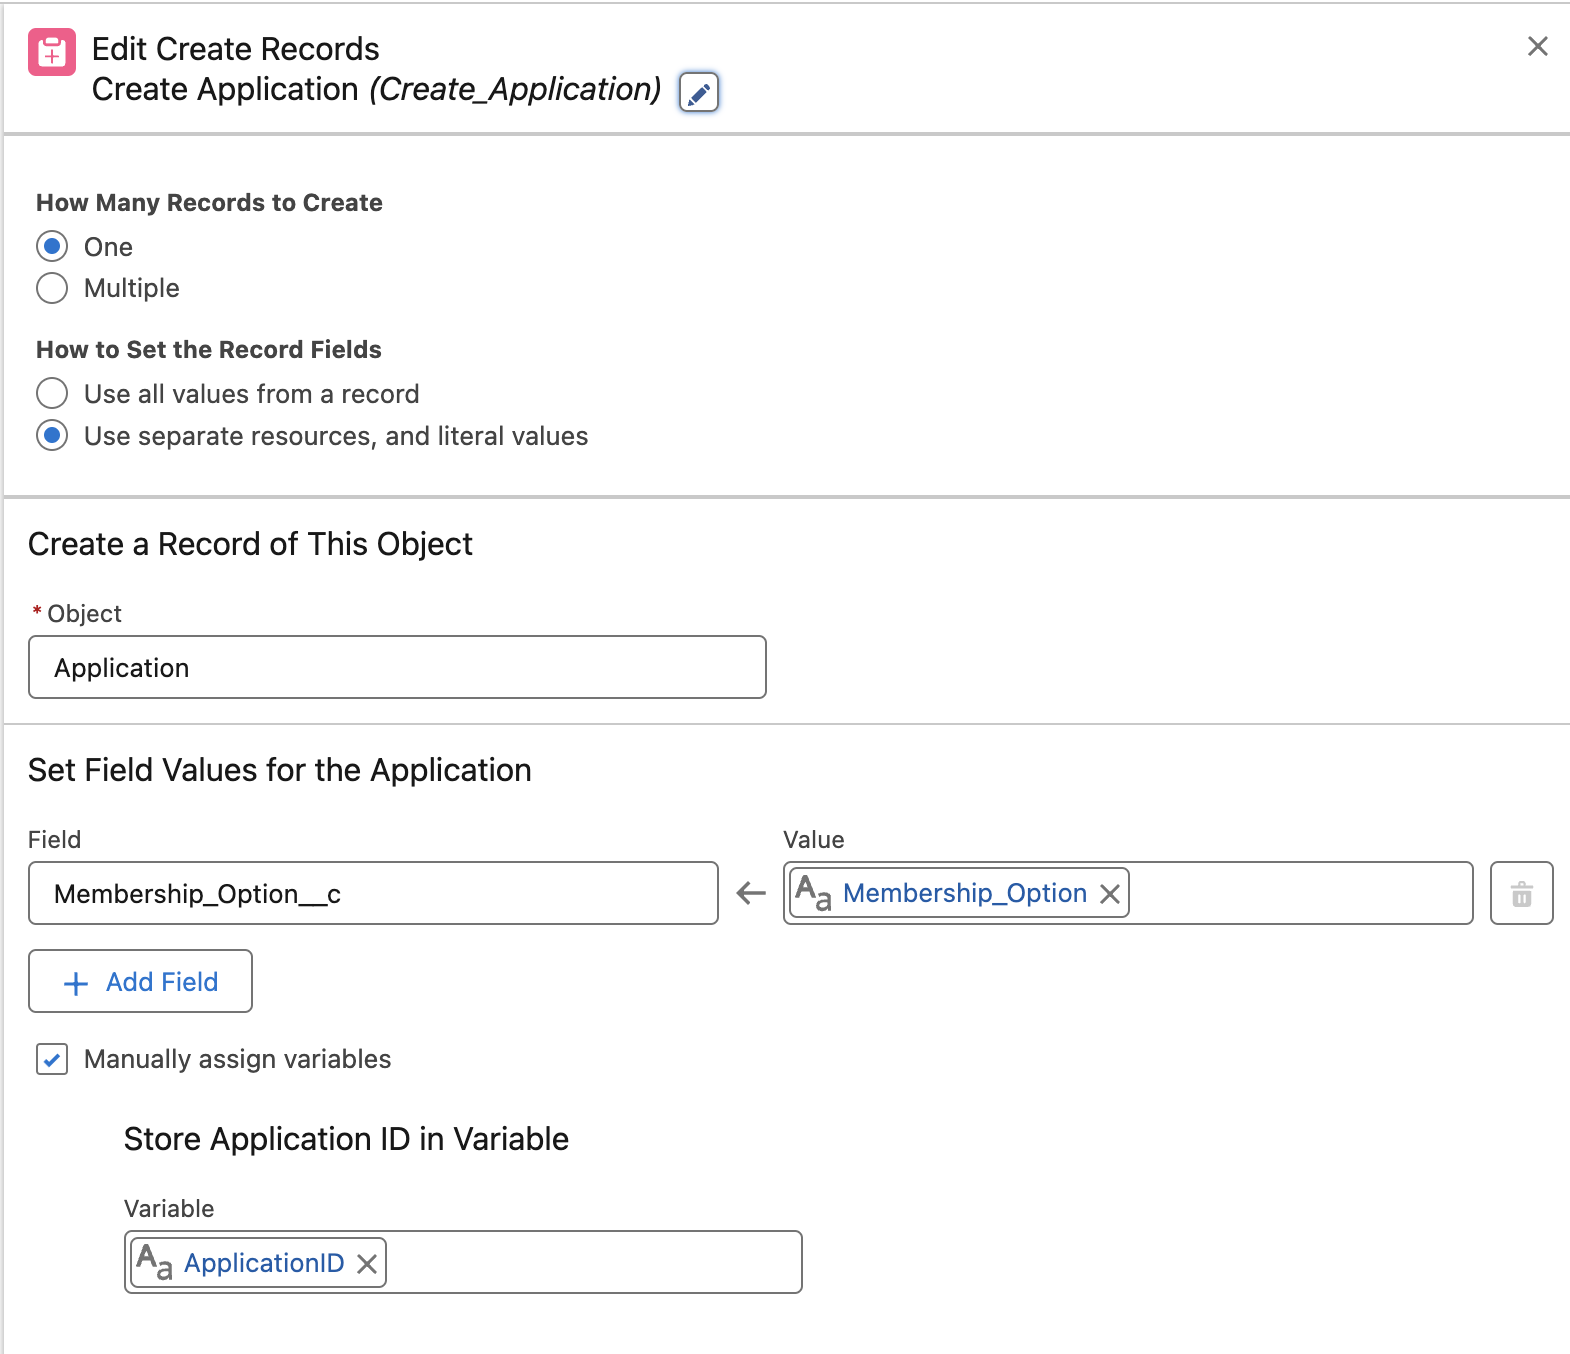
8. Cart URL Integration:
This URL solution utilises StoreConnect’s direct-to-cart URL structure.
- Ensure that a subscription Product is configured and visible on the site and can be purchased through a checkout.
- Note the URL path name of the product. In this example, we will note
omnico-basic-membershippath section from the full URLhttps://d-storeconn-00d5j00000dgr9xeab-4b88d3aba2fc.herokuapp.com/products/omnico-basic-membership. - Now we define the direct-to-cart URL we will use as the browser will accept it in StoreConnect. Based on this format
[store domain]{/path}/cart/[product string]?[other-parameters]. - This will be our desired output with example customer data:
"https://d-storeconn-00d5j00000dgr9xeab-4b88d3aba2fc.herokuapp.com/cart/omnico-basic-membership:1?type=buy&name=Bob%20Jones&email=bob@example.com&phone=0400123123&street=1%20Omega%20Street&city=Adelaide&state=South%20Australia&country=Australia&postcode=5000&return=false - We will also utilise UTM codes via StoreConnect’s UTM Tracking Codes to pass an Application Process and Id into the Order data and append these UTMs to our direct-to-cart URL.
&utm_source=membership-application&utm_token=a3I5j000000sh4PEAQNote: We are using a constant string that defines this process for the utm_source and the application Id we created in Section 7.16 with the utm_token.
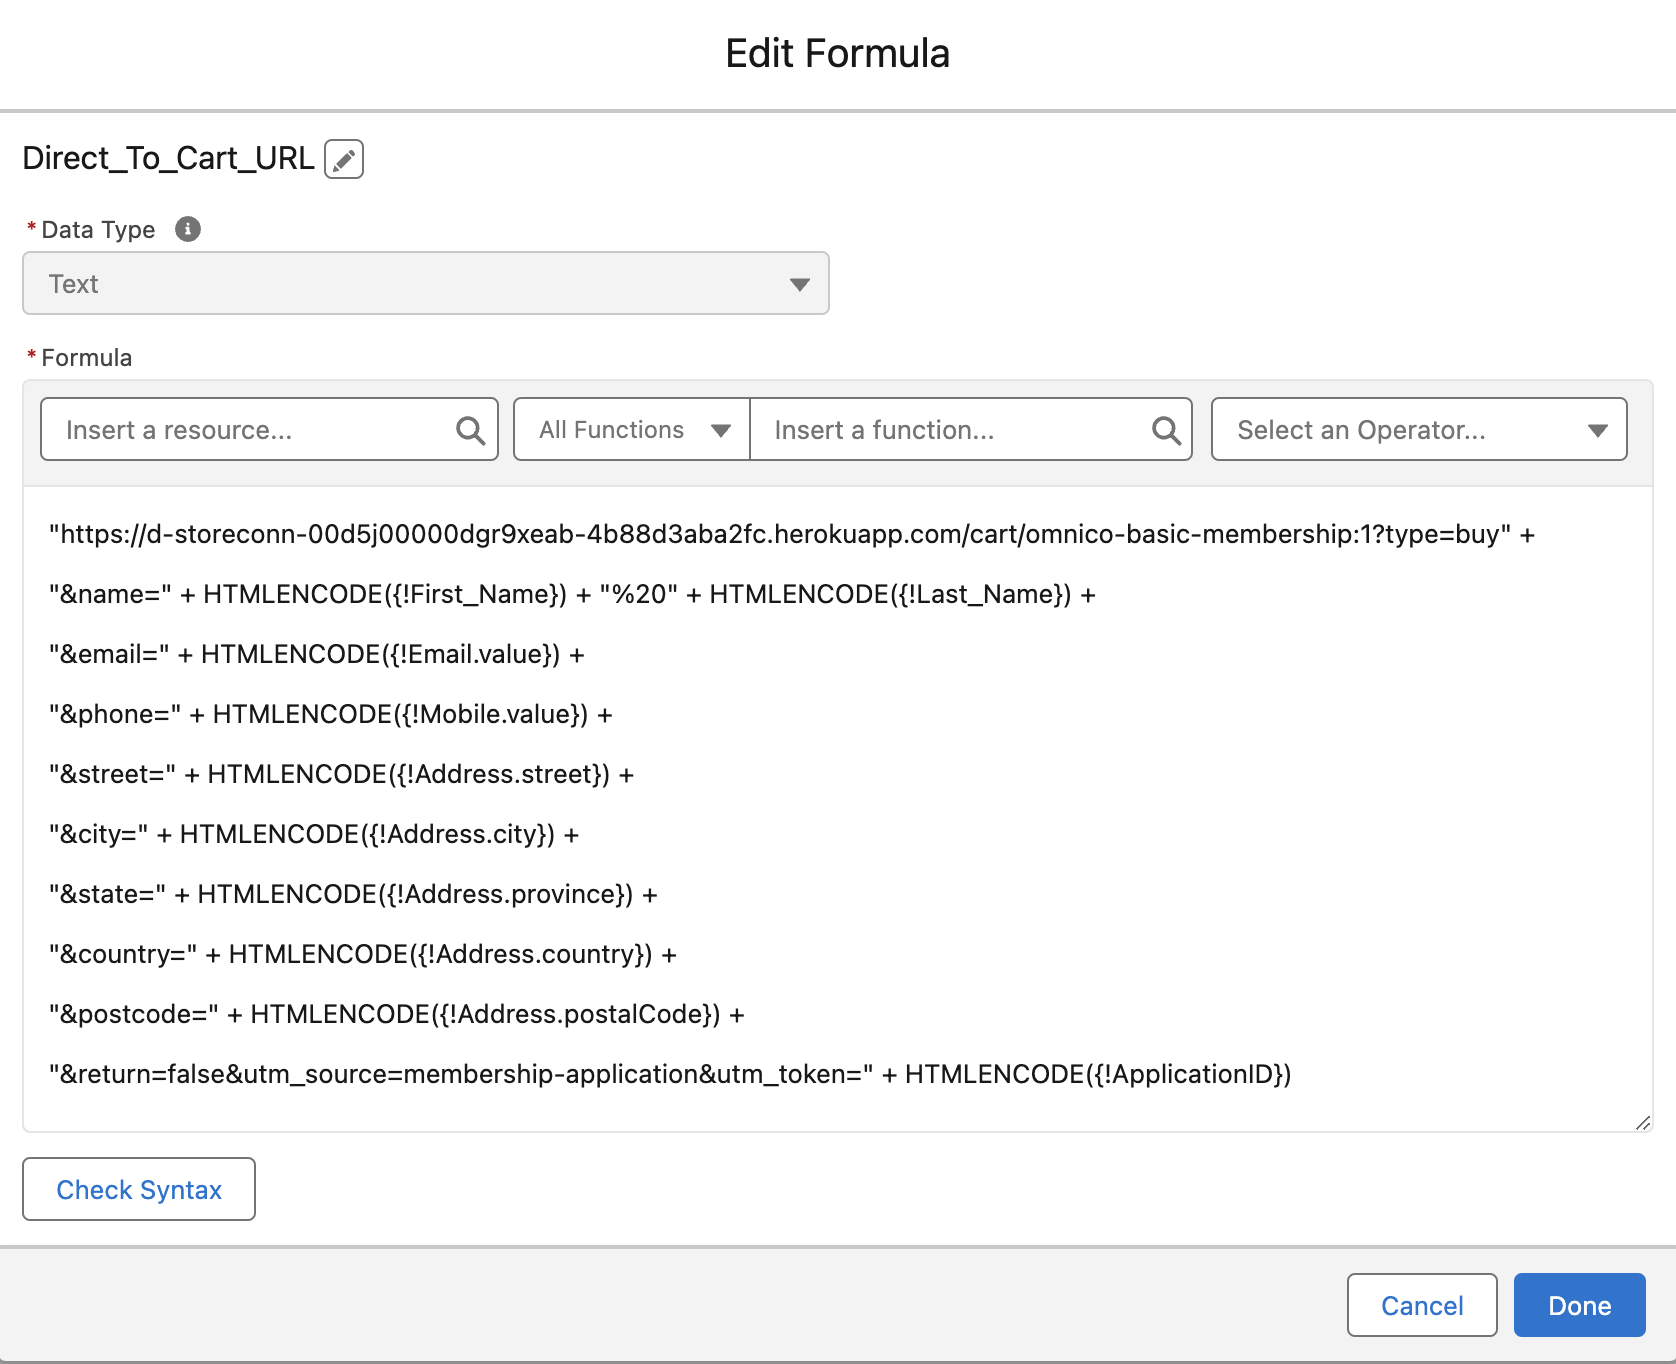
- We will now create the Salesforce formula from our Variables in the flow, to merge a URL that OpenURL will send to the browser. We will utilise the HTMLENCODE function to transform our variable text values to URL standards. Create a New Resource in the flow with a type of formula and name it
Direct_To_Cart_URL. -
Here’s a sample formula that constructs the URL based on our current example:
"https://d-storeconn-00d5j00000dgr9xeab-4b88d3aba2fc.herokuapp.com/cart/omnico-basic-membership:1?type=buy" +
 "&name=" + HTMLENCODE({!First_Name}) + "%20" + HTMLENCODE({!Last_Name}) +
 "&email=" + HTMLENCODE({!Email.value}) +
 "&phone=" + HTMLENCODE({!Mobile.value}) +
 "&street=" + HTMLENCODE({!Address.street}) +
 "&city=" + HTMLENCODE({!Address.city}) +
 "&state=" + HTMLENCODE({!Address.province}) +
 "&country=" + HTMLENCODE({!Address.country}) +
 "&postcode=" + HTMLENCODE({!Address.postalCode}) +
 "&return=false&utm_source=membership-application&utm_token=" + HTMLENCODE({!ApplicationID})
As a result, the formula should look like this:
- After saving this formula, click the ‘Add Element’ connector under the Create Records we just created.
- In the Search box, type
OpenURLand click the element called OpenURL (we installed this component in section 2). - Provide a Label and API Name. We will use
Redirect_Direct_To_Cartas the API Name here. - Type
replaceinto the Mode field. - Add the
Direct_To_Cart_URLformula resource.
As a result, we should see this in Open URL function: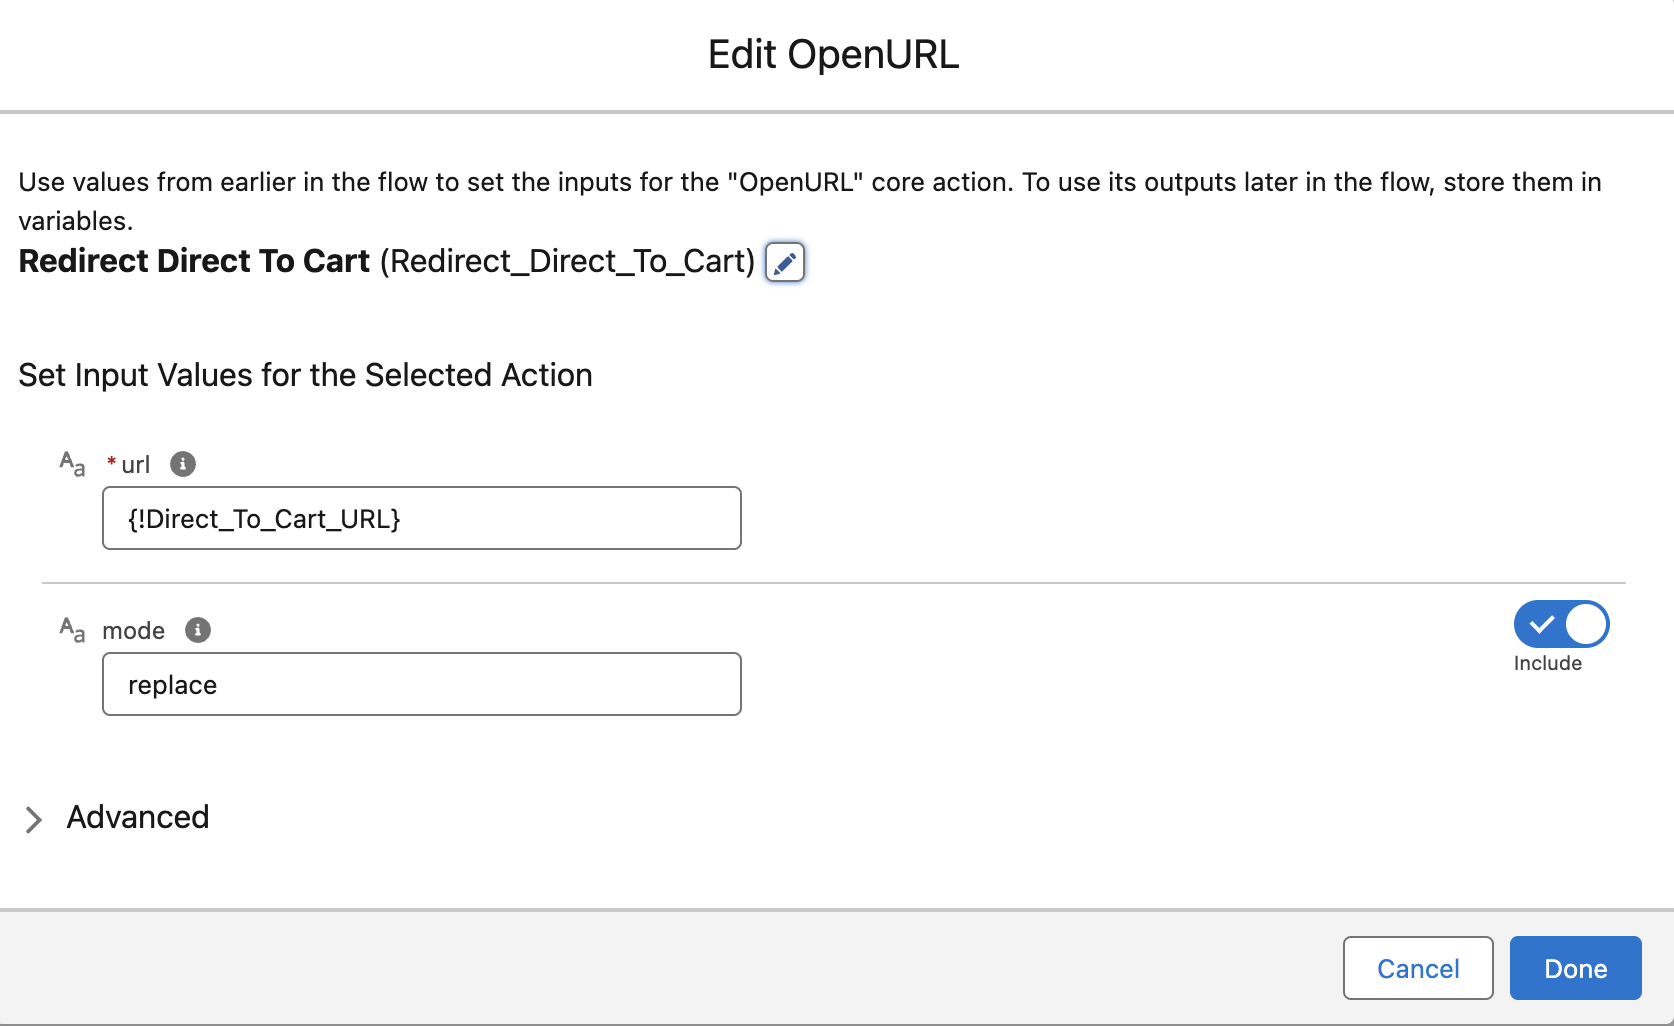
-
Close this section by clicking the Done button.
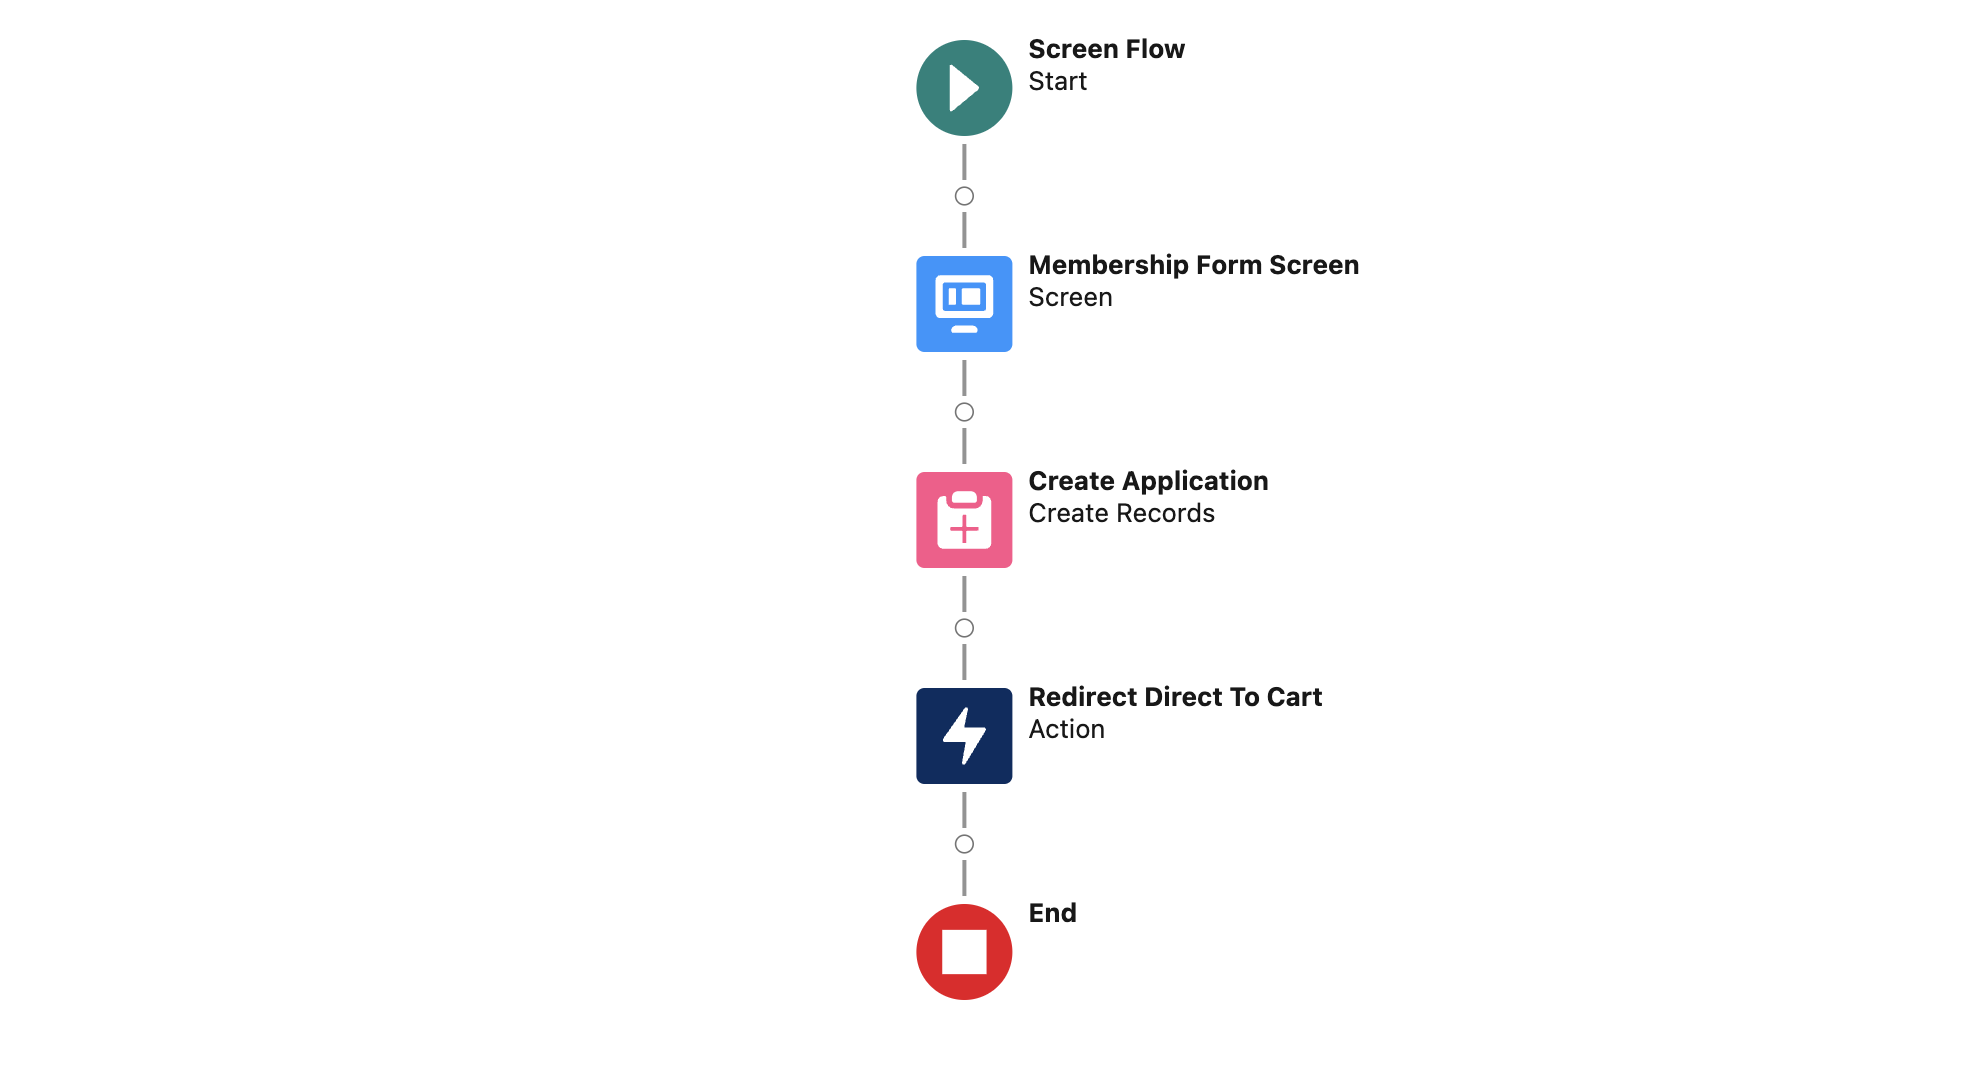
As a result, our flow should look like this:
- We now name, save, and activate the flow we created.
- Click Save and provide a Flow Label and Flow API Name. The Flow API Name we will use is
Membership_Application. Note this for use later in the next section. - In the Show Advanced section, set ‘How to Run the Flow’ to ‘System Context Without Sharing - Access All Data’. Click Save.
- Click the ‘Activate’ button at the top right of the flow builder interface.
- Click the Back arrow at the top left of the flow interface to return to our flows list.
- Find the Flow we just created and click the arrow-down button on the far right of the row of our flow entry. Select “Edit Access.”
- Check the ‘Override default behaviour and restrict access to enabled profiles or permission sets’ checkbox and ensure that at least the Site Profile in section 6 step 3 is Enabled here.
9. Lightning Web Component and App Development:
Build a Lightning Web Component and App to embed your flow into your external website. This contains the form on your site.
Utilise the resources from GitHub: embedFlowInExternalWebsite as a guide. In this example, we follow this guide and will add code to the component and controller of a Lightning component and in a Lightning App.
- Open the Developer console from the Salesforce Setup cog icon menu.
- Go to ‘File’ -> ‘New’ -> ‘Lightning Component’.
- In the New Lightning Bundle dialogue that pops up, provide a Name
embedFlowInExternalWebsite. No other options in this box are required in this example. Click the Submit button. - Ensure you are navigated to the Component item of this Lightning Component (Hold: Ctrl + Shift + 1) navigate to the
embedFlowInExternalWebsite.cmptab in the console. -
Replace the aura:component template with the following code:
<aura:component implements="flexipage:availableForAllPageTypes,lightning:availableForFlowActions" access="GLOBAL"> <aura:handler name="init" value="{!this}" action="{!c.init}" /> <lightning:flow aura:id="flowData"/> </aura:component> - Go to ‘File’ -> Save.
- Navigate to the Controller Element of the Lightning Component. Click the ‘Controller’ element in the top right panel of the developer console or Hold: Ctrl + Shift + 2. Click the tab called
embedFlowInExternalWebsiteController.js. -
Replace the Javascript template with the following code and reference the API Name of the flow we created previously in this line
flow.startFlow("YOUR_FLOW_API_NAME");Below is our example.({ init : function (component) { var flow = component.find("flowData"); flow.startFlow("Membership_Application"); } }) - Go to ‘File’ -> Save.
- Go to ‘File’ -> ‘New’ -> ‘Lightning Application’ and provide the Name:
embedFlowInExternalWebsiteApp, check the ‘Lightning Out Dependency App’ checkbox and click the Submit button. - Ensure we are viewing the
embedFlowInExternalWebsiteApp.apptab in the console and can see the aura:application template. -
Replace the aura:application template with the following code.
<aura:application access="GLOBAL" extends="ltng:outApp" implements="ltng:allowGuestAccess"> <aura:dependency resource="c:embedFlowInExternalWebsite"/> </aura:application> - Go to ‘File’ -> Save All.
We should now see these 3 screens in the developer console:


10. Flow Embedding on Website:
Embed the Salesforce Lightning Flow into your website using the provided script from the guide in the previous step. This script will render the flow within a designated div element on your website. (The below script utilises a StoreConnect web-page)
First, we need to ensure our Screen Flow has access to our Site Profile.
- Search ‘Sites’ in the Setup Quick Find bar.
- Click on the Site Label in the Sites list. Not
Editor the site URL. - Click the
Public Access Settingsbutton. - Scroll down to the ‘Enabled Flow Access’ list and click Edit.
- Select the flow we created in the last step, from Available Flows column into the Enabled Flows column and then click Save. Note: This Flow should be available if we provided access in Section 7 step 20.
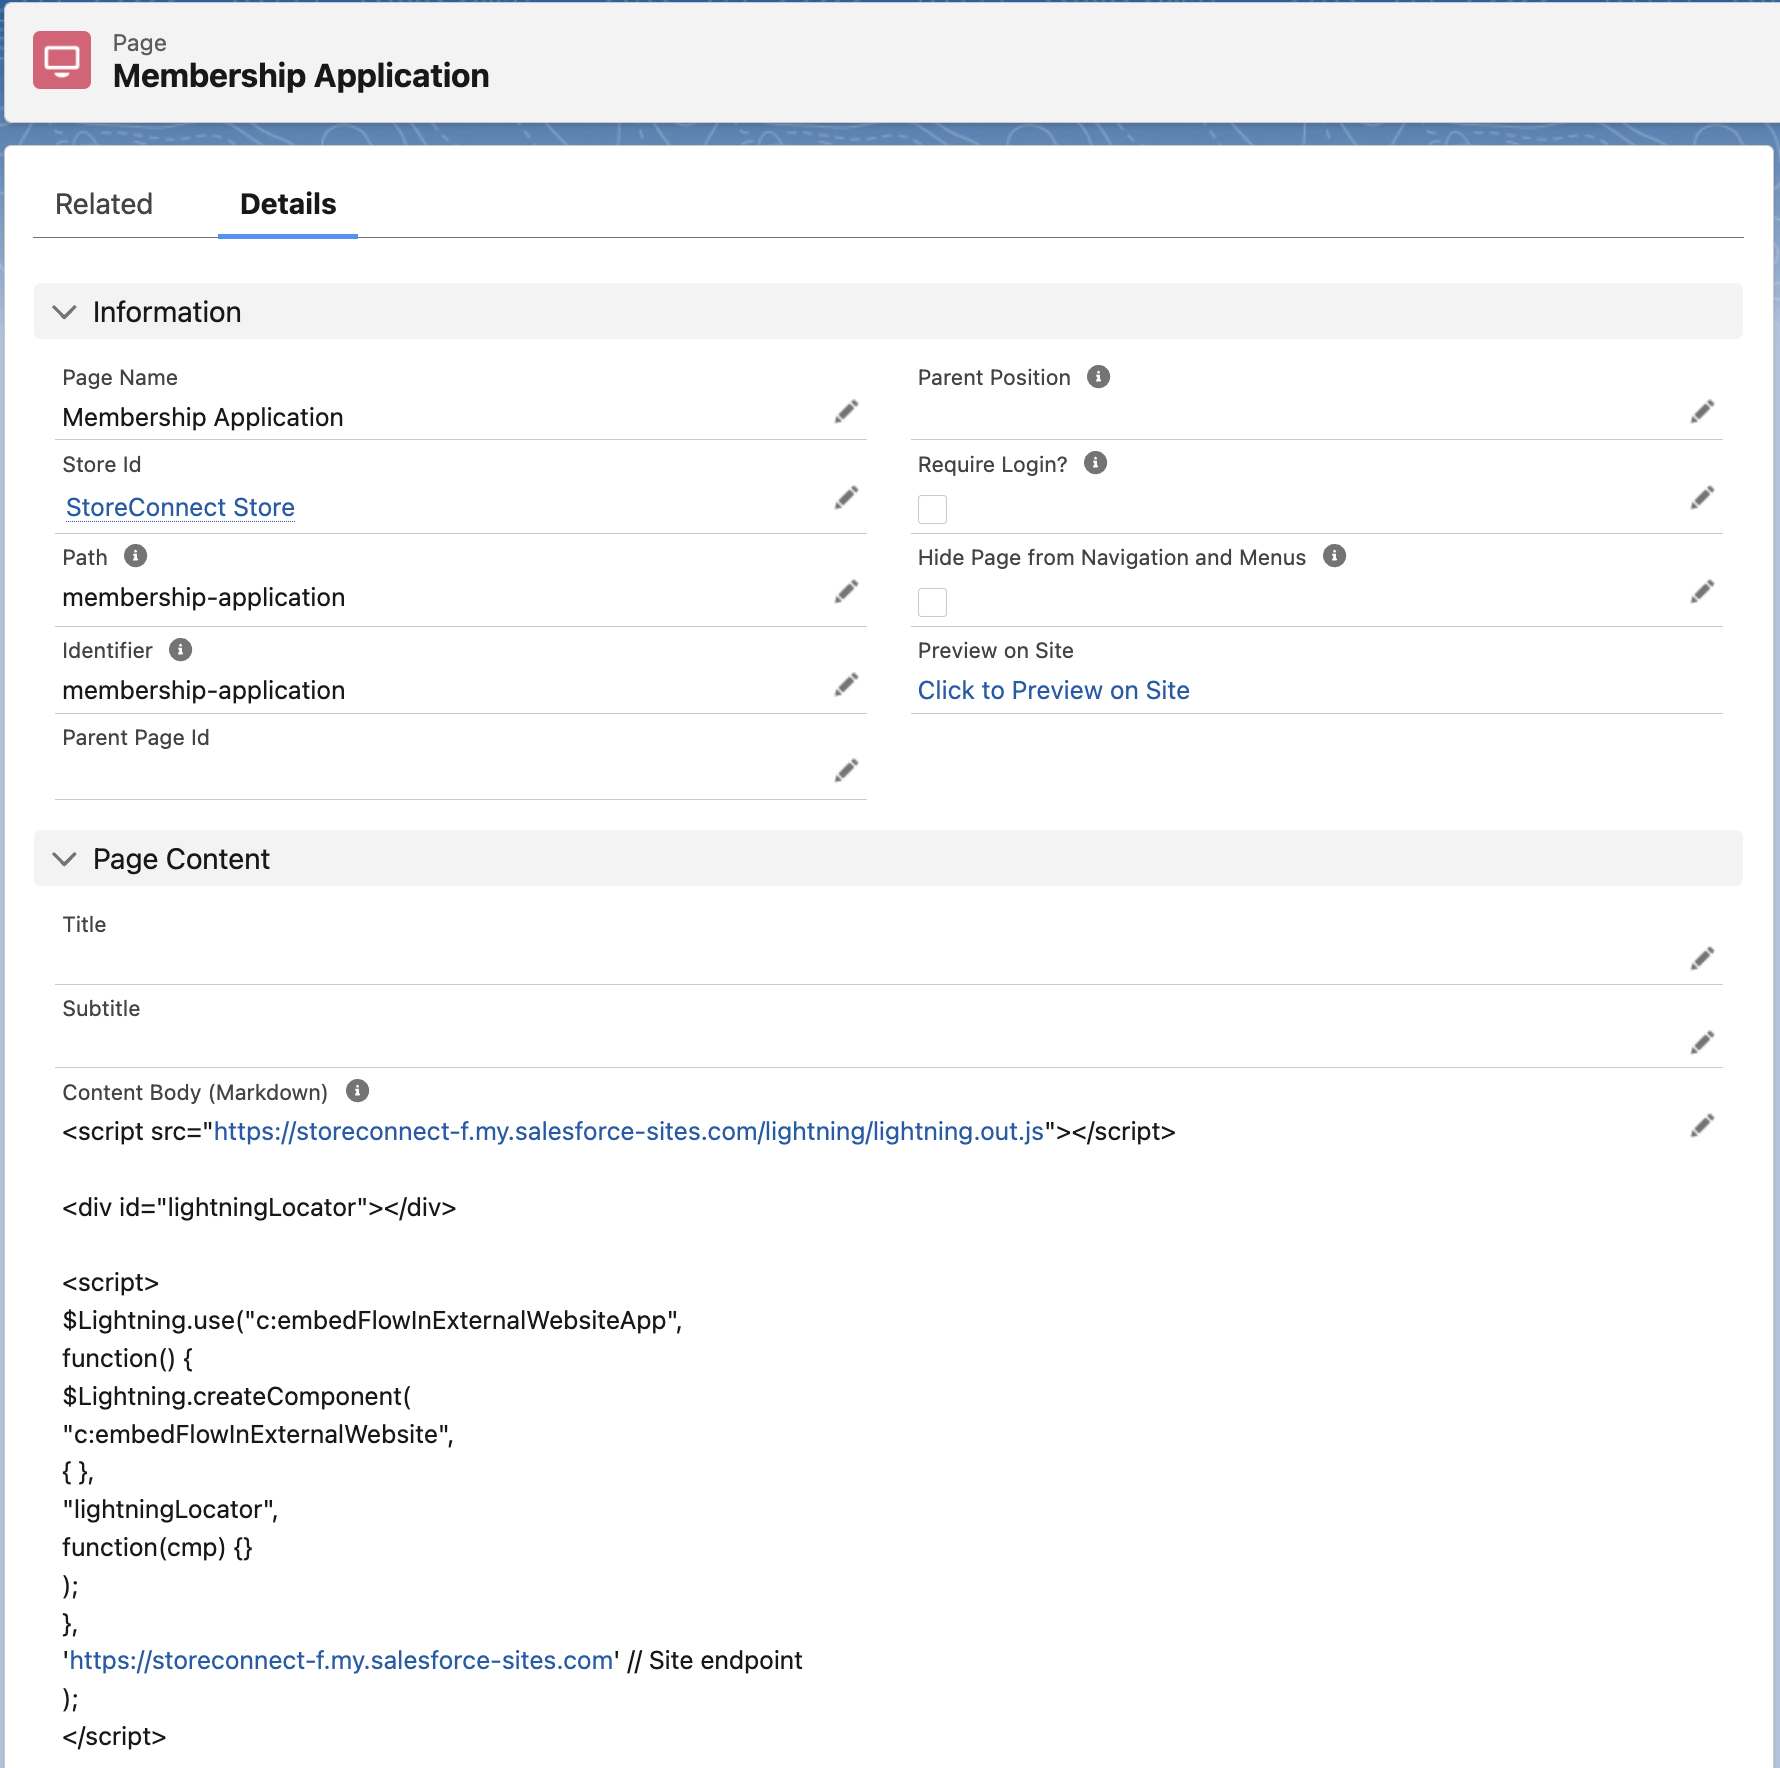
- Create a WebPage on your website, if using StoreConnect CMS, Create a new Page, name it, give it a path, identifier and associate it with a Store.
- In the Content field, include the following script and markup. If you are using a CMS or webhost other than StoreConnect, ensure that this script is on your website’s page markup.
- Where we see
https://YOUR-SALESFORCE-SITE-URL.com, replace this with the URL of the site URL we created in Section 3.
  <script src="https://YOUR-SALESFORCE-SITE-URL.com/lightning/lightning.out.js"></script>
   <div id="lightningLocator"></div>
   <script>
       $Lightning.use("c:embedFlowInExternalWebsiteApp",
           function() {
               $Lightning.createComponent(
                   "c:embedFlowInExternalWebsite",
                   { },
                   "lightningLocator",
                   function(cmp) {}
               );
           },
           'https://YOUR-SALESFORCE-SITE-URL.com'  // Site endpoint
       );
   </script>
Following these steps, we should see a Page record that looks like this:
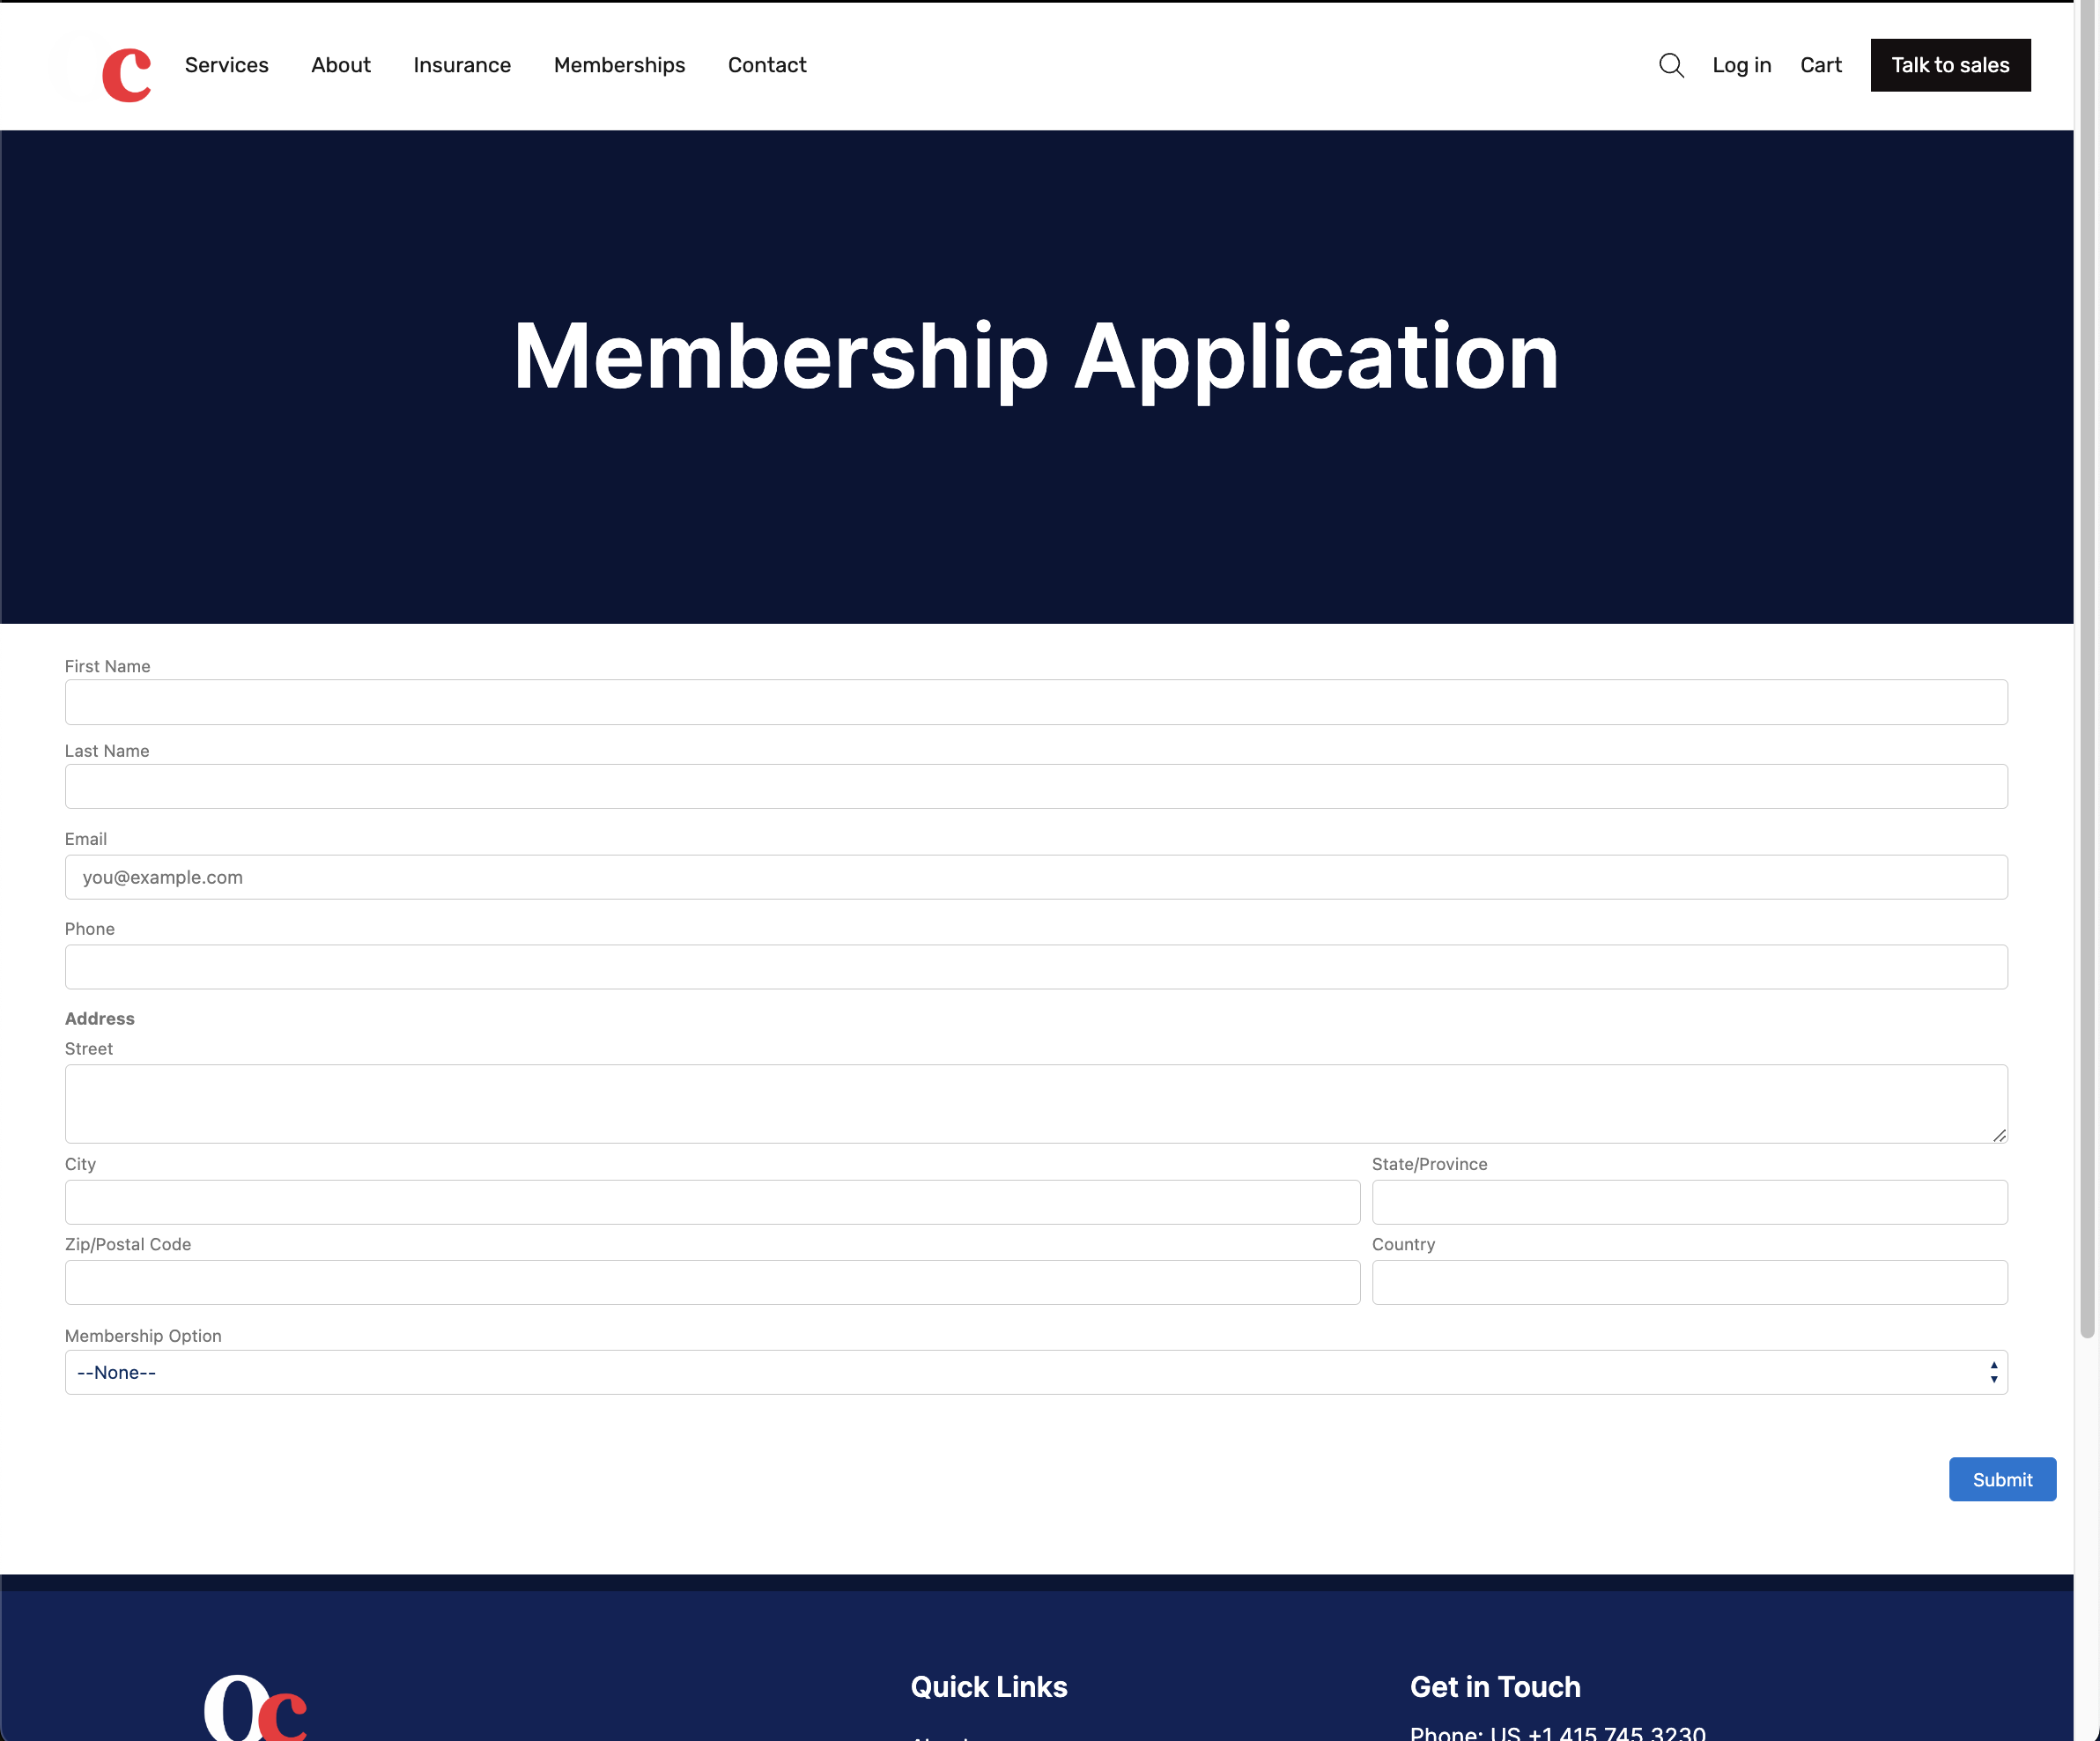
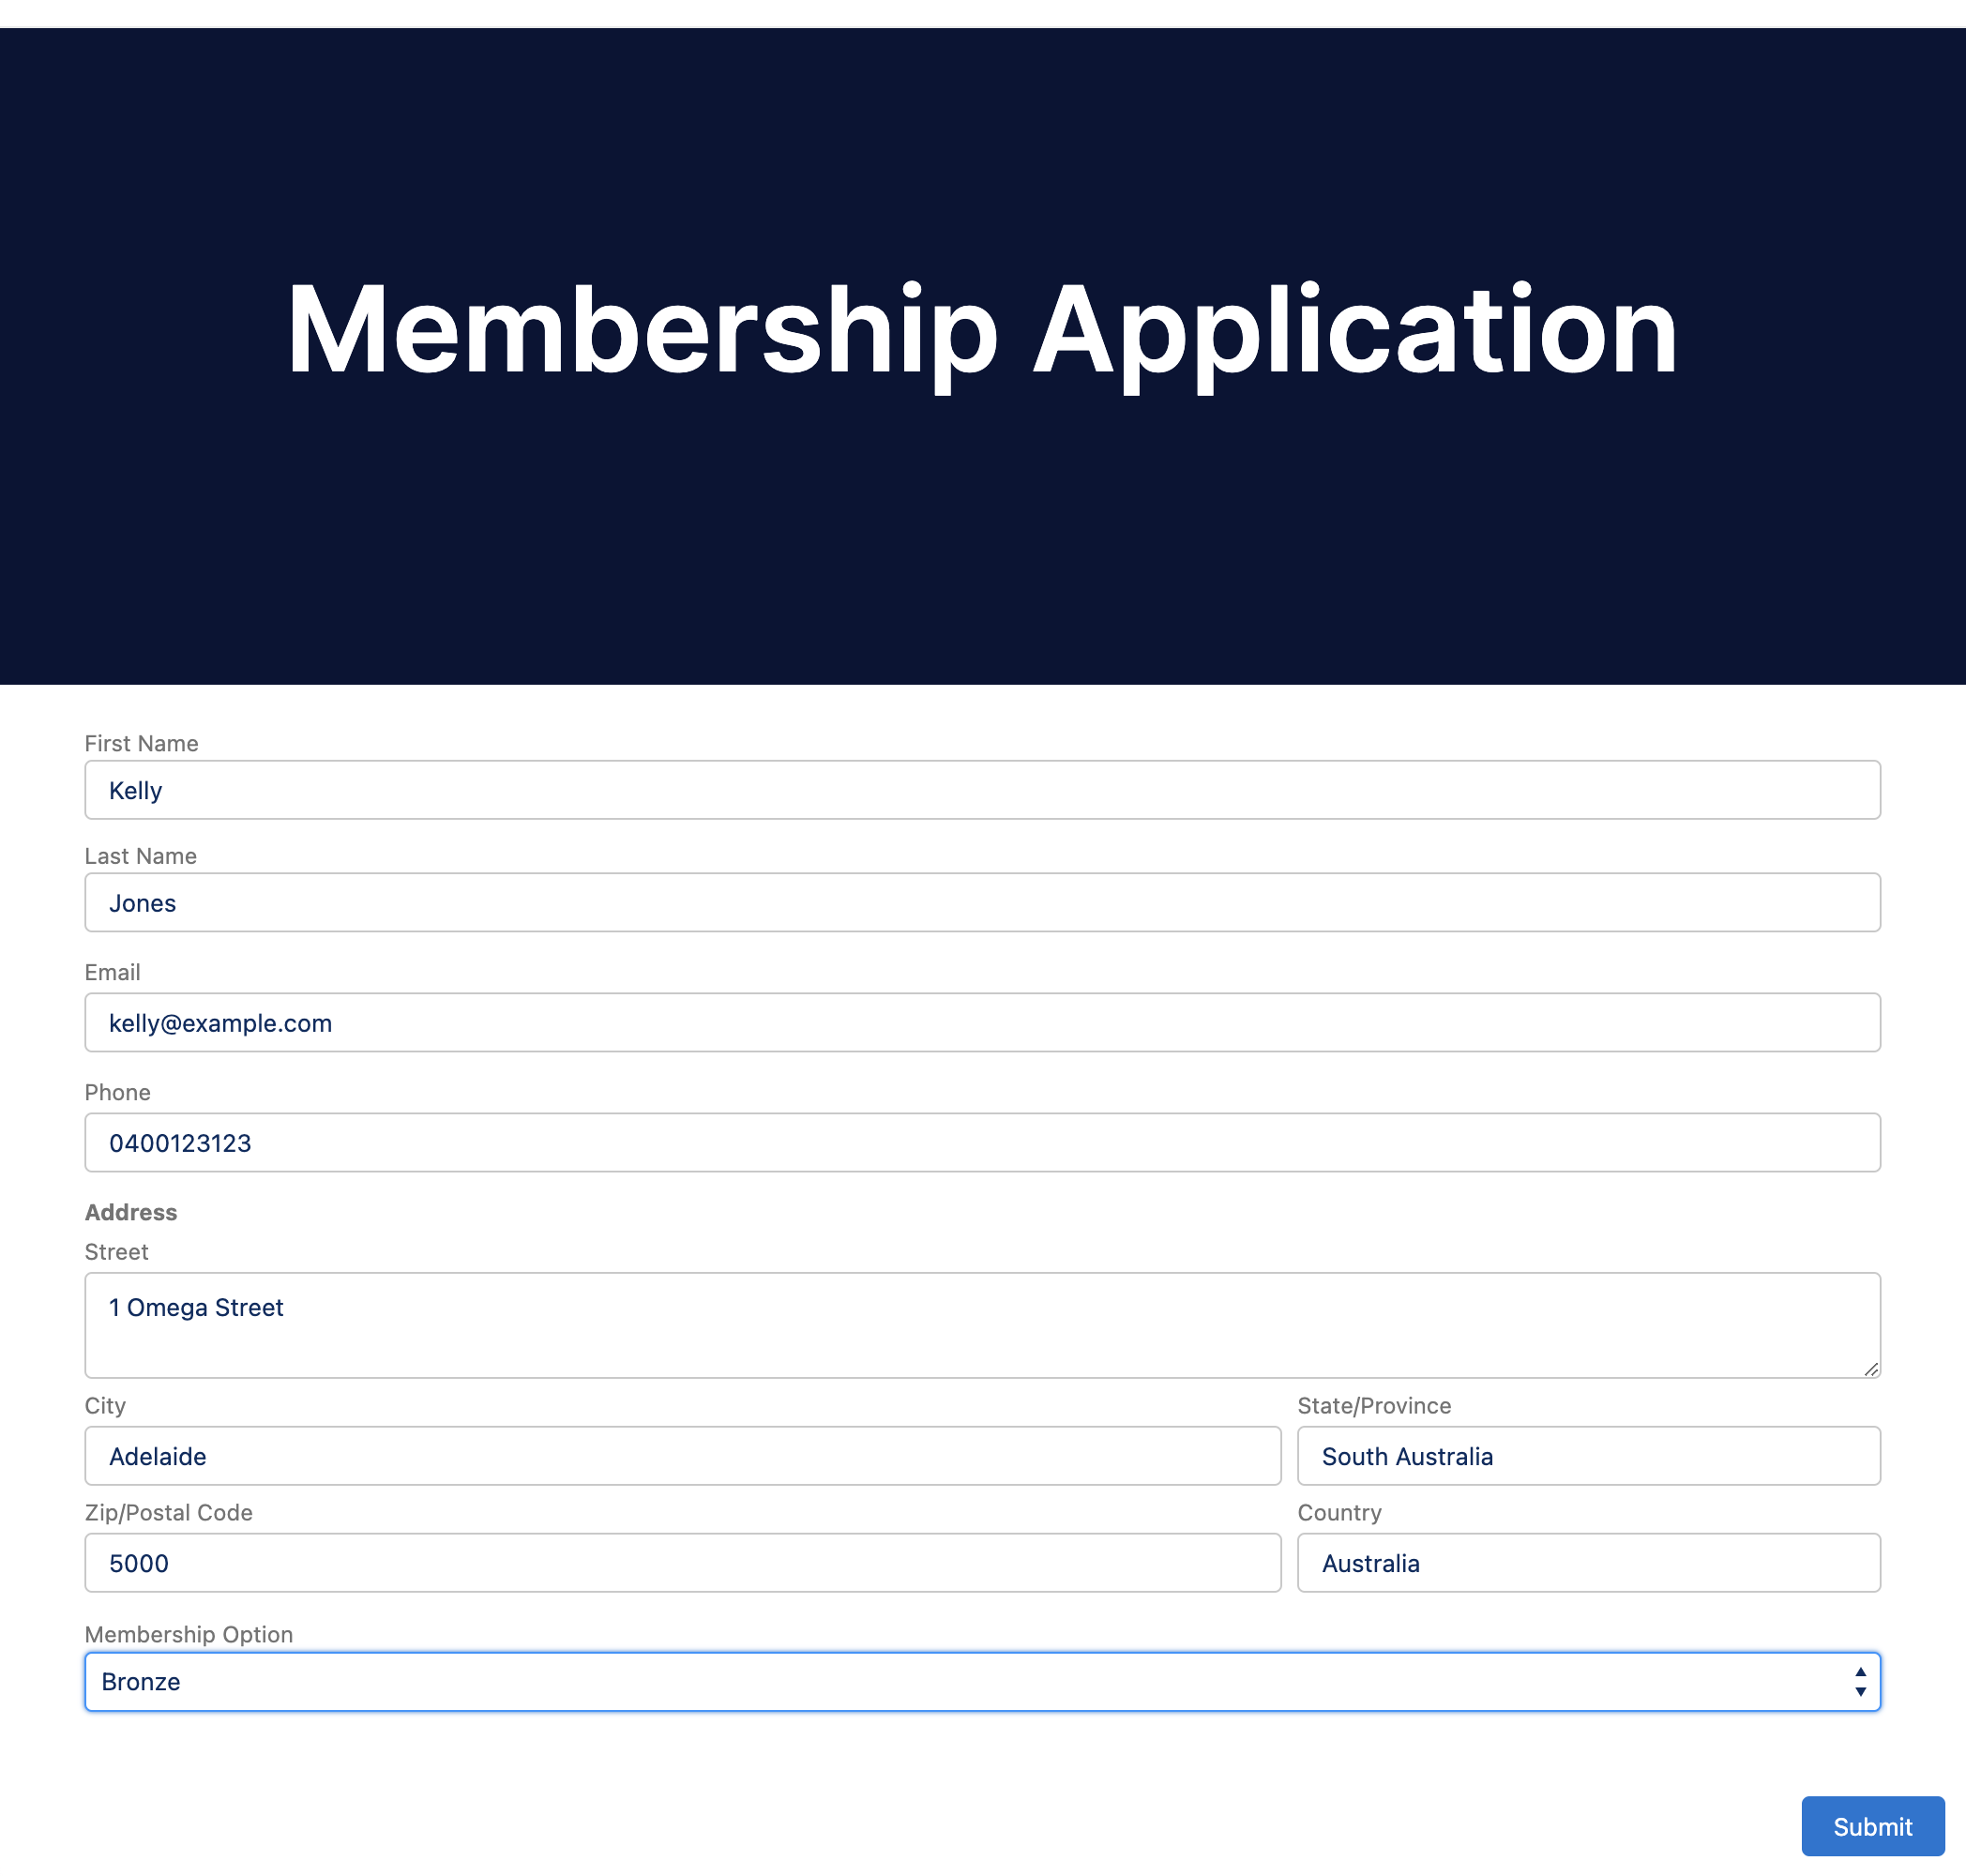
This should render the form on the store public website at the address https://YOUR-STORE-SITE-URL/PAGE-NAME] and look like this:
11. Linking Flow Data to Order:
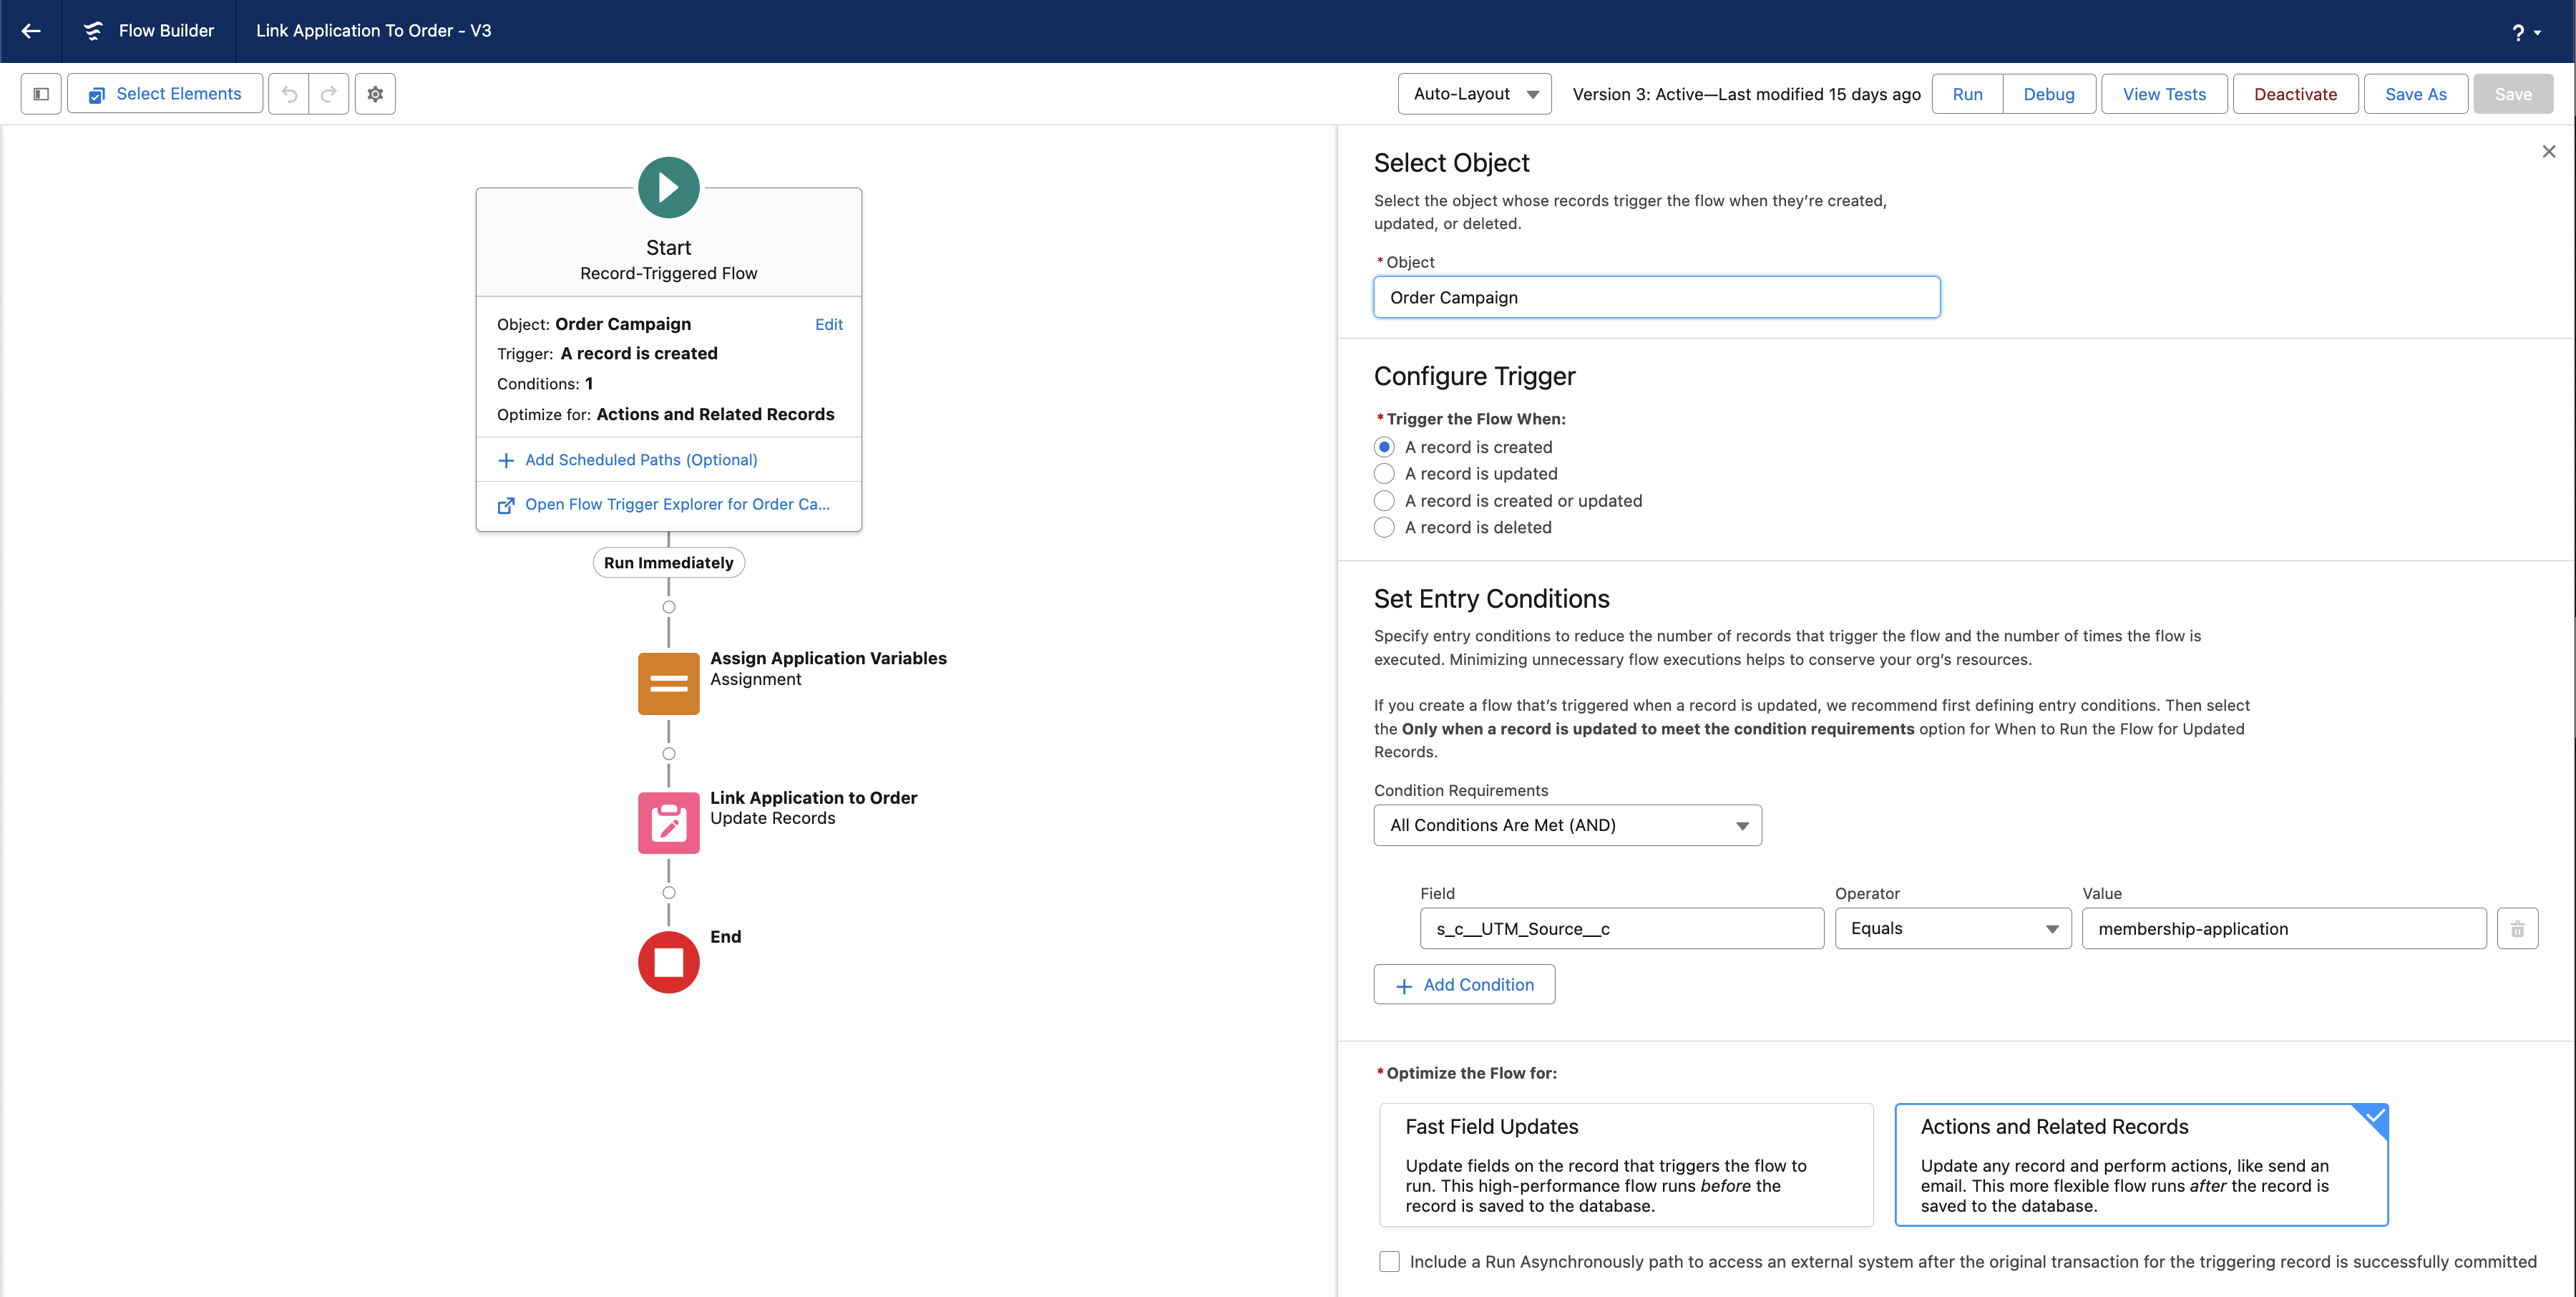
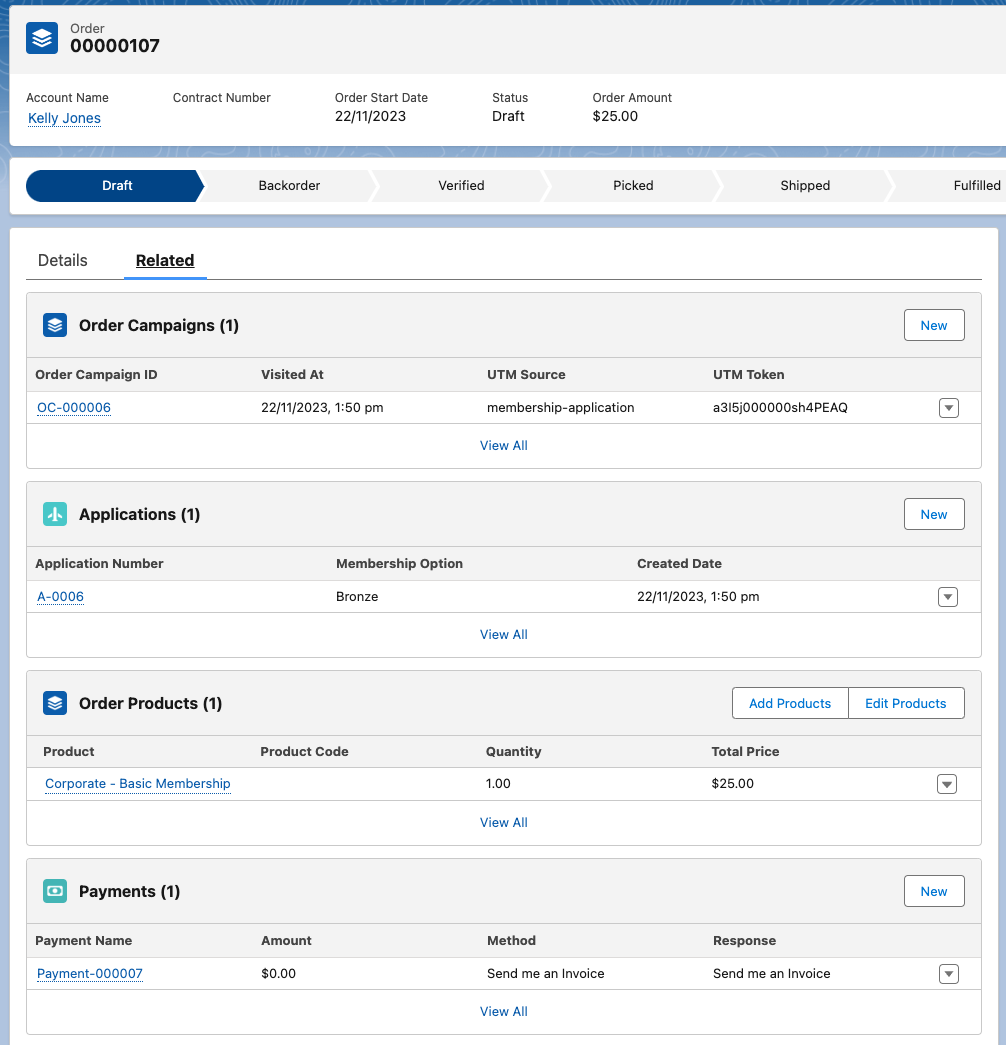
Finally, we create an automation that takes the form data and custom record and links it to the order in Salesforce. We will use a record-triggered flow from the StoreConnect Order Campaigns records that capture UTM codes. In this example, the UTM Source and UTM Token &utm_source=membership-application&utm_token=a3I5j000000sh4PEAQ.
- Search ‘Flows’ in the Setup Quick Find bar and click
Flowsunder ‘Process Management’. - Click the ‘New Flow’ button on the top right of the screen.
- Ensure the “Record-Triggered Flow” option is selected and click the ‘Create’ button at the bottom right of the modal.
- Select
Order Campaignfor the Object. - In this example, we only need to set ‘Trigger the Flow When: A record is created’.
- Set our Condition Requirements to All Conditions Are Met and here we will filter the trigger to when an Order Campaign is created with a UTM source of
membership-application. Set the s_c__UTM_Source Field (operator) Equalsmembership-applicationfor the Value. - Optimize the flow for: Actions and Related Records (which is an ‘after update’).
- Click the ‘Add Element’ circle connector that turns to a plus sign on mouse hover.
- Choose an Assignment element and call the API Name
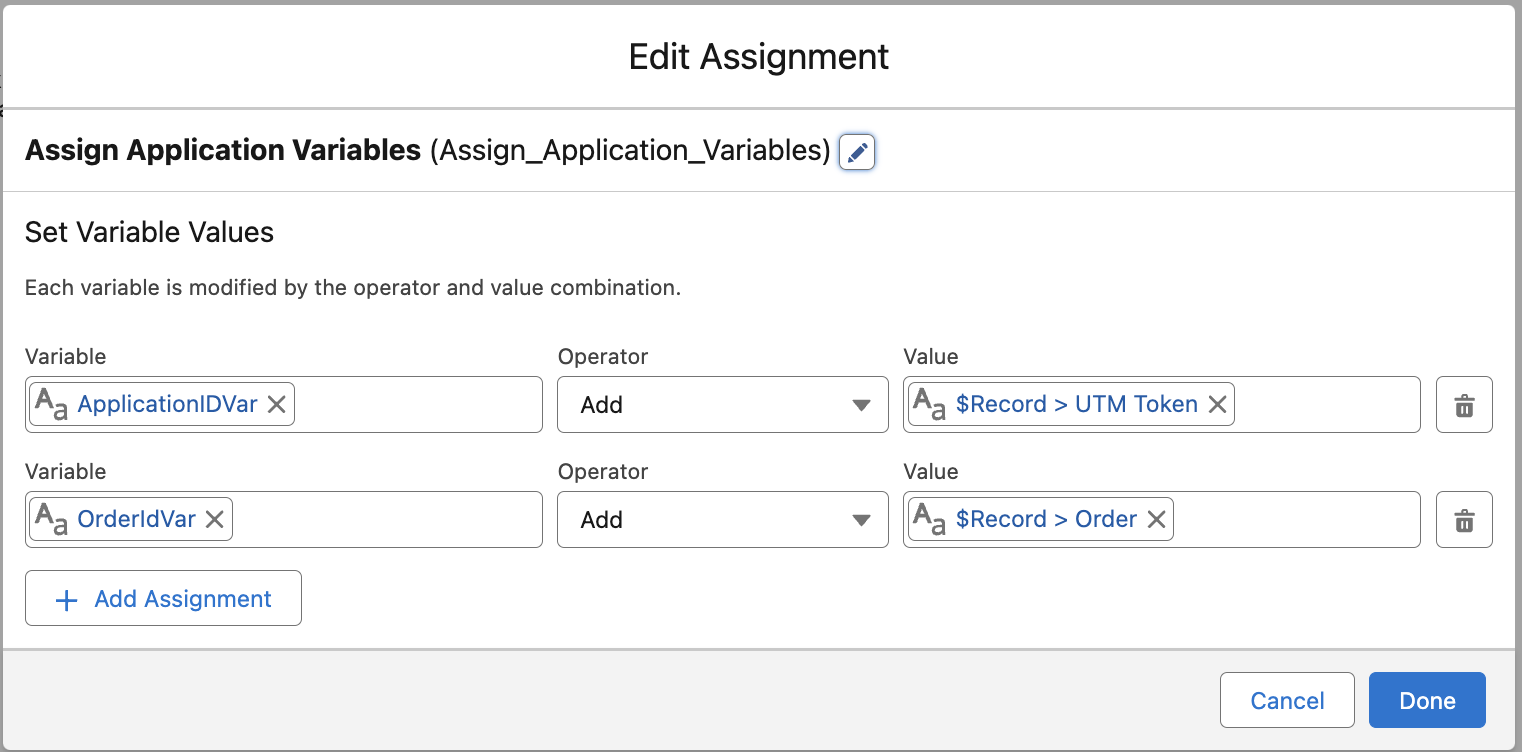
Assign_Application_Order_Variables. - Create the first variable as a Text Data type and call it
ApplicationIdVar, set the Operator to Add and then set the Value to $Record (s_c__Order_Campaign__c) > UTM Token (s_c__UTM_Token__c). - Create a second variable as a Text Data type and call it
OrderIdVar, set the Operator to Add and then set the Value to $Record (s_c__Order_Campaign__c) > Order (s_c__Order_Id__c). - Click the ‘Add Element’ circle connector to add a new function under our variable keys assignment above.
- Call the Element API Name
Link_Application_to_Order. - When setting “How to Find Records to Update and Set Their Values”, select
Specify conditions to identify records, and set fields individuallyto find an Application record and link it to the parent Order of this Order Campaign. - Set the Update Record Object to
Application. - Set the filter to ‘All Conditions Are Met’ with the
IdField and Equals (operator) to ourApplicationIdVarfor the Value. - To “Set Field Values for the Application Records”, select the Lookup field to the order on our Application custom object, in this case, the field is
Membership_Order__c, set the Value to ourOrderIdVarvariable. - We now name, save and activate the flow we created.
- Click Save and provide a Flow Label and Flow API Name. The Flow API Name we will use is
Link_Application_To_Order. - In the Show Advanced section, set ‘How to Run the Flow’ to ‘System Context Without Sharing - Access All Data’. Click Save.
- Click the ‘Activate’ button at the top right of the flow builder interface.
Our flow and trigger function should look like this:
 The assignment function should look like this:
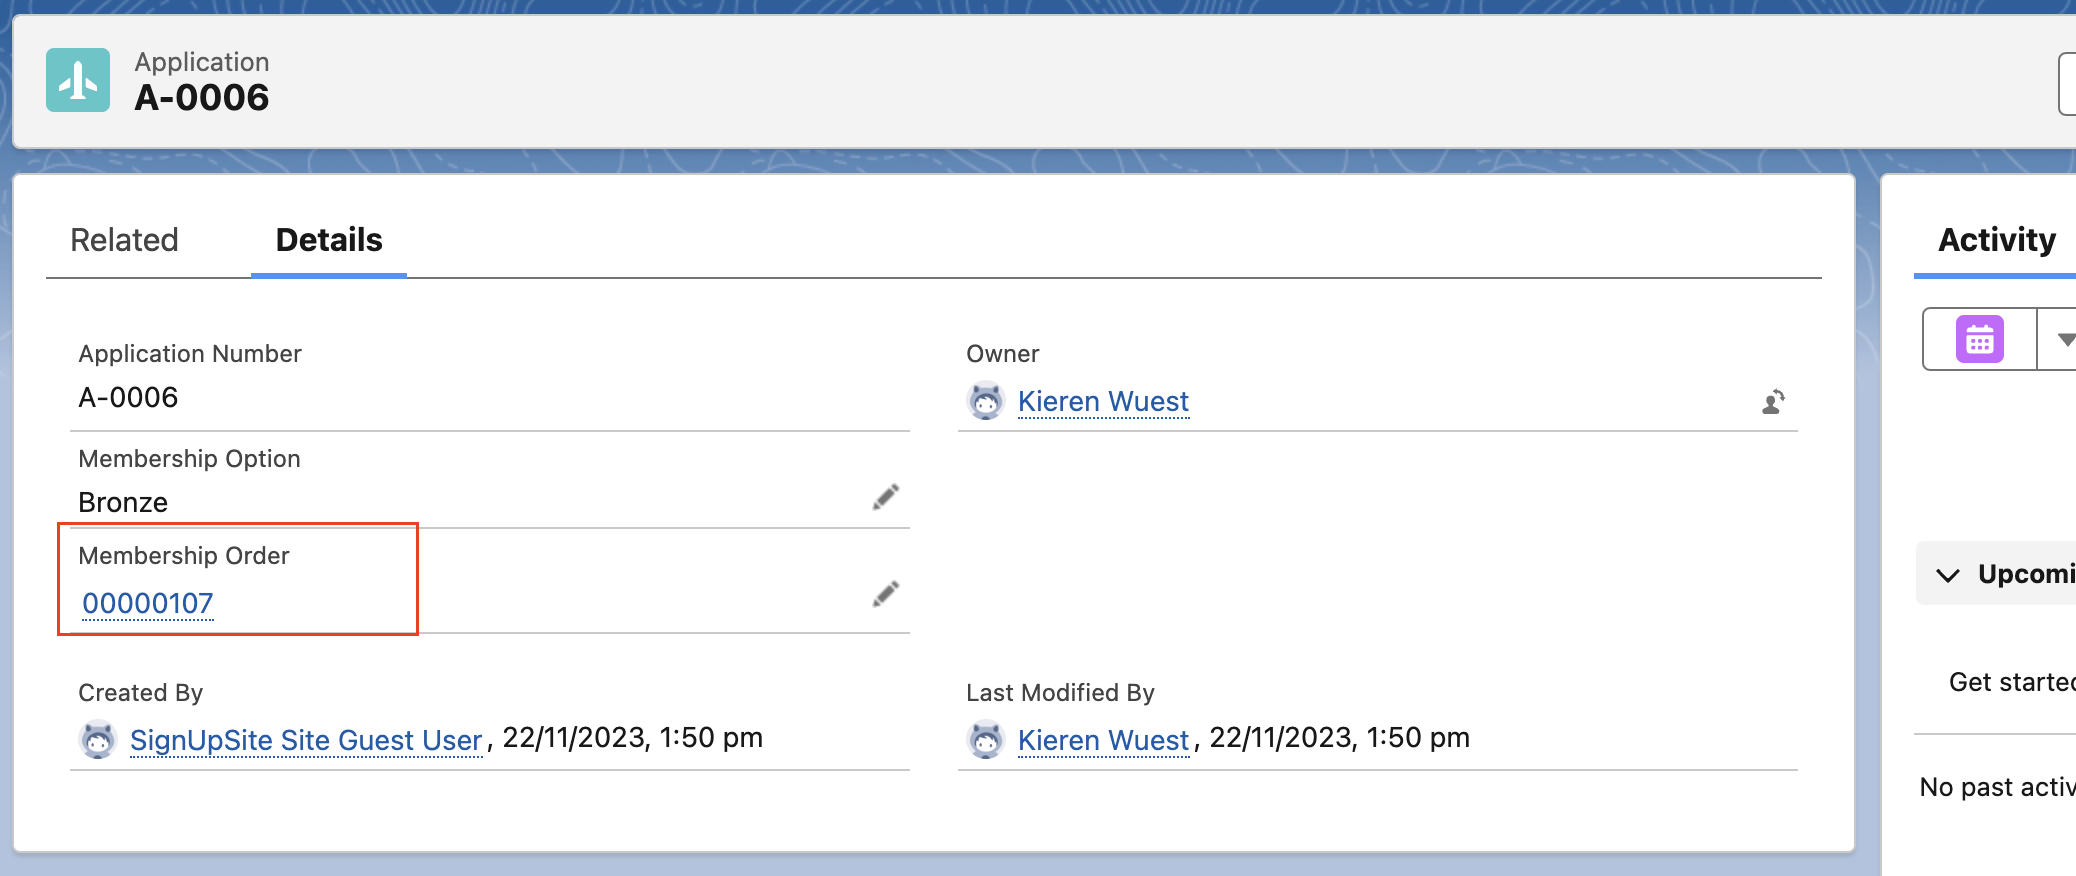
 The record Update function should look like this:

12. Our Solution Now Should Do the Following:
- Produce a Lightning Screen Flow webform on an unauthenticated webpage.
- Clicking Submit on the Lightning form will create a Custom Object Record.

- It will then take the required customer and process data, and pass it to a preselected product in a checkout for payment via direct-to-cart URL.

- Once the checkout creates an Order, Order Items, Order Campaign, Contact and Account in Salesforce, our second flow is triggered from the Order Campaign and links our Application to the Order in Salesforce.
Notes on Future Enhancements: This solution can be extended for file uploads utilising advanced file upload on UnofficialSF. The web form will take a moment to cache the lightning component from the Salesforce servers, which could be further enhanced by creating a webform with a framework such as React for more advanced trailblazers. Stay on the lookout for further enhancements to come.